
In this tutorial ,We will learn to build a simple cross platform GUI based serial port communication with Arduino Microcontroller using Python and tkinter (ttkbootstrap).To make the interface look nice we will use the theme extension for tkinter called ttkbootstrap which provides modern flat style themes.
The tutorial is aimed at beginners who wants to build Python and tkinter based widgets to control and communicate with serial port based devices like Arduino, Raspberry PI, Raspberry Pi Pico (RP2040, RP2350) or Data Acquisition systems like Labjack etc.
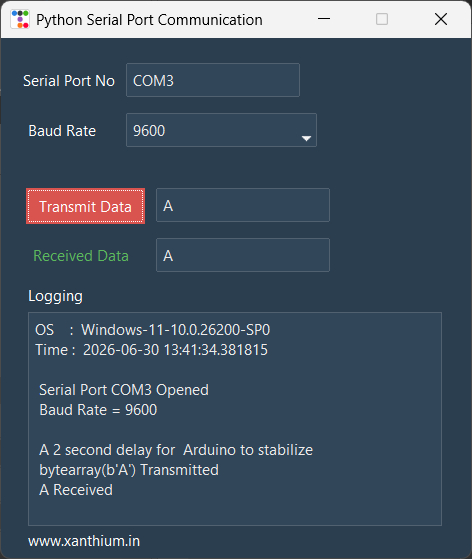
All code is available under MIT opensource license that can be used for both commercial and opensource projects.
Here we will use pySerial Library to communicate with the serial port and use the tkinter(ttkbootstrap) library to build a cross platform GUI for ease of use.
If you are new to Python Serial Port Programming Check the detailed tutorial below.
If you are new to tkinter (ttkbootstrap) GUI framework for Python 3.x.x,Do check our tutorial below.
Contents
- Source Codes
- Installing tkinter (ttkbooststrap),PySerial on Windows
- Coding using Thonny IDE
- Identifying the COM port number
- Arduino to PC Hardware connections
- Connect & Communicate with a Bare Microcontroller from PC
- Arduino Side Code
- Software Architecture of tkinter Serial Port Program
- Creating the Tkinter GUI Elements
- Reading and Writing into Serial Port
Source Codes

Download Python tkinter(ttkbootstrap) Serial Communication Program as Zip File
Browse Python tkinter Serial Communication code in Github
Please use the full code from the Github Repo. Codes shown in the Website may be partial, intended to illustrate specific sections or methods used.
Make sure that you have Python Interpreter and ttkbootstrap libraries installed before running the code.

Linux specific parts of running the tkinter code like configuring group policy ,finding out serial ports ,installing the relevant libraries can be found here.
Installing tkinter (ttkbooststrap),PySerial on Windows 11
To create our Python/Tkinter based serial monitor program you may need to install the following libraries in your Windows 11 or Windows 10 System.
- Python Interpreter / Tkinter GUI Library
- ttkbootstrap theme extension for Tkinter
- Pyserial (Serial Port Library)
First check whether you have installed Python on your System, If not you can easily install by downloading the appropriate installer from Python Website .
Now Python Installer comes in two versions
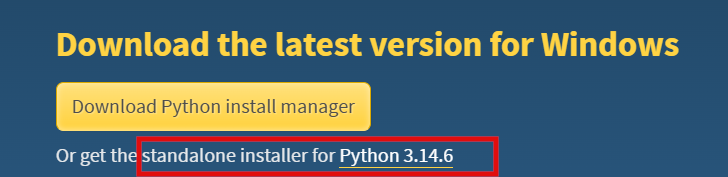
- Python Install Manager - This is the recommended version
- Stand Alone Python Installer
We will use the Python Install Manager to Install our Python Interpreter on our Windows 11 system.

Just follow the Below Instructions.
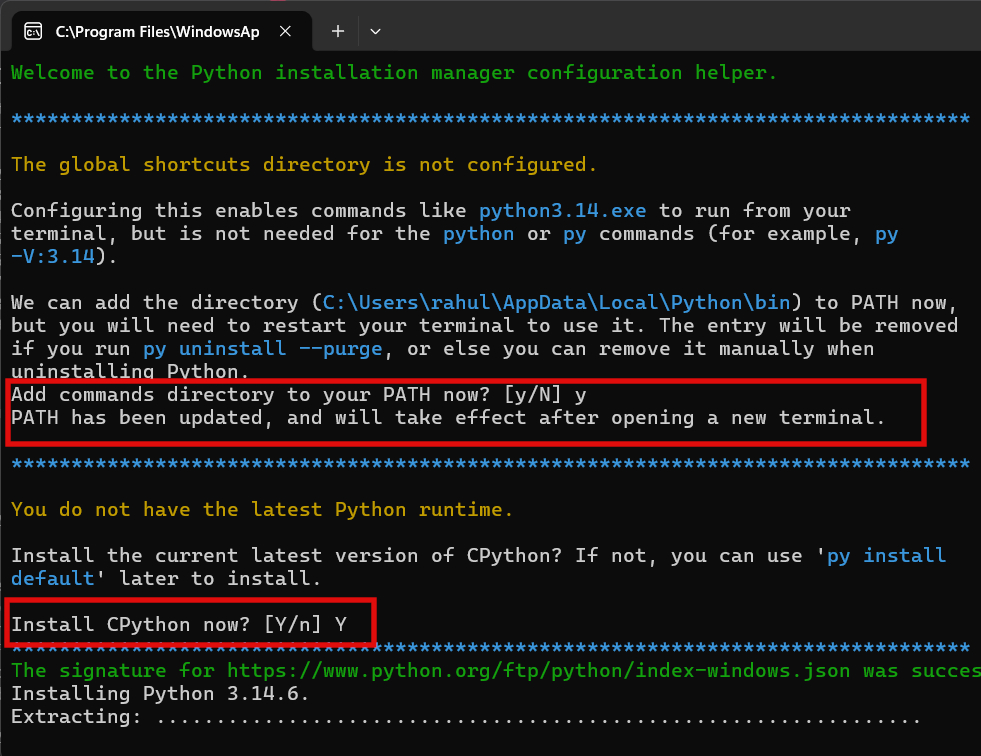
After which you can install the required libraries using the PIP Installer by running the following commands.
python -m pip install ttkbootstrap
python -m pip install pyserial
or
py -m pip install ttkbootstrap
py -m pip install pyserial
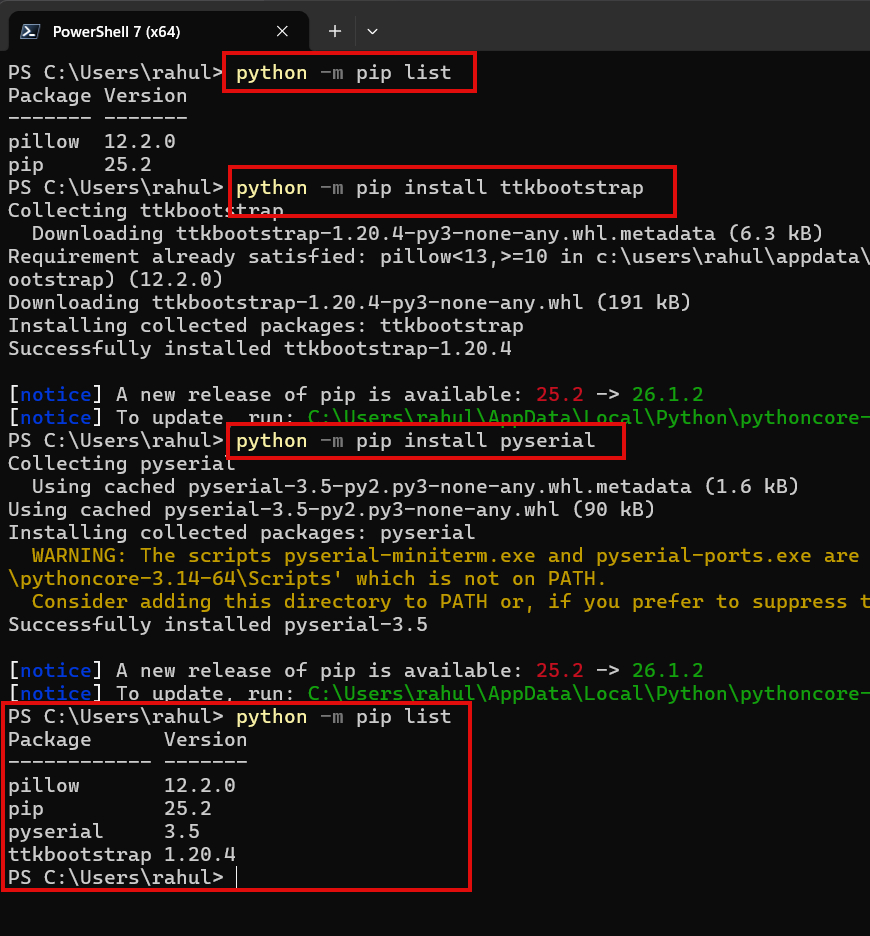
After installation you can check the installed packages using
python -m pip list For Software development you can use the built in IDLE IDE or run the code from command line.
Python tkinter Serial Programming using Thonny IDE
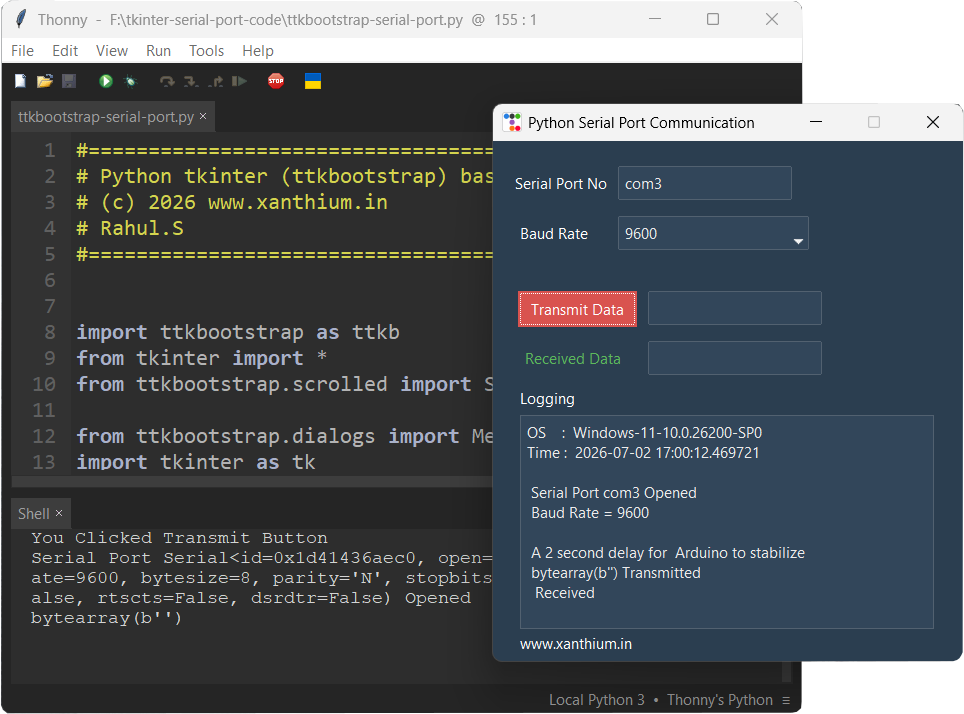
Another way to install the Python interpreter and an IDE as a single package is to download the Thonny IDE which is a friendly opensource Python IDE aimed at beginners.
The thonny IDE comes with its own Python interpreter built in and there is no need for you to install additional Python interpreters.
It also comes with PySerial preinstalled.
You can install ttkbootstrap library by going to tools - > Manage Packages... and then searching for ttkbootstrap on PyPi
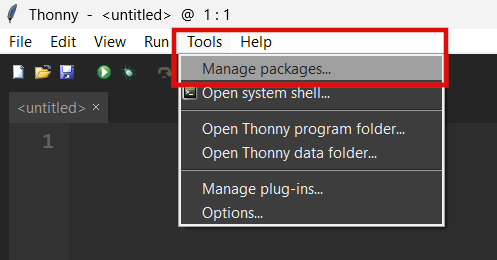
You can then search for your required library using the search box at the top.
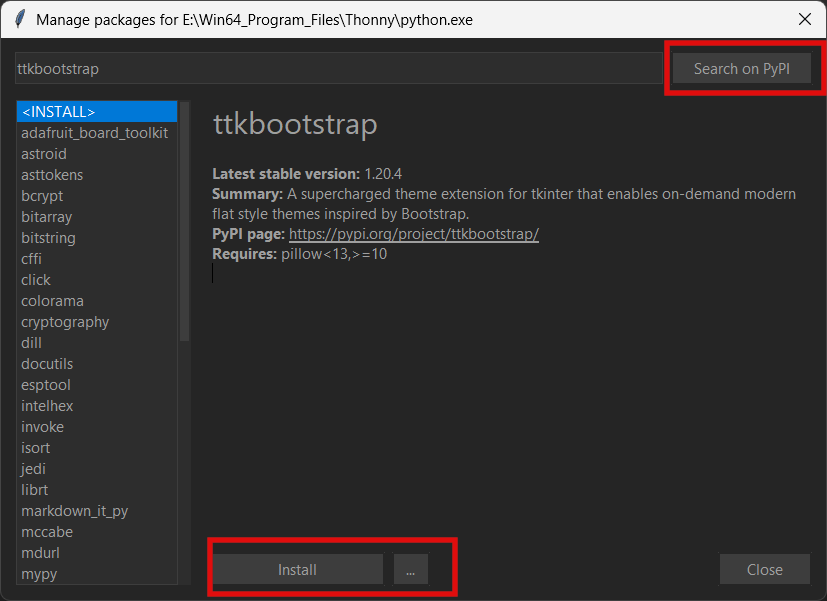
then click Install to add the library to the IDE .
Identifying the COM port number on Windows
First connect your Arduino ,USB to Serial Converter ,USB GPIO system with Relays to your Windows 10 orWindows 11 USB port.
Open up your Device Manager.(type it in the search bar of the Windows10,11 system)
Look under Ports,
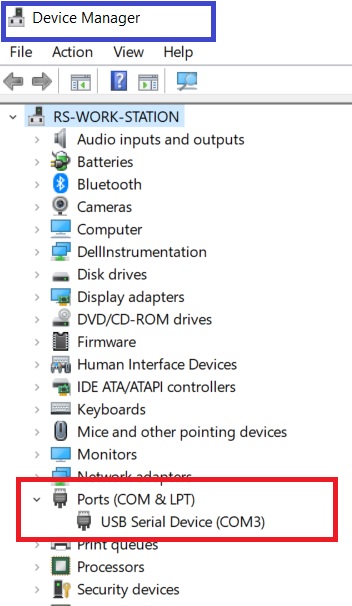
Please use that particular number ( here COM3 ) to open a connection to serial port using tkinter and Python.
The COM port number may be different in your system.
Arduino to PC Hardware connections
This section details the hardware connections needed to connect an Arduino to Windows PC Serial Port using Python and Tkinter (ttkbootstrap).
First thing is to Connect your Arduino or USB to Serial Port Converter to windows PC using USB cable .Find out your COM port number by going to your " Device Manager Program "and looking under the " Ports" Section as shown above.
You can now just run your Python/Tkinter Serial communication program and communicate with the Arduino. Make sure that the Arduino side code is uploaded to the board.
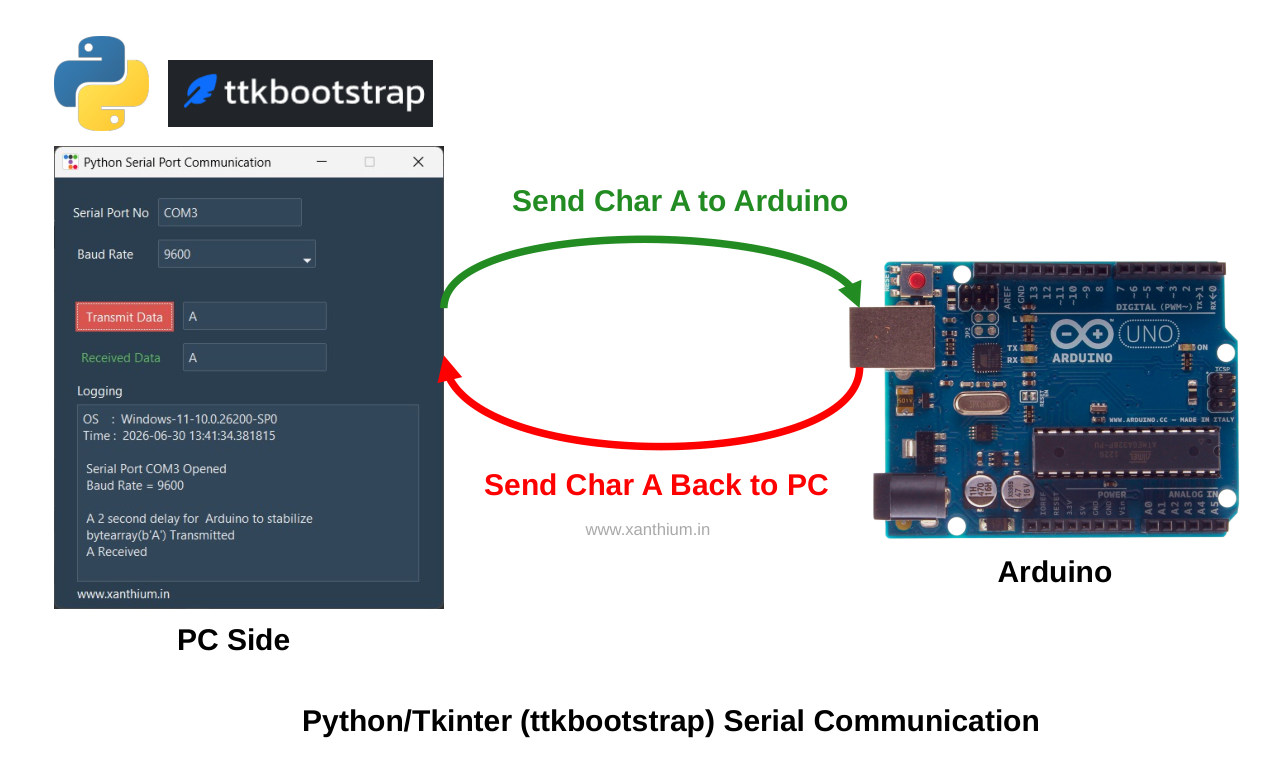
The Python tkinter program communicates with the Arduino through the virtual serial (COM) port created by the board. To better understand how this communication works, it is useful to look at the hardware architecture of the Arduino UNO and see how the UART (Universal Asynchronous Receiver/Transmitter) of the ATmega328P communicates with the PC through the USB interface.
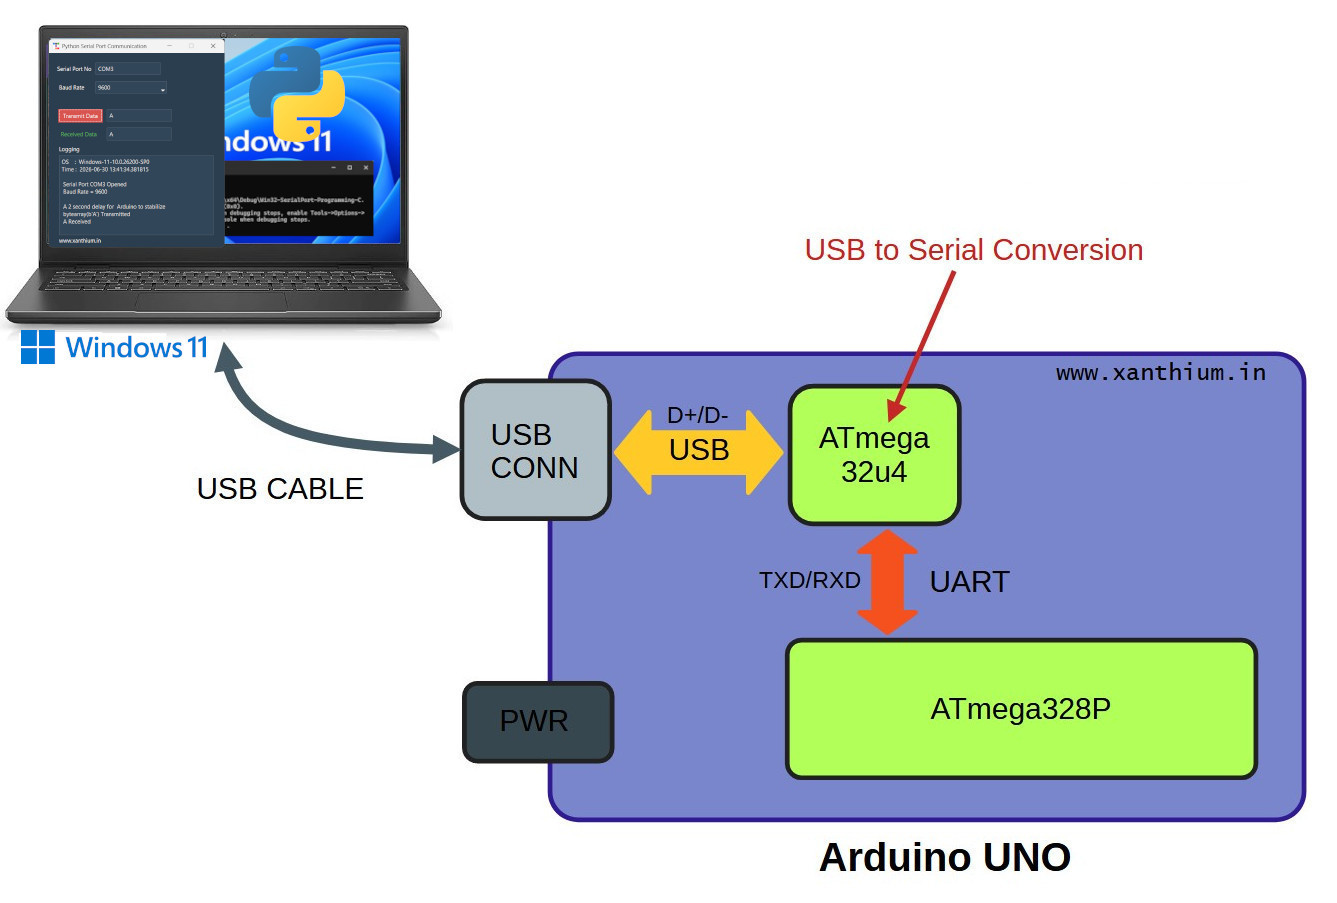
The Arduino UNO contains two microcontrollers. The ATmega328P is the primary microcontroller that executes the Arduino sketches you upload. The ATmega16U2 acts as a USB-to-serial converter, handling USB communication with the computer and presenting the board as a virtual COM port.
The UART pins of the ATmega328P are directly connected to the UART pins of the ATmega16U2. Specifically, the TXD (Transmit Data) pin of the ATmega328P is connected to the RXD (Receive Data) pin of the ATmega16U2, while the RXD pin of the ATmega328P is connected to the TXD pin of the ATmega16U2. When the ATmega328P transmits serial data, the ATmega16U2 receives it, converts it into USB packets, and sends it to the computer. Likewise, data sent from the computer over USB is converted back into UART data by the ATmega16U2 and forwarded to the ATmega328P.
Connecting a Bare Microcontroller to PC
In this section, we will learn how to interface a standalone microcontroller, such as the 8051 (AT89S51 or W78E052DDG), MSP430, or PIC16F series, with a PC and exchange data using the UART serial communication protocol through a Python/Tkinter application.
Since modern computers/laptops typically provide USB ports instead of RS-232 serial ports, a USB to Serial Converter is required. This converter translates the UART signals generated by the microcontroller into USB signals that the PC can recognize, enabling reliable serial communication between the microcontroller and the Tkinter application, as illustrated below.
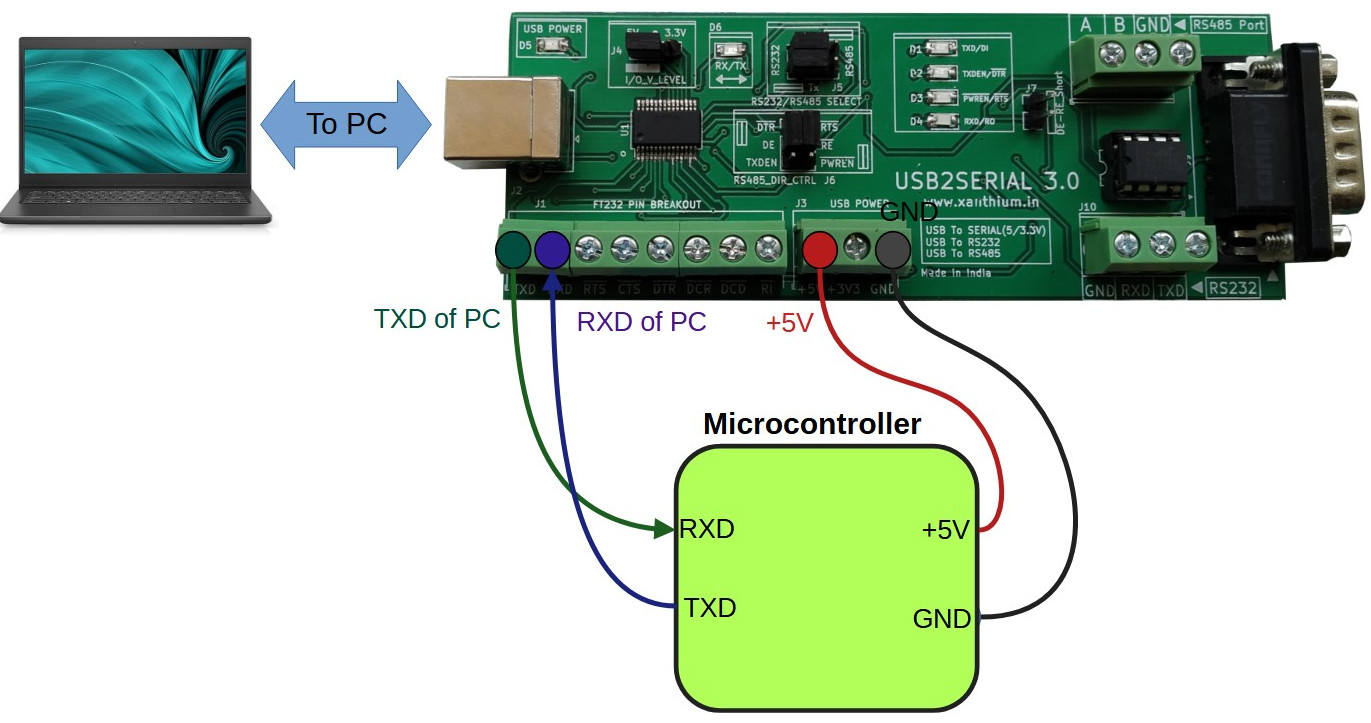
Here we are using USB2SERIAL V3.0 which can do USB to Serial, USB to RS232 and USB to RS485 Conversion.
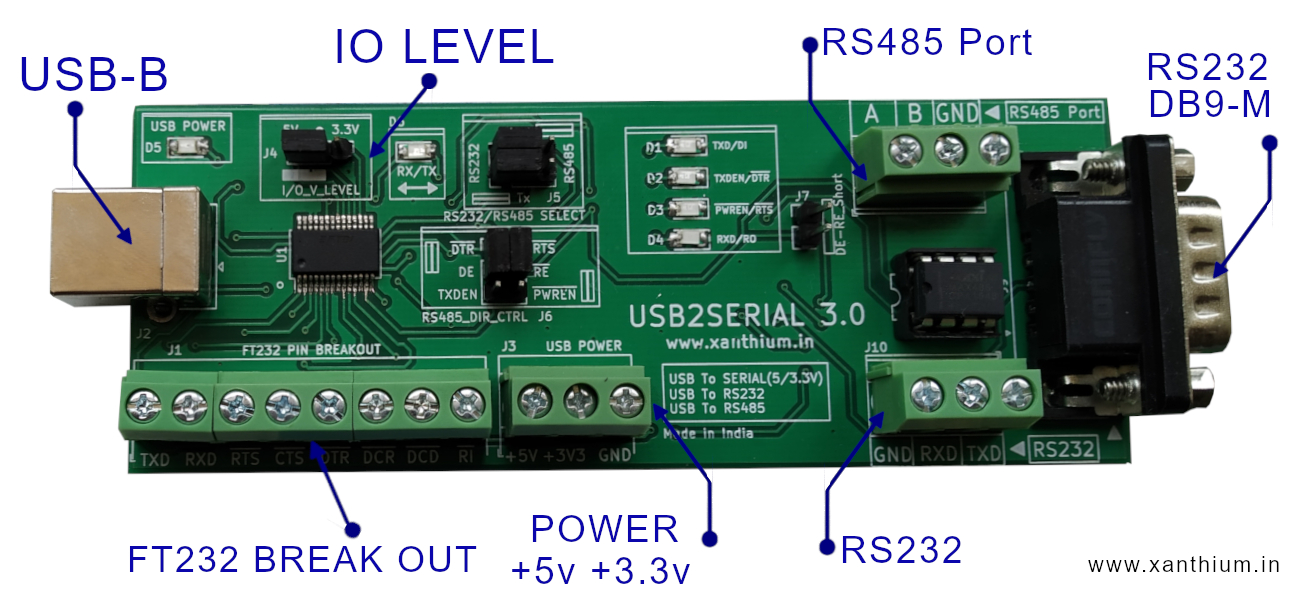
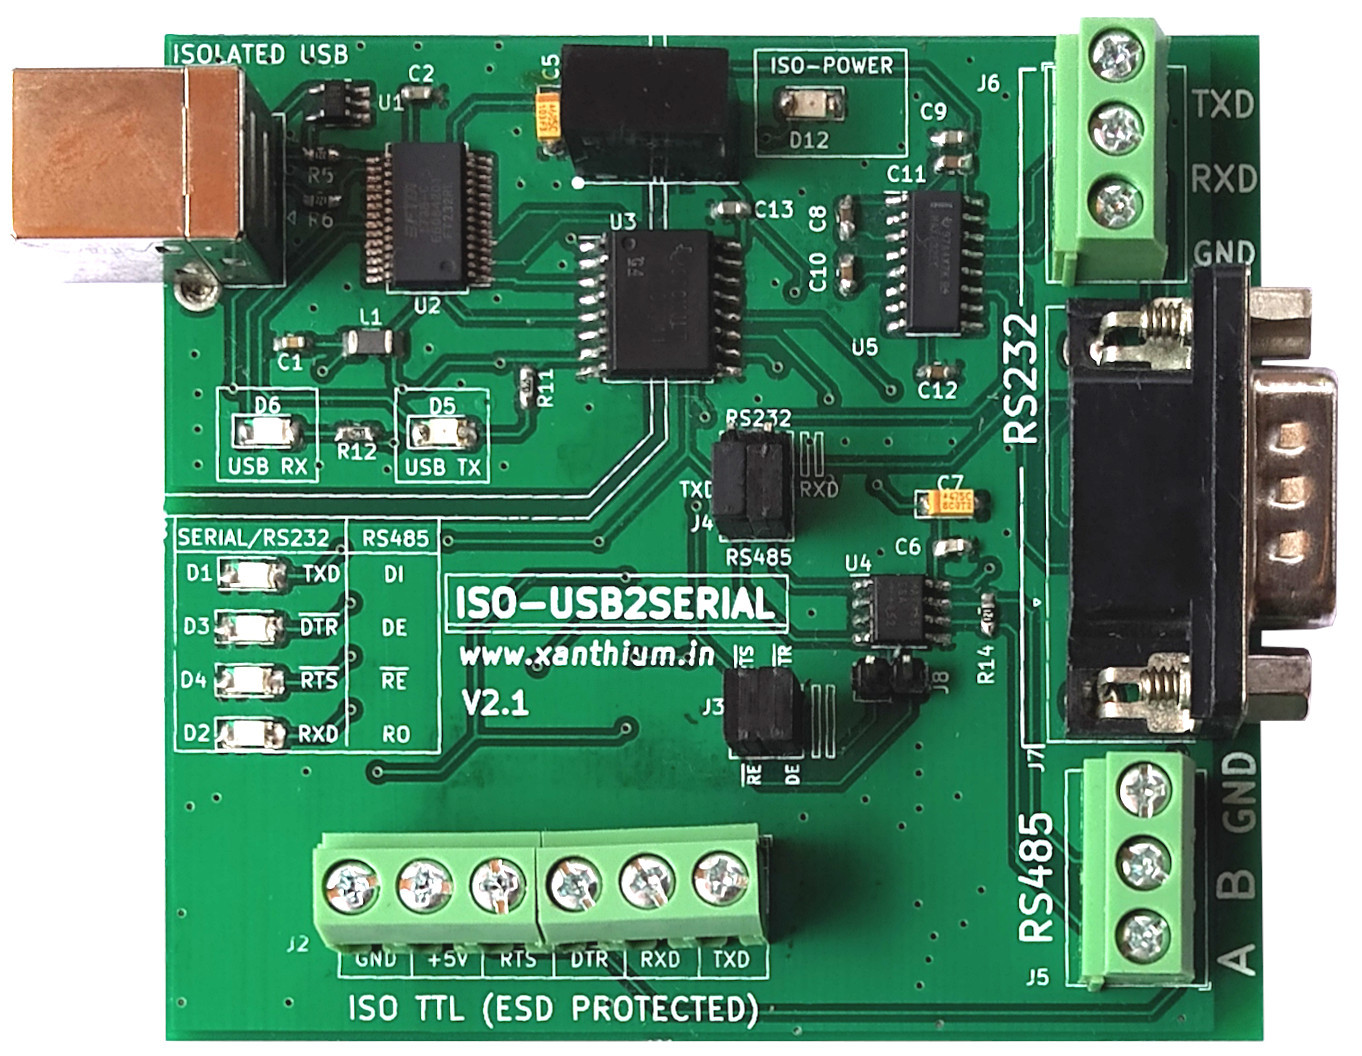
In some applications, the microcontroller interfaces with industrial equipment or other electrical systems that are susceptible to high-voltage spikes, electrical noise, or transient surges.
These transients can travel through the communication lines and potentially damage the computer connected to the USB to Serial converter. In such situations, it is recommended to use an isolated USB-to-Serial converter, which provides galvanic isolation between the PC and the target hardware, protecting the computer from harmful electrical disturbances.
For that purpose you can use a fully Isolated USB to Serial/RS232/RS485 Converter like ISO-USB2SERIAL V2.0 the one shown below.
Arduino Side Code
Before running your Python code you should upload the below Arduino code into the Board
// Arduino Recieves Characters from Tkinter App running on PC
// and send backs text string

void setup()
{
 Serial.begin(9600);
}
void loop()
{
 // Check if data is available
 if (Serial.available() > 0)
  {
   char command;
   command = Serial.read();  // read one character
   switch (command)
   {
     case 'A':
           Serial.println('A');
     break;
     case 'B':
           Serial.println('B');
     break;
     case 'C':
           Serial.println('C');
     break;
     default:   // Unknown command
       Serial.println("Invalid command");
     break;
     delay(500);
   }
 }
}
The Arduino program listens for single character commands sent from a Python Tkinter application over the serial port.
When it receives a character, it checks whether it is 'A', 'B', or 'C'. If it matches one of these commands, the Arduino sends the same character back to the PC.
If the received character is anything else, it sends the message "Invalid command".
Software Architecture of tkinter (ttkbootstrap) Serial Port Program
The Python tkinter Serial program is written to be easily understandable by a novice programmer who wants to connect an embedded system or microcontroller like ATmega328P,RP2040 or RP2350 with your Windows or Linux PC using Serial Port (USB Virtual COM Port).
The Code is written using Python,Tkinter and uses ttkbootstrap theme extension for providing a clean elegant look.
The whole code is contained as a single Python file.
To make the whole serial port program simple we are not using any Python Threads as the code is quite simple and does not do much heavy lifting.
If you are interested to learn how to use threading in Python,
do check out our Python threads tutorial here or
Now the architecture of the Python tkinter serial program is quite simple. The Code first creates all the GUI elements of the code inside the main tkinter window and assigns the corresponding handler functions.
All the logic is controlled by the Transmit Data Button as shown in the below diagram.
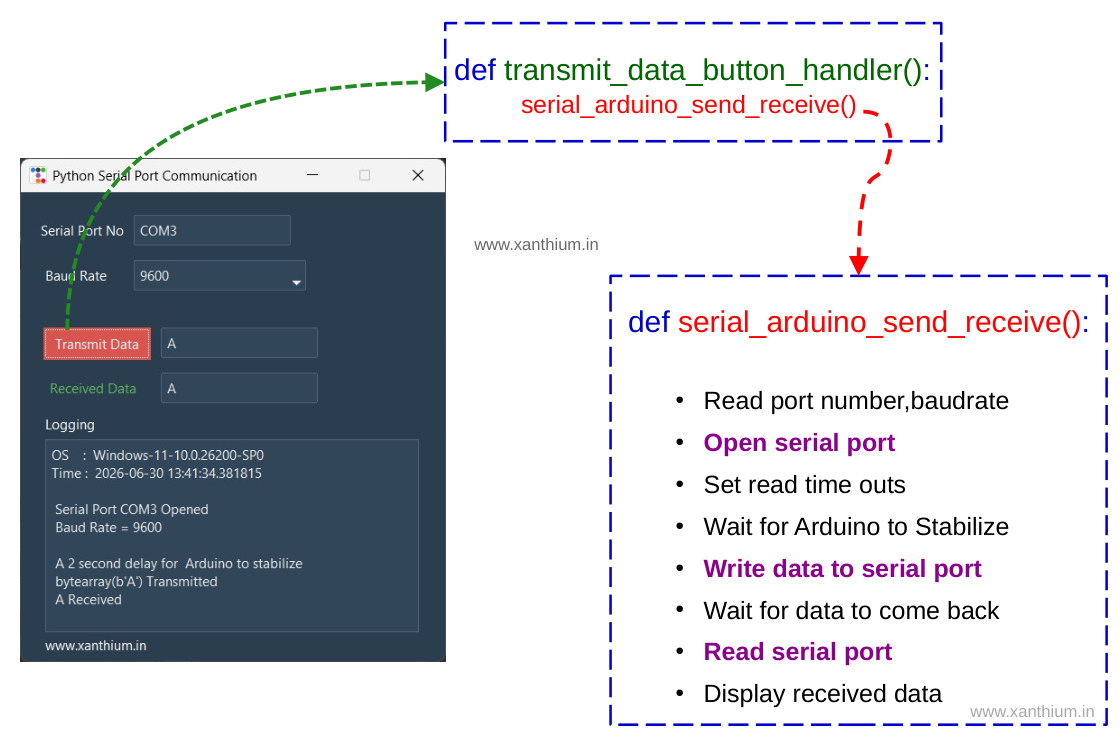
First you provide all the required details like COM port number, Baudrate number etc through the entry box and the drop down combo box
When you click the Transmit Data Button, the control of the code passes to the Transmit Data Button handler function (transmit_data_button_handler()) which in turn calls the serial_arduino_send_receive() function.
All the work is done by the serial_arduino_send_receive() function. The function tries to open a connection to the serial port using the serial.Serial() class from the PySerial Module using the given COM Port number and baud rate value.
On Success, it sets up read time outs. Arduino will reset when you open the serial port using PySerial so we wait for some time for the Arduino to Stabilize.
We send a character to the Arduino using the write() method and then wait for Arduino to send back data.
Arduino will send data back ,on receiving a character from the PC which is read by using readline() function and displayed on the Received Data Box inside the tkinter Window.
Here is a an overview of our Python code showing its major sections. The code is pseudocode, please use the full code from Github Repo
# Python tkinter (ttkbootstrap) based GUI Serial Communication Program
# Pseudocode
# use full code from github,link above

# import statements
import ttkbootstrap
import serial
import platform
import time

# Main function that does all work
def serial_arduino_send_receive():
    # opens the serial port
    # send and receive data to arduino

# GUI Handler Functions
def transmit_data_button_handler():

   serial_arduino_send_receive() # main function that does all the serial tx/rx comm

def baudrate_combobox_selected_handler(e):
   print(e)

# tkinter GUI Creation Code
root = ttkb.Window()
    #Create COM Port number Entry Widget
    #Create Baud rate selection Combobox
    #Create Transmit  Button
    #Create Transmit data Entry Widget
    #Create Receive Data Widget
root.mainloop()
Creating the Tkinter GUI Elements for Serial Monitor
Here we will talk about the various tkinter (ttkbootstrap) GUI element's that are used in our Python Serial Communication Program.
You can also check out our full Youtube tutorial on using the tkinter/ttkbootstrap GUI elements from here,
In this case we will be using only the GUI element's listed below so you can just follow along.
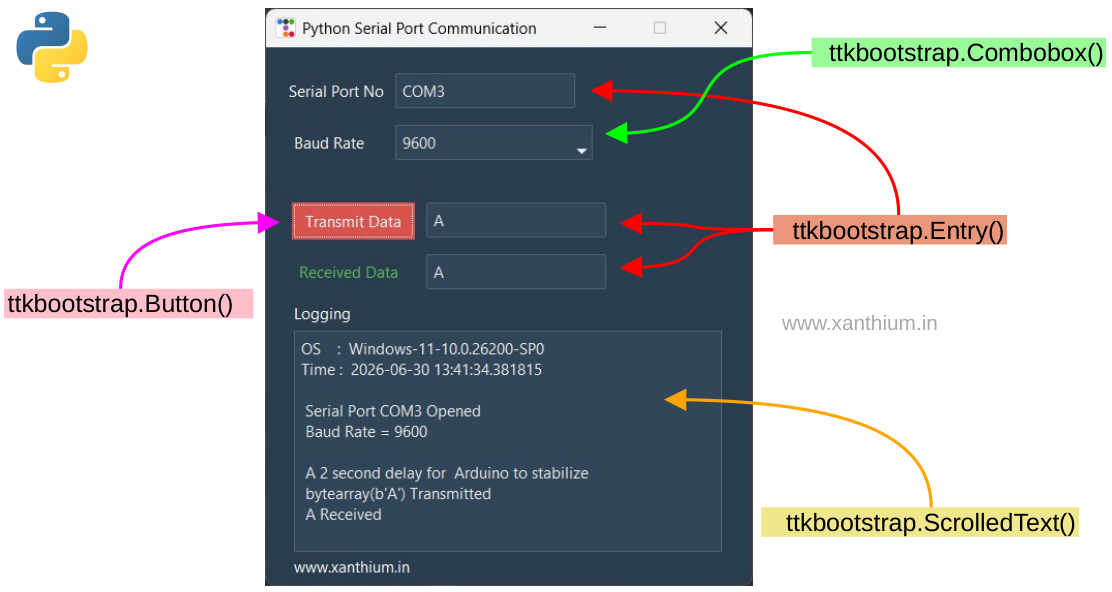
Main GUI elements used in our tkinter serial port program are listed below.
Labels ttkbootstrap.Label() Youtube Tutorial
Buttons ttkbootstrap.Button() Youtube Tutorial
Drop Down List ttkbootstrap.Combobox() Youtube Tutorial
Text Entry Box ttkbootstrap.Entry() Youtube Tutorial
Text Box with Scroll Bars ttkbootstrap.ScrolledText() Youtube Tutorial
Creating a Tkinter/ttkbootstrap Window
First thing to do is to create a simple Window to anchor your GUI elements.
Below code helps you to do that
import ttkbootstrap as ttkb

root = ttkb.Window(themename = 'superhero') # theme = superhero

#root = ttkb.Window(themename = 'cosmo') # theme = cosmo
#root = ttkb.Window(themename = 'darkly') # theme = darkly
#root = ttkb.Window(themename = 'solar') # theme = solar

root.geometry('470x520')                            # width x height
root.title('Python Serial Port Communication')      # name of window

root.resizable(0,0) # Disable resizing in all directions,Maximize button disabled
                    # root.resizable(x,y)
root.mainloop()
First we Import the ttkbootstrap library, Make sure that ttkbootstrap library is installed .
ttkb gives it a shorter alias, so you can write ttkb.Window() instead of ttkbootstrap.Window().
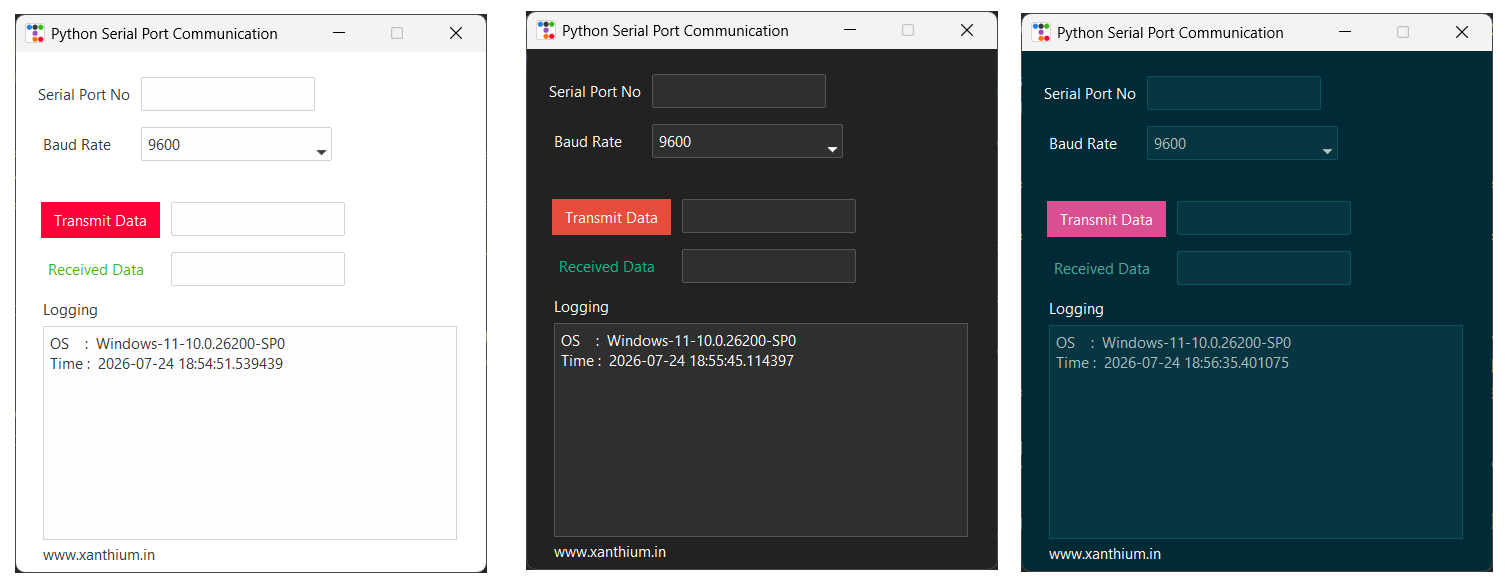
you can change the theme of the Window as you desire by using different prebuilt themes like solar ,cosmo ,darkly etc. The themes are basically divided into dark and light themes.
Here is an image of our program using different themes (cosmo, darkly and solar).
root.resizable(0,0) # Disable resizing in all directions,Maximize button disabledI am going to lock in the size of the Window ,So the user cannot change the dimensions by dragging it.
Creating the Labels
You can create labels using the Label Class as shown below .This should all be inside the GUI loop.
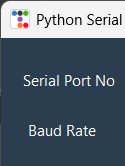
root = ttkb.Window(themename = 'superhero') # theme = superhero

com_port_name_label = ttkb.Label(text = 'Serial Port No')
com_port_name_label.place(x=20,y=30)

received_data_label = ttkb.Label(text = 'Received Data',bootstyle="success")
received_data_label.place(x=30,y=205)

root.mainloop()
we are using the .place() method to hardcode their location on the main window. The controls are not meant to move or resize.
Creating Entry Boxes for Data Input
For reading user input we will be using the ttkbootstrap.Entry() boxes in your serial monitor programming.
We will use Entry() Boxes to read parameters like COM Port number ,Data to be transmitted to the Arduino etc and use that info to transmit data to the connected Arduino or Raspberry PI Pico (RP2040,RP2350).
We will also be using Entry() Boxes to Display the received data. You can read and write to the entry Boxes using Python ,So the box can also be used to display data.
You can also use a Label() to display the received data too, here we will stick with the Entry() Boxes.
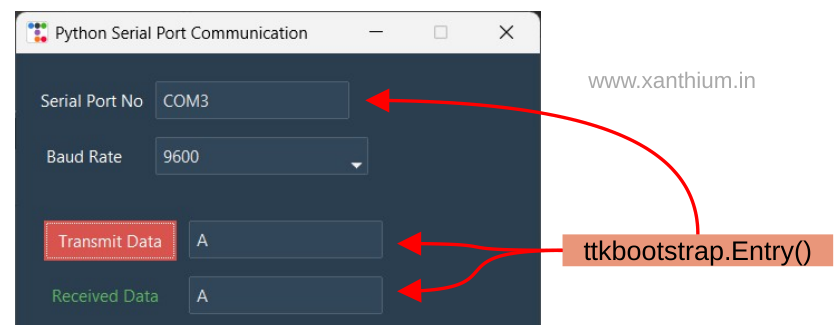
you can create ttkbootstrap Entry() Boxes using
# Create COM Port number Entry Widget
com_port_number_entry_box = ttkb.Entry()
com_port_number_entry_box.place(x=125,y = 25)
Once the Box is created and some data is to be read from it, this can be done using the .get() method as shown below
# part of def serial_arduino_send_receive(): function,where we read the serial port number

port_number = com_port_number_entry_box.get() # read the port number from entry box
.get() always a returns a string . In our case we need the string (COM 31) so no need to convert it to other data types.
If we require an int ,you may need to convert it like shown below.
# example code showing integer conversion
need_integer_value= int(enter_a_number_entry_box.get())
Writing Text into Entry() Box using Python

The data received from the Arduino by our tkinter(ttkbootstrap) serial communication program will be displayed inside an Entry() Box (received_data_entry ).
First we create the Entry() box
#Receive Data Widget
received_data_entry = ttkb.Entry()
received_data_entry.place(x=155,y = 200)
and use the .insert() method to write data into the Entry() box as shown below.
# part of def serial_arduino_send_receive(): function,
import tkinter as tk

#serial port reception part code ,partial

received_data =  serial_port_object.readline()         # read the data from serial port
received_data =  received_data.decode("utf-8").strip() # readline() returns bytes which we need to be converted back to string
                                                       # .strip() removes the \r\n send by the Arduino

#writing into entry() box
received_data_entry.insert(0,received_data) # 0 means the beginning of the entry box.
											# received_data has to be a string not byte
the syntax for the .insert() method is
.insert(index, string to be written ) #0 means the beginning of the entry box.
									  #tk.END from end
The Value to be inserted has to be of type String not Byte.
you can clear the Entry box using .delete() as shown below.
import tkinter as tk  # for tk.END
from tkinter import *

received_data_entry.delete(0,tk.END) #clear the received_data_entry box
Selecting Baudrate using drop down Combobox
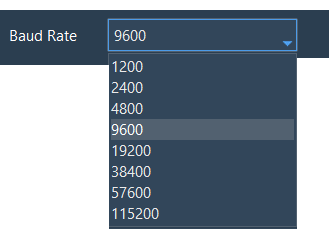
We will use a drop down combobox for selecting the required baud rate for communicating with Arduino using the PC 's Serial port .
We will use the ttkbootstrap.Combobox() class to create the drop down list and create respective handler functions as shown below.
First we have to create a list of standard baud rate values.
# Baud rate selection Combobox
std_baudrate = ['1200','2400','4800','9600','19200','38400','57600','115200'] # std baudrate options for serial comm
                                                                              # these are text,convert to int
now create the combobox element and bind it to its handler.
#Combobox value selected Handler
def baudrate_combobox_selected_handler(e):
    print(e)


baudrate_combo = ttkb.Combobox(values = std_baudrate) # Pass std_baudrate list to combobox
baudrate_combo.current(3)                             # set 9600 as default

baudrate_combo.bind('<<ComboboxSelected>>',baudrate_combobox_selected_handler) # bind the combobox

baudrate_combo.place(x=125,y=75)
Nothing happens inside our handler baudrate_combobox_selected_handler(e):
as we will be getting the value from the combobox using .get() method which returns a string which we have to convert into int as shown below.
# part of def serial_arduino_send_receive(): function,
def serial_arduino_send_receive():
   ..........
   ..........
   baudrate    = int(baudrate_combo.get())       # read the baud rate from combo box
                                                 # convert baudrate string to int
Creating and using Transmit Button
We are using the ttkbootstrap.Button() class of the ttkbootstrap library to create the Transmit Button.
The Button plays a major role in the working of our tkinter serial communication program, when you press the Transmit Button the program send your data into the connected Arduino using the COM Port.
#Partial Code

# Transmit Button Click Event Handler
def transmit_data_button_handler():
   serial_arduino_send_receive() # main function that does all the serial tx/rx comm


#Create a Button
transmit_data_button = ttkb.Button(text = 'Transmit Data',bootstyle="danger",command = transmit_data_button_handler)
transmit_data_button.place(x=25,y=150)
First we create a Button and bind an event handler with it ( transmit_data_button_handler) using the command parameter as shown above (command = transmit_data_button_handler)
You can change the theme of the button by using the bootstyle parameter of the Button class (bootstyle="danger").
When you click the Button ,the event handler def transmit_data_button_handler(): is called
which in turn calls the function serial_arduino_send_receive() which does all the transmitting and receiving work.
Building a logging Window
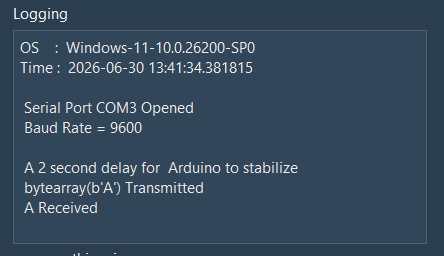
We are also including a logging window to show the inner workings of the serial port communication program for debugging purposes. As the program runs the status of the serial port ,open/close ,the data send and error messages will be displayed inside a scrollable text box as shown above.
Here we are go to use ttkbootstrap.ScrolledText() to create our logging window. You can create one as
log_data = ScrolledText(root,height = 10,width = 50,wrap = WORD,autohide = True)
log_data.place(x=25,y=272)
You can insert text into the ScrolledText box using the .insert() method.
for example
log_data.insert(tk.END,f'OS    :  {platform.platform()}\n')#for windows version info

or
log_data.insert(tk.END,f'\n {received_data} Received ')
Reading and Writing into Serial Port using Tkinter
In the previous sections we learn how to create the GUI elements of your Tkinter Python serial communication Code.
Here we will explore the main function that helps to transmit and receive data from the connected Arduino using Python and Tkinter.
To run the program you have to provide the port number ,baud rate and the data to be transmitted into the respective entry boxes.
When we press the Transmit Button data in the transmit_data_button_entry_box is send to the Arduino connected to the respective serial port. The program will then wait for the Arduino to send back a reply. After the Reply is received, it is displayed on the Received Data text Box.
The below figure shows the program flow of our tkinter serial program.
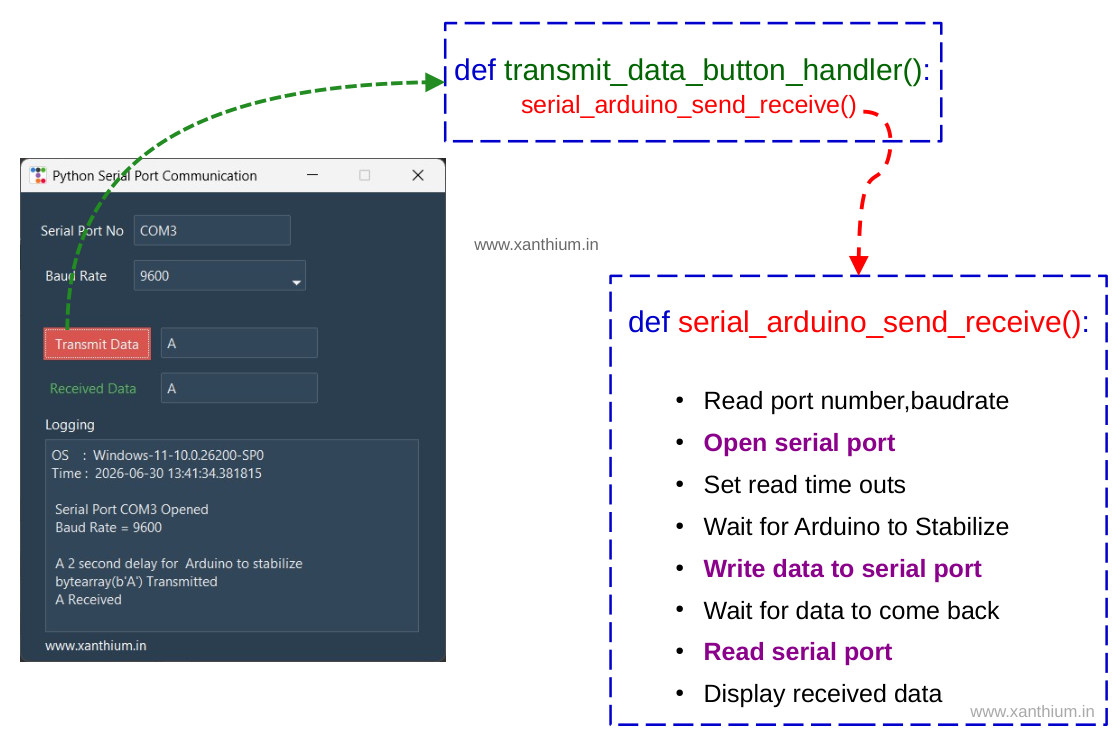
For communicating with the serial port ,we will be using the python pyserial module, So make sure that it is installed on your system.
The main logic of our program is inside the function def serial_arduino_send_receive(): .
When you press the Transmit Button the button handler calls the serial_arduino_send_receive() function which then proceeds to do the following things.
Read Port Number and Baud Rate from respective GUI elements
Try to Open a connection to Serial port using serial.Serial() class from Pyserial Module
Set Read Timeout for your Serial port object
Wait 2 seconds so that Arduino gets stabilized
If Successful ,get the character to be transmitted from Entry() Box
Convert the character to byte array
Transmit the character byte to Arduino serially using write() method
Wait for Arduino to respond ,Read the data from Serial Port
Display the data on the Received Data
def serial_arduino_send_receive():

   port_number = com_port_number_entry_box.get() # read the port number from entry box
   baudrate    = int(baudrate_combo.get())       # read the baud rate from combo box
                                                 # convert baudrate string to int
Here we get the required port number and baudrate.get() method returns a string but for baud rate we need an int so we have to convert the string to int as shown in the above code.
Opening the Serial Port
We are using pySerial library for serial port and tkinter for building the GUI elements.
To open the serial port we use the serial.Serial() class and create a serial port object using the provided port name and baud rate inside an exception handler.
Do Remember to set the Serial Port Read Time outs here.
try:
       serial_port_object = serial.Serial(port_number,baudrate) # open the serial port
       serial_port_object.timeout  = 3                          # Setting Read timeouts here

except serial.SerialException as var :
       print('An Exception Occured')
       print('Exception Details-> ', var)
       Messagebox.show_error(title='Serial Exception Occured', message=f'{var}' )

else:
       # proceed to read and write data into the serial port
       # ..........
       #...........
If there was any error in opening the serial port an exception will occur and a message box will pop up displaying the error message .
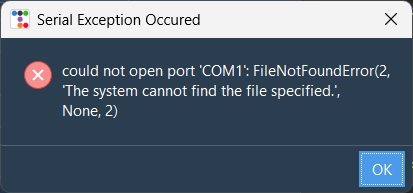
Please note that once you open the serial port using pySerial the Arduino will get RESETed, So we need to wait for two seconds at least till Arduino get ready to receive your data
Writing to Serial Port
After the successful opening of the serial port ,We proceed to transmit our data into the Arduino using the the write() method of the pyserial serial object.
data_to_be_transmited = transmit_data_button_entry_box.get()      # get the character to be transmitted from th entry box
data_to_be_transmited = bytearray(data_to_be_transmited, "utf-8") # convert string to byte array as pyserial write() requires byte array

serial_port_object.write(data_to_be_transmited) # send the character to Arduino
The code reads the text entered by the user in the transmit_data_button_entry_box Entry widget by calling its get() method, which returns the entered text as a string.
The string is then converted into a byte array using bytearray(data_to_be_transmited, "utf-8") because the write() method of the pySerial library cannot send Python strings directly,it expects data in the form of bytes.
The "utf-8" argument specifies the character encoding used to convert the string into bytes.
Finally, serial_port_object.write(data_to_be_transmited) transmits these bytes through the serial port to the connected device, In our case an Arduino.
Reading from Serial Port
Once the Arduino receives a character from the PC ,it will send back a string or character depending upon the received character.
The PC side Python/tkinter code will read the serial port buffer of the PC using serial_port_object.readline() method.
Here we are using the readline() method which will return only after reading a \n character (newline escape character), so we should send \n character from the Arduino side.
We should then convert the received bytes back to string using the .decode() function and remove the extra spaces and newline charcters using .strip()
You can then display the received data.
received_data =  serial_port_object.readline()         # read the data from serial port
received_data =  received_data.decode("utf-8").strip() # readline() returns bytes which we need to be converted back to string
                                                       # .strip() removes the \r\n send by the Arduino
print(received_data)

received_data_entry.insert(0,received_data) #display received data

serial_port_object.close() # close the serial port
- Log in to post comments