
This tutorial is designed to get a Python novice started quickly on using ttkbootstrap GUI Library to create beautiful and professional looking Python Programs . Tutorial assumes that the reader has some experience with Python language. Source Code link Below.
As an embedded designer, your task often involves crafting nimble programs to facilitate seamless communication with an array of devices, including data loggers ,data acquisition modules, Serial port monitors etc. Python emerges as the go-to language for engineers operating within the embedded domain, enabling the creation of such programs with ease.
While Python's native toolkit, tkinter, serves as a fundamental choice for creating graphical user interfaces (GUIs), its appearance may seem outdated to some. To address this, many opt for ttkbootstrap, a sleek and modern alternative. Not only does ttkbootstrap enhance the visual appeal of GUIs, but it also simplifies the development process compared to other GUI frameworks.
The tutorial teaches the following
- Source Codes
- What is ttkbootstrap framework
- Installing ttkbootstrap GUI Library
- How to install ttkbootstrap library using PIP on Windows OS
- How to install ttkbootstrap Library on Debian based Linux systems like Ubuntu
- Install tkinter
- install ttkbootstrap
- How to create a Basic Window in tkinter/ttkbootstrap
- How to create a label in tkinter/ttkbootstrap
- change font type/font size of label text
- change label theme
- Creating and Using Entry Box widget in tkinter/ttkbootstrap
- Creating and Using Buttons in tkinter/ttkbootstrap
- Creating and Using Drop Down Combo boxes in tkinter/ttkbootstrap
- Creating and Using Scrollable TextBox (ScrolledText) in tkinter/ttkbootstrap
- Change Font Type/Font Size
- Read the input Text from ScrollableTextBox (ScrolledText)
- Creating and Using Radio Buttons in Tkinter
- Creating and Using Check Buttons in Tkinter/ttkbootstrap
- Displaying images on tkinter(ttkbootstrap) Window
- Creating a table in tkinter using tableview class
- Creating a Meter Widget in tkinter
- Running Periodic Background tasks in ttkbootstrap
- Convert tkinter (ttkbootstrap) Python script to a Windows executable using Pyinstaller
What is ttkbootstrap framework
Tkinter serves as Python's primary binding to the Tk GUI toolkit, offering a standardized interface for graphical user interfaces (GUIs) across Linux, Microsoft Windows, and macOS platforms. While Tkinter remains versatile and widely adopted, one notable drawback is its GUI elements' outdated appearance compared to other frameworks.
Enter ttkbootstrap – a theme extension designed specifically for Tkinter. By integrating ttkbootstrap, developers can imbue their Tkinter applications with sleek, modern flat-style themes inspired by Bootstrap.
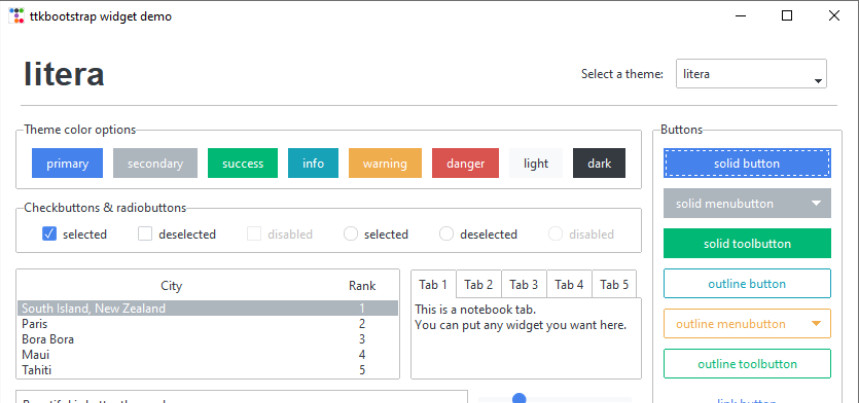
ttkbootstrap comes packaged with a collection of beautifully styled light and dark themes, predefined styles for widgets, new gui widgets like Meter, DateEntry, and Floodgauge.You can see the widgets below.
Source Codes
Install ttkbootstrap Library on Windows 10/11
Make sure that python interpreter is installed on your system (Here our System is Windows ).
You can use any Python interpreter, here we are using CPython that is available with Standard Python Distribution.
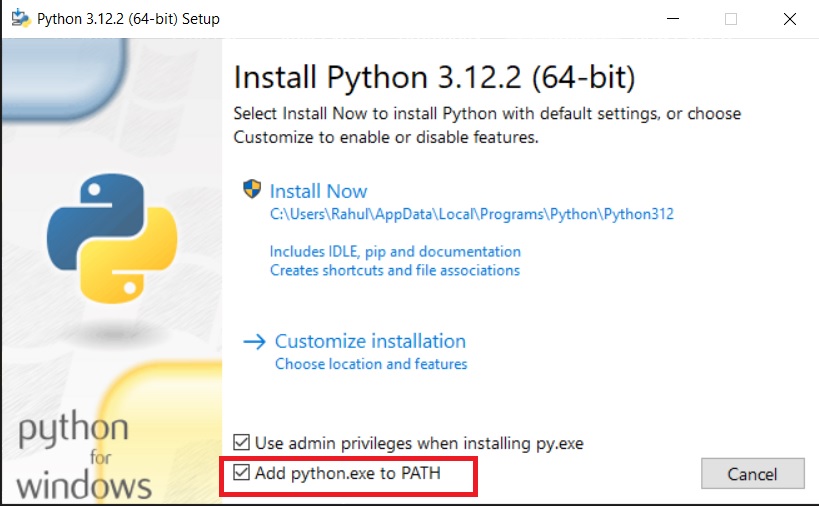
Make sure that you add Python interpretor (python.exe) to the path variable on Windows system during install.
Please note Python recommends creating a VENV Virtual Environment for Software development instead of directly installing the packages into the central python interpreter library.
If you are new to Python VENV ,
Please do check our tutorial on creating,configuring and running python programs inside a venv environment on both Windows and Linux systems here
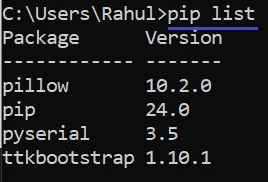
You can see the available modules by using the pip command.PIP comes preinstalled with Python interpreter.
On command line type
pip listif ttkbootstrap not installed ,use PIP to install it using the below command.
pip install ttkbootstrap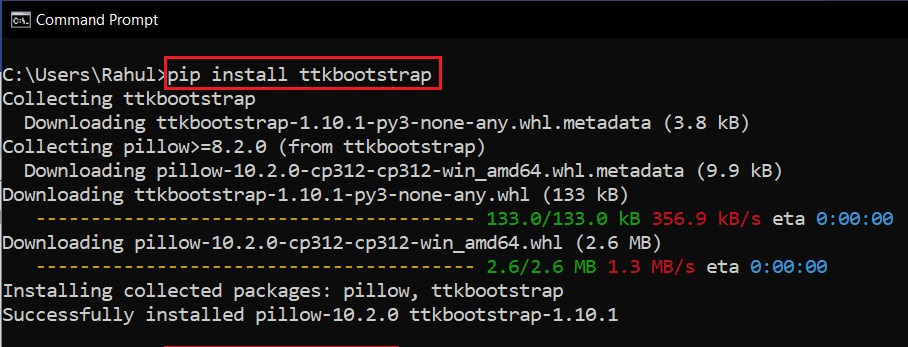
You can check ttkbooststrap installed or not by using pip list command
Installing ttkbootstrap GUI Library on Linux Systems
Installing ttkbootstrap GUI module on Linux systems especially Debian based Systems like Ubuntu (25.10),Linux Mint etc is quite different from the Windows installation.
If you tried to install ttkbootstrap GUI library on Linux using the "python3 -m pip install ttkbootstrap" command ,
you will get an error message saying "error:externally-managed-environment this environment is externally managed ".

The Debian based systems do not allow you to install the ttkbootstrap as a system wide package,So you will have to install the ttkbootstrap locally using a Virtual environment setup.
If you are new to using VENV virtual environment on Linux check our tutorial here.
Here are the Required steps to install ttkbootstrap GUI library on Ubuntu 25.10
Install tkinter Library using apt package manager
Create a venv virtual environment
Activate venv virtual environment
Locally install ttkbootstrap GUI library inside the VENV environment
Installing tkinter
First thing to do, is to install the tkinter GUI Library using apt-get package manager.This will be installed as a system wide package for your Ubuntu Installation.
Unlike the Windows Python interpreter (Cpython),Ubuntu 25.10 do not come with tkinter preinstalled.
Install tkinter using below commands.
sudo apt-get update
sudo apt-get install python3-tk 
Once tkinter is installed .Open up your Python interpreter and run the following code.
import tkinter
tkinter._test()
If tkinter installation is successful ,a small window will pop up as shown below.

Installing ttkbootstrap Libary
Make sure that tkinter is working before installing ttkbootstrap.
Now you have to create a virtual environment to locally install the ttkbootstrap library. If you are new to virtual environment on Linux do check this tutorial.
Create a directory for running your Python Code and create a virtual environment using venv inside that directory.

Sometimes the venv may say ensurepip not installed.So install it by issuing the command shown in the above screenshot.
Do use the correct version number,it may be different on your system.
After you have successfully created the venv virtual environment.

Activate the virtual environment

and install the ttkbootstrap library using pip installer by issuing
pip install ttkbootstrap
You can see the ttkbootstrap library locally installed inside your directory.

Please note that ttkbootstrap library is available only after you have activated your venv virtual environment,as it is locally installed.
Here is the ttkbootstrap code running on ubuntu25.10

Create a basic Window using ttkbooststrap
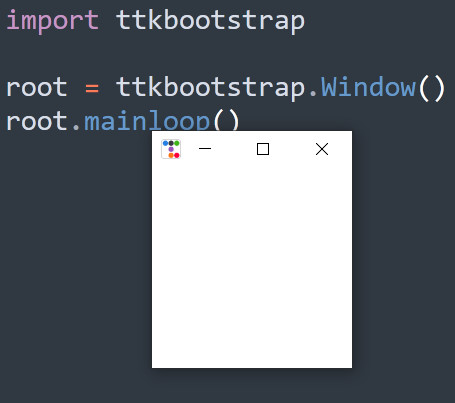
Here we will create a very basic window using ttkbooststrap (tkinter) and Python. Put the below code into your text editor,save it and run it.
import ttkbootstrap
root = ttkbootstrap.Window()
root.mainloop()
This will create a very basic window like the one below.
- You can control the size of the window using the root.geometry('widthxheight') method.
- You can add a title to the Window using root.title('your title for the Window') method.
root.mainloop() is simply a method in the main window that executes what we wish to execute in an application . This will loop forever until the user exits the window or waits for any events from the user. The mainloop automatically receives events from the window system and deliver them to the application widgets. This gets quit when we click on the close button of the title bar
You can set the theme of the Window using keyword themename
root = ttkbootstrap.Window(themename = 'superhero') # theme = superheroor
#root = ttkbootstrap.Window(themename = 'cosmo')Names of various pre-installed themes can be found in the ttkbootstrap website.
Now the full code is below
import ttkbootstrap
root = ttkbootstrap.Window(themename = 'litera')  # select theme
root.geometry('400x900')                          # widthxheight
root.title('My ttkbootstrap Window')              # name of window
root.mainloop()
You can use alias to shorten the ttkbootstrap
import ttkbootstrap as ttkbthen program becomes
import ttkbootstrap as ttkb              #alias to shorten  ttkbootstrap to ttkb
root = ttkb.Window(themename = 'litera') # ttkbootstrap.Window() to ttkb.Window()
root.geometry('400x900') # widthxheight
root.title('My ttkbootstrap Window')
root.mainloop()
Disable/Enable the Maximize Button on tkinter window
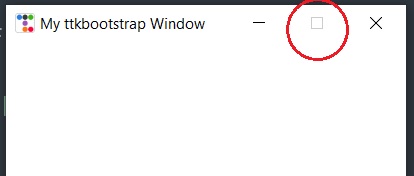
Here we will learn how to control the resize property of the tkinter/ttkbootstrap window.
In some cases we don't want the user of our application maximizing the application window.We can disable the maximize button on the window by calling the .resizable(x_axis,y_axis) method. It takes two arguments to disable or enable resize function in x or y axis.
root.resizable(0,0) #Disable resizing in all directions,Maximize button disabled
                    #root.resizable(x,y)
root.resizable(1,0) #Enable Resize in X direction only
#Disable resizing y direction onlyroot.resizable(0,1) #Disable Resize in X direction only
#Enable resizing y direction only
Detect and Handle Window Close Button Event in tkinter
- Occasionally, it becomes necessary to notify the user when they attempt to close a tkinter/ttkbootstrap window by pressing the close button, allowing them to reconsider their action.
- Sometimes we may need to close connection to file objects or database connections when the user presses the close button on the window.
So to do these things we may need to intercept and capture the Window Close Button Event in tkinter/ttkbootstrap framework and handle it our self.
When you press the close button on a tkinter window. the destroy() method of that window is called.
Tkinter supports a mechanism called protocol handlers. Here, the term protocol refers to the interaction between the application and the window manager.
The most commonly used protocol is called WM_DELETE_WINDOW, and is used to define what happens when the user explicitly closes a window using the window manager.
You can use the protocol method to install a handler for this protocol. The code below shows how to do it
#Python code for Detect and Handle Window Close Button Event in tkinter/ttkbootstrap
import ttkbootstrap as ttkb
def custom_exit_handler():
    print ('You Clicked Exit Button')
    #add custom code here
    root.destroy()
root = ttkb.Window(themename = 'litera')
root.geometry('400x900')                # widthxheight
root.title('My ttkbootstrap Window')
root.protocol("WM_DELETE_WINDOW", custom_exit_handler)
root.mainloop()
Here when you press the Close Button,
custom_exit_handler() function is called,a message is printed to terminal and the window is destroyed. You can add your custom code in that function before the window is destroyed.
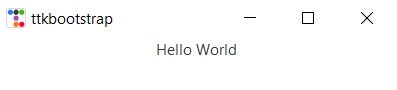
Creating and Using Labels in tkinter/ttkbootstrap
import ttkbootstrap as ttkb
root = ttkb.Window(themename = 'litera')
root.geometry('400x400')                # widthxheight
My_Label = ttkb.Label(text = "Hello World")
My_Label.pack()
root.mainloop()
Here, a label widget is created using the Label class provided by ttkbootstrap. The text displayed on the label is set to "Hello World".
My_Label.pack()This line packs the label into the window. Packing is a way to organize widgets within a container in tkinter.
Here the Label is placed at the center ,since we are using .pack() method.
If you need precise and absolute placement you can use the .place() method as shown below.
My_Label = ttkb.Label(text = "Hello World")
My_Label.place(x=10,y=300) 
You can also change the size and type of font on the Labels using
import ttkbootstrap as ttkb
root = ttkb.Window(themename = 'litera')
root.geometry('400x200') # widthxheight
My_Label_1 = ttkb.Label(text = "Helvetica 15",font = ('Helvetica',15) ).place(x=10,y=10)
My_Label_2 = ttkb.Label(text = "Ariel 15",font = ('Ariel',15) ).place(x=10,y=40)
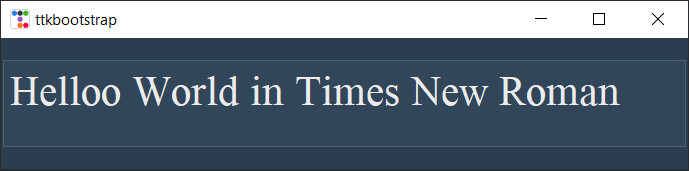
My_Label_3 = ttkb.Label(text = "Times New Roman 15",font = ('Times New Roman',15)).place(x=10,y=80)
My_Label_4 = ttkb.Label(text = "Comic Sans MS 15",font = ('Comic Sans MS',15) ).place(x=10,y=120)
My_Label_5 = ttkb.Label(text = "Courier New 15",font = ('Courier New',15) ).place(x=10,y=160)
root.mainloop()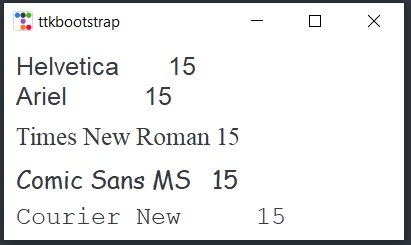
You can also use built in styles using bootstyle keyword.
import ttkbootstrap as ttkb
root = ttkb.Window(themename = 'litera')
root.geometry('400x200')                # widthxheight
My_Label_1 = ttkb.Label(text = "Helvetica       15",bootstyle = 'primary',font = ('Helvetica',15)      ).place(x=10,y=10)
My_Label_2 = ttkb.Label(text = "Ariel           15",bootstyle = 'warning',font = ('Ariel',15)          ).place(x=10,y=40)
My_Label_3 = ttkb.Label(text = "Times New Roman 15",bootstyle = 'danger' ,font = ('Times New Roman',15)).place(x=10,y=80)
My_Label_4 = ttkb.Label(text = "Comic Sans MS   15",bootstyle = 'success' ,font = ('Comic Sans MS',15)  ).place(x=10,y=120)
My_Label_5 = ttkb.Label(text = "Courier New     15",bootstyle = 'dark'    ,font = ('Courier New',15)    ).place(x=10,y=160)
root.mainloop()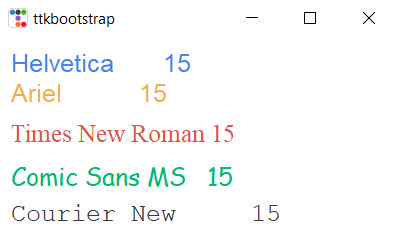
You can also change the colour of the text on the Label using the foreground property as shown below.
MyLabel1 = ttkbootstrap.Label( text = 'Ariel',          font=('Ariel',20),          foreground = 'red'   )
MyLabel2 = ttkbootstrap.Label( text = 'Times New Roman',font=('Times New Roman',20),foreground = 'blue'  )
MyLabel3 = ttkbootstrap.Label( text = 'Comic Sans MS',  font=('Comic Sans MS',20),  foreground = 'green' )
Creating and Using Buttons in tkinter/ttkbootstrap
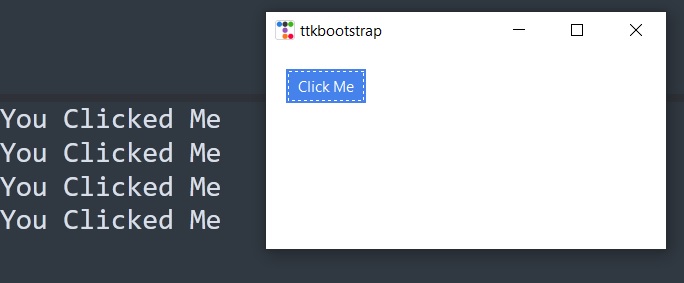
Button can be created using the following command.
button_1 = ttkb.Button(text = 'Click Me',command = button_1_handler)To make the button do something we have to define a handler function and give its name to the command keyword argument.
def button_1_handler():
   print('You Clicked Me')
So when you click the button button_1_handler() will be called and the statements inside it will run. Here it will just print a method to the command line.
Full code below.
#Python tkinter/ttkbootstrap code for Creating and Using Buttons
import ttkbootstrap as ttkb
def button_1_handler():
   print('You Clicked Me')

root = ttkb.Window(themename = 'litera')
root.geometry('400x200')                # widthxheight
#create button
button_1 = ttkb.Button(text = 'Click Me',command = button_1_handler)
button_1.place(x=20,y=20)
root.mainloop()
Output of running the code.
Creating and Using Entry Box Widget in tkinter/ttkbootstrap
Entry box is a tkinter/ttkboostrap widget that is used to get input from the user.
You can create an entry widget by
My_Entry = ttkb.Entry()this will create an entry box to which you can write text or numbers.
The entered data can be retrieved using the .get() method.
Entered_data = My_Entry.get()You can put the .get() method inside a button handler to get the entered data when you press a button as shown below.
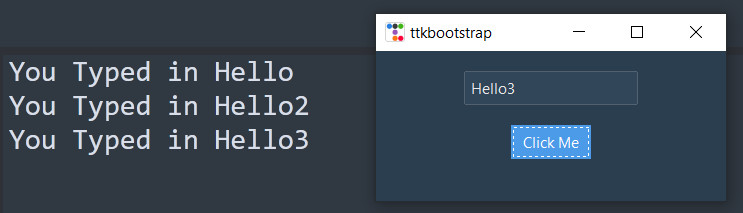
# ttkbootstrap Entry Widget
import ttkbootstrap as ttkb
def button_1_handler():
   print(f'You Typed in {My_Entry.get()}')

root = ttkb.Window(themename = 'superhero') # theme = superhero
root.geometry('350x150')
#Create Entry Widget
My_Entry = ttkb.Entry()
My_Entry.insert(0,'Enter some data')
My_Entry.pack(pady = 20)
#Create Button
button_1 = ttkb.Button(text = 'Click Me',command = button_1_handler)
button_1.pack()
root.mainloop()
You can print a default text into the entry box to prompt the user to do some thing.
My_Entry.insert(0,'Enter some data')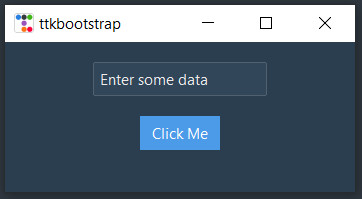
On running the code ,you can see the value entered printed to command line when you press the button.
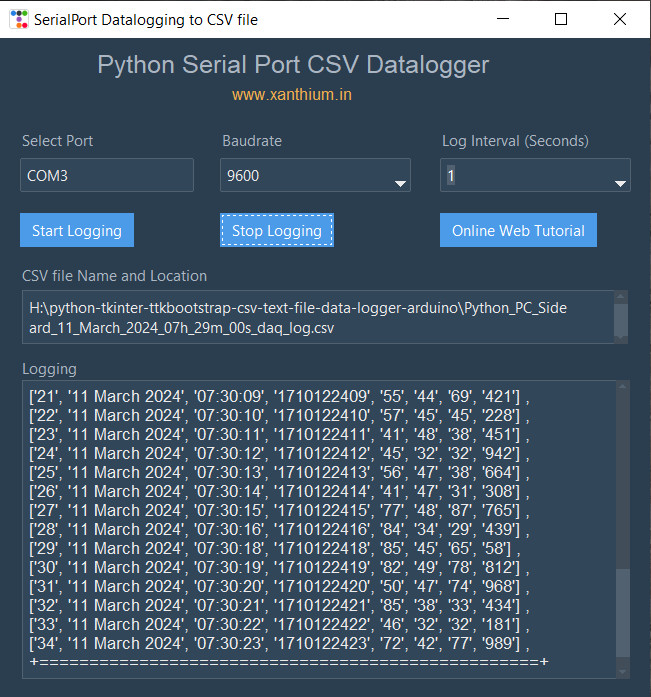
Creating and Using Drop Down Combo boxes in tkinter/ttkbootstrap
Drop down combo boxes are used to present users with a list of options from which they can select one or more items for example baud rate for serial communication or serial ports. You can use the Combobox class in ttkbootstrap to create drop down comboxes.
At first we have to create a list of items that are used to populate the drop down menu.
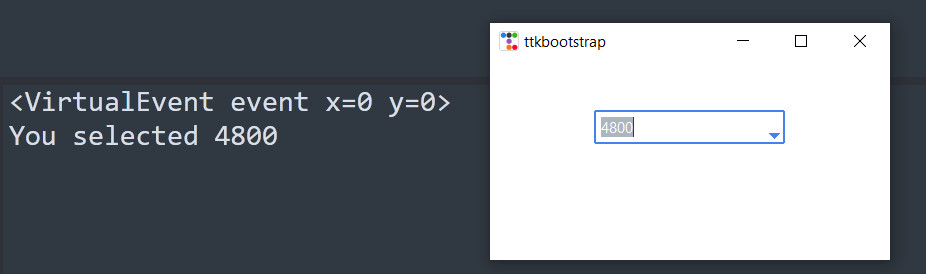
options = ['1200','2400','4800','9600'] #create Dropdown optionsthen we create the Combobox and place it inside the window using the .pack() method. You can also use .place().
You have to pass your drop down items list to the the keyword argument values
#create Combobox
my_combo = ttkb.Combobox(values = options) # Pass options list to combobox
my_combo.pack(pady = 50)                   # pady = 50,place it 50 units from top
when the user selects an item from combobox, the combo box will generate the '<<ComboboxSelected>>' virtual event. To handle this event ,we have to bind the combobox to a handler function.
my_combo.bind('<<ComboboxSelected>>',combobox_selected_handler) # bind the comboboxso when the user selects an item, combobox_selected_handler() function will be called and you can get the selected value using the my_combo.get() method.
def combobox_selected_handler(e):
    print(e)                                #prints the virtual event
    print(f'You selected {my_combo.get()}') #my_combo.get() get the selected value
Full code below
#Python tkinter/ttkbootstrap code for Creating and Using Drop Down Combo boxes
import ttkbootstrap as ttkb
options = ['1200','2400','4800','9600'] #create Dropdown options
def combobox_selected_handler(e):
    print(e)
    print(f'You selected {my_combo.get()}')

root = ttkb.Window(themename = 'litera')
root.geometry('400x200')                # widthxheight
#create Combobox
my_combo = ttkb.Combobox(values = options)
my_combo.pack(pady =50)
my_combo.current(3)#set the default value on combobox
my_combo.bind('<<ComboboxSelected>>',combobox_selected_handler)#bind the combobox
root.mainloop()
Output of the code
Creating and Using Scrollable Text Box (ScrolledText) in tkinter/ttkbootstrap
ScrolledText is a multiline textbox available in kinter/ttkbootstrap with vertical and horizontal scrollbars.
To use the ScrolledText box we need to import the required classes from tkinter/ttkbootstrap.
from tkinter import *
from ttkbootstrap.scrolled import ScrolledText # import the scrolled text box
                                               # ttkbootstrap.scrolled.ScrolledText
now you can create the text box
my_text = ScrolledText(root,height = 10,width = 200,wrap = WORD,autohide = True)
my_text.pack(pady = 20,padx =20)
Full code
import ttkbootstrap as ttkb
from tkinter import *
from ttkbootstrap.scrolled import ScrolledText # import the scrolled text box
                                              # ttkbootstrap.scrolled.ScrolledText
root = ttkb.Window(themename = 'litera')
root.geometry('400x200')                # widthxheight
my_text = ScrolledText(root,height = 10,width = 200,wrap = WORD,autohide = True)
my_text.pack(pady = 20,padx =20)
root.mainloop()
When you run the code .
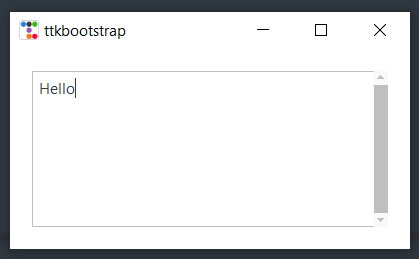
You can add text to the ScrolledText text box in ttkbootstrap by
my_text.insert(END,'Helloo,type something\n')# add text
Change Font Type / Font Size
You can also change the type and size of font that appears on the ScrolledText text box in tkinter/ttkbootstrap.
# Define the font family and font size
font_family = 'Comic Sans MS'
font_size = 25
my_text = ScrolledText(root,height = 10,width = 100,wrap = WORD,autohide = True,font=(font_family, font_size))
my_text.insert(END,f'Helloo World in Comic Sans \n')# add text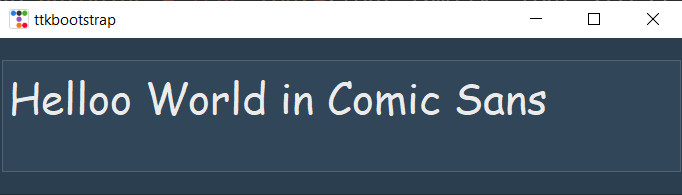
Read the input text from ScrolledText box
You can also read the text written inside the ScrolledText box and use it as a input entry box, this helpful when you have to take in a large volume of text .
my_text = ScrolledText(root,height = 10,width = 100,wrap = WORD,autohide = True)
text = my_text.get('1.0',END) #get all the text from the ScrolledText widget
print(text)
The first part, '1.0' means that the input should be read from line one, character zero (ie: the very first character).
END is an imported constant which is set to the string "end".
The END part means to read until the end of the text box is reached.
The only issue with this is that it actually adds a newline to our input. So, in order to fix it we should change END to end-1c.
The -1c deletes 1 character, while -2c would mean delete two characters, and so on.
Here is a an example of how it works.
#read text from ScrolledText
from tkinter import *
import ttkbootstrap as ttkb
from ttkbootstrap.scrolled import ScrolledText
import tkinter as tk
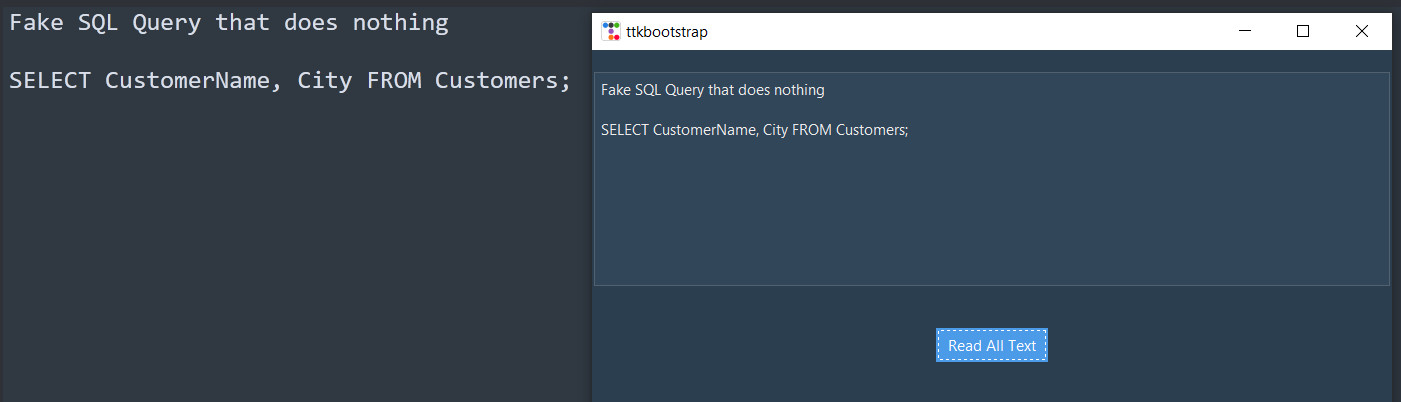
def button_1_handler():
text = my_text.get('1.0',END) #get all the text from the ScrolledText widget
print(text)
root = ttkb.Window(themename = 'superhero') # theme = superhero
root.geometry('800x500')
my_text = ScrolledText(root,height = 10,width = 100,wrap = WORD,autohide = True)
my_text.pack(pady = 20)
#create button
button_1 = ttkb.Button(text = 'Read All Text',command = button_1_handler).pack(pady = 20)
root.mainloop()when you press the button ,the program reads all text entered in ScrolledText box and prints it on the command line.
Creating and Using Radio Buttons in Tkinter (ttkbootstrap)
Radio buttons are a type of graphical user interface (GUI) element that allows the user to choose one option from a set of predefined options. They are typically used when only one choice can be selected at a time from a group of options. In this section ,We will learn how to create Radio Buttons in Tkinter using the ttkbootstrap theme.
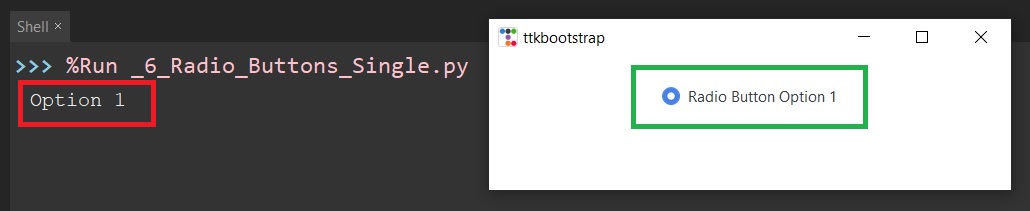
Here is a Partial code on creating a Single Radio Button for demo only
#Partial Code for Creating Radio Button in Tkinter
import ttkbootstrap as ttkb
import tkinter as tk
root = ttkb.Window()
#function to handle the Radio Button Selection
def on_radio_select():
   print(radio_button_var.get())

radio_button_var = tk.StringVar() #create a variable radio_button_var of type tk.StringVar()
# Create the radio button
radio_button1 = ttkb.Radiobutton(root,
                                 text     = "Radio Button Option 1",
                                 value    = "Option 1",
                                 variable = radio_button_var,
                                 command  = on_radio_select)

root.mainloop()
First we have to import both ttkbootstrap and tkinter modules
import ttkbootstrap as ttkb   # for ttkb.Radiobutton()
import tkinter as tk          # for tk.StringVar() function
We then define a Variable called radio_button_var of type tk.StringVar() that will store selection status of the Radio button Group.
Then we will create the Radio button using
# Create the radio button
radio_button1 = ttkb.Radiobutton(root,
                                 text     = "Radio Button Option 1",
                                 value    = "Option 1",
                                 variable = radio_button_var,
                                 command  = on_radio_select)
Here
text = "Radio Button Option 1", will be the name displayed near the Radio Button.
value = "Option 1", When the Radio button radio_button1 is selected the string "Option 1" is stored on radio_button_var
variable = radio_button_var, Name of the variable for storing button status
command = on_radio_select Name of the function which will run when the Radio button radio_button1 is selected
We also have to define a function to handle the Radio Button Select Event, This function will run when the user selects the Radio Button. Shown below
#function to handle the Radio Button Selection
def on_radio_select():
   print(radio_button_var.get())
When the Radio Button is Clicked ,def on_radio_select(): will run as it is assigned to the command argument. Here we will get the Value of the selected Button using radio_button_var.get() and print it to console. In our case it will be "Option 1", as we are using a single Radio button
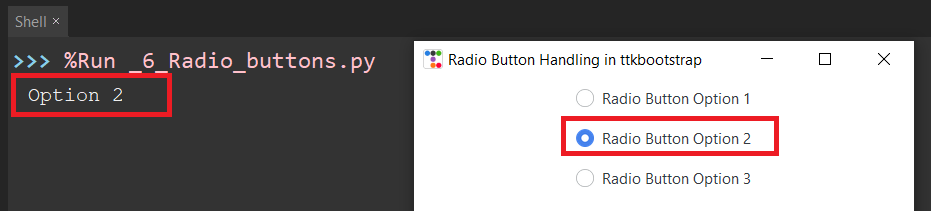
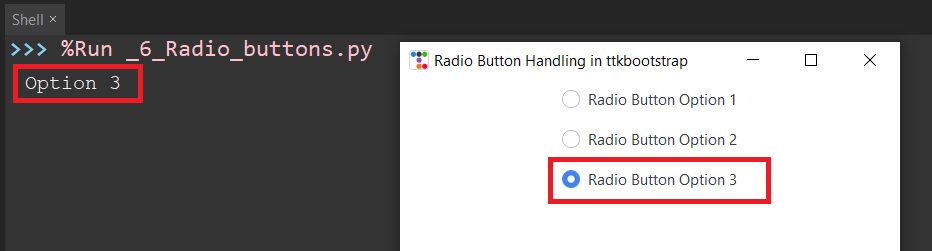
Now we will Create 3 Radio Buttons that actually do some work and select. Code here is shown below.
#Creating Radio Button using Tkinter
import ttkbootstrap as ttkb
import tkinter as tk
root = ttkb.Window()
root.title('Radio Button Handling in ttkbootstrap')
root.geometry('500x300')                             # width x height
#function to handle the Radio Button Selection
def on_radio_select():
   print(radio_button_var.get())

radio_button_var = tk.StringVar() #create a variable radio_button_var of type tk.StringVar()
# Create the radio buttons
radio_button1 = ttkb.Radiobutton(root,
                                text     = "Radio Button Option 1",
                                value    = "Option 1",
                                variable = radio_button_var,
                                command  = on_radio_select)
radio_button1.pack(pady=10)
radio_button2 = ttkb.Radiobutton(root,
                                text     ="Radio Button Option 2",
                                value    = "Option 2",
                                variable = radio_button_var,
                                command  = on_radio_select)
radio_button2.pack(pady=10)
radio_button3 = ttkb.Radiobutton(root,
                                text     = "Radio Button Option 3",
                                value    = "Option 3",
                                variable = radio_button_var,
                                command  = on_radio_select)
radio_button3.pack(pady=10)
# Optional: Set a default selected value
radio_button_var.set("Option 3")
root.mainloop()
When you run the code and select the different buttons ,you can see the corresponding value printed on the shell.

Creating and Using Check Boxes in Tkinter (ttkbootstrap)
In this section ,We will learn to create checkbutton's in tkinter GUI framework using the ttkbootstrap library. So first i will show you the code and explain it.
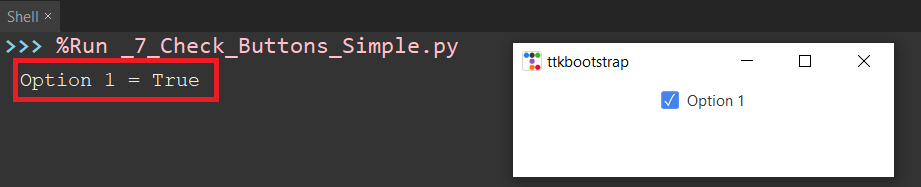
#Simplified code to create a single checkbutton in tkinter ttkbootstrap GUI framework
import tkinter as tk
import ttkbootstrap as ttkb # for tk.BooleanVar()
# Function to handle the check button state change
def on_check_button_select():
   print(f'Option 1 = {chk_var1.get()}')
# Create the main window
root = ttkb.Window()
chk_var1 = tk.BooleanVar() #True/False
# Create Check Buttons
check_button1 = ttkb.Checkbutton(root,
                                text     = "Option 1",
                                variable = chk_var1,
                                command  = on_check_button_select)
check_button1.pack(pady=10)
root.mainloop()
First thing we have to do is to declare a variable to handle the CheckButton states which is a Boolean Value (True or False). If CheckButton is Checked the value is True and If not checked value is False.
chk_var1 = tk.BooleanVar() #chk_var1 can be True/FalseAfter that we create the tkinter checkbutton using the below code.
# Create Check Buttons
check_button1 = ttkb.Checkbutton(root,
                                text     = "Option 1",
                                variable = chk_var1,
                                command  = on_check_button_select)
Here text is the name that appears near the Checkbutton ,In our case it will be Option 1
variable = chk_var1, here chk_var1 is designated as the variable that will contain the Boolean state of the CheckButton (Checked or Not Checked).You can use the chk_var1.get() method to get the state of the Check Button in the event handler.
command = on_check_button_select ,Here we assign the name of the function (on_check_button_select) that will run when our CheckButton is clicked by the user.
To handle the Checkbutton clicked Event ,we have to define a function (in our case on_check_button_select )and assign it to the respective check button .The function is shown below.
# Function to handle the check button state change
def on_check_button_select():
   print(f'Option 1 = {chk_var1.get()}')
Inside the function ,You can use the chk_var1.get() method to get the state of the Check Button and perform the required logic. chk_var1.get() method will return a boolean value (True or False).
On running our tkinter Check Button Code ,We get the Following output.
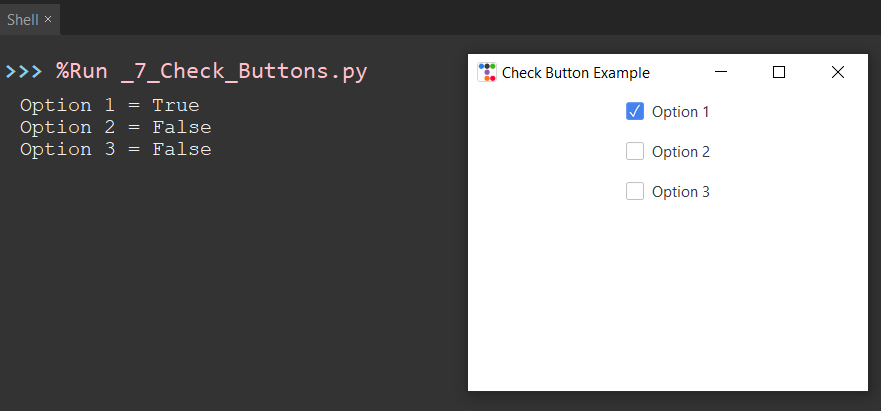
Now we will create Multiple Checkboxes using the below code
#Code to create 3 checkBoxes in Python tkinter using ttkbootstrap library
import tkinter as tk
import ttkbootstrap as ttkb
# Create the main window
root = ttkb.Window()
root.title('Check Button Example')
root.geometry('400x300')
# Function to handle the check button state change in tkinter(ttkbootstrap)
def on_check_button_select():
   print(f'Option 1 = {chk_var1.get()}')
   print(f'Option 2 = {chk_var2.get()}')
   print(f'Option 3 = {chk_var3.get()}')

# Create variables to track the state of the check buttons in tkinter(ttkbootstrap)
chk_var1 = tk.BooleanVar() #True/False
chk_var2 = tk.BooleanVar()
chk_var3 = tk.BooleanVar()
# Create 3 Check Buttons in tkinter using ttkbootstrap library
check_button1 = ttkb.Checkbutton(root,
                                text     = "Option 1",
                                variable = chk_var1,
                                command  = on_check_button_select)
check_button1.pack(pady=10)
check_button2 = ttkb.Checkbutton(root,
                                text     = "Option 2",
                                variable = chk_var2,
                                command  = on_check_button_select)
check_button2.pack(pady=10)
check_button3 = ttkb.Checkbutton(root,
                                text     = "Option 3",
                                variable = chk_var3,
                                command  = on_check_button_select)
check_button3.pack(pady=10)
'''
# Start with some checkboxes selected (optional)
var1.set(True)  # Option 1 is selected by default
var2.set(False) # Option 2 is not selected by default
var3.set(True)  # Option 3 is selected by default
'''
# Run the application
root.mainloop()
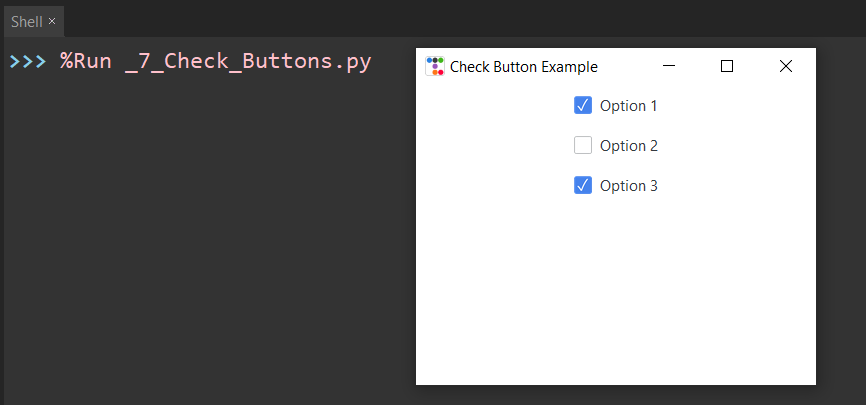
This code will create 3 Checkboxes on running it .
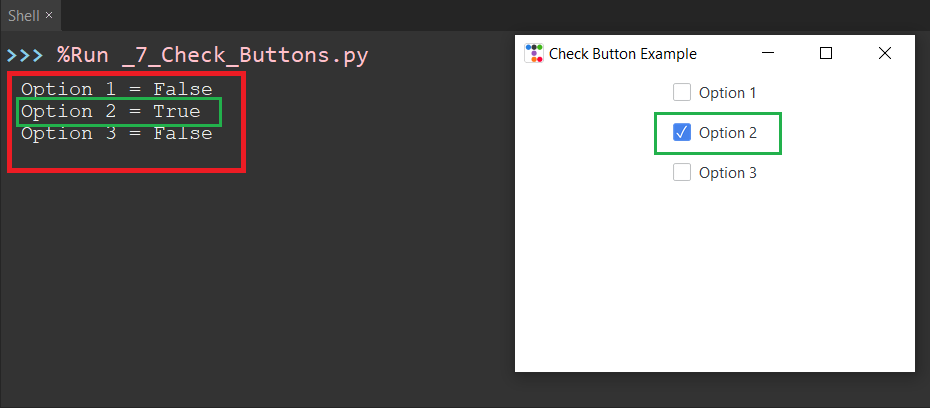
Optional Code for Default Checkbox Selection
# Start with some checkboxes selected (optional)
chk_var1.set(True)  # Option 1 is selected by default
chk_var2.set(False) # Option 2 is not selected by default
chk_var3.set(True)  # Option 3 is selected by default
This code will allow the program to start with some checkboxes pre-selected.
chk_var1.set(True)would make the first checkbox selected by default.chk_var2.set(False)would make the second checkbox not selected by default.chk_var3.set(True)would make the third checkbox selected by default.
On running this it would look like this.
Displaying images on tkinter /ttkbootstrap Window
In this section, We will learn how to display images on a tkinter (ttkbootstrap) window using Python code. Here we will be only using tkinter and ttkbootstrap libraries, no external libraries for image processing like pillow or OpenCV are going to be used.
Now due to the fact that we are not using external libraries ,tkinter will only allow you to display two types of image formats on the Window.
They are
PNG Images (Portable Network Graphics)
GIF Images (Graphics Interchange Format)
Please note that Tkinter (ttkbootstrap) will not allow you to display JPEG images on the Window. In the case of GIF images animation is not supported.
Using PhotoImage()
To display the image on a tkinter frame you have to create an image object using the PhotoImage() class ..The PhotoImage class in Tkinter is used to work with image files, allowing you to display images in Tkinter (ttkbootstrap) based graphical user interfaces (GUIs). It is part of the standard Tkinter library and supports specific image formats, like .png, .gif, .ppm, and .pgm.
Basic Syntax is
photo_object = PhotoImage( file = "image_file_path" )file="image_file_path" specifies the file path of the image you want to load. The path can be either relative or absolute.
Example
photo_object = PhotoImage( file = "myimage.png" ) # myimage.png should be in the same directory as python source code

photo_object = PhotoImage( file = r"c:\myimage.png" ) # using absolute path, raw raw string literal mode

photo_object = PhotoImage(file ="c:\\myimage.png")  # using absolute path,
Now you can use a Label Widget to display the photo object using the image parameter of the label as shown below.
label1 = ttkb.Label(image = photo_object) # image parameter specifies the image that will be displayed on the label
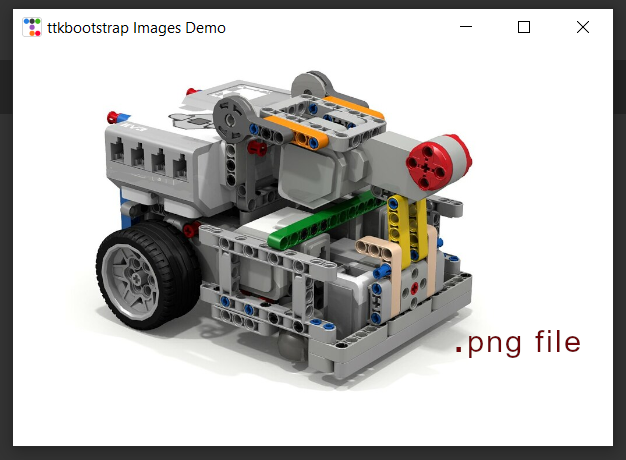
Here is a simple code to display a picture of robot (robot.png) in your directory on a tkinter window
#from tkinter import PhotoImage       #for PhotoImage()

from tkinter import *
import ttkbootstrap as ttkb

root = ttkb.Window()
root.title('ttkbootstrap Images Demo') # Window Name
root.geometry('600x400')

# Creating a photoimage object to use image
photo_object = PhotoImage(file = "robot.png") #create a photo image object

label1 = ttkb.Label(image = photo_object)# image parameter specifies the image that will be displayed on the label

label1.pack(pady = 10)

root.mainloop()
On running the code.
Creating Tables in tkinter (ttkbootstrap) using Tableview
- Log in to post comments