
In this beginner friendly tutorial, You will learn about Creating and using a Python virtual environment using the venv package. The venv package is available with the standard Python distribution on both Windows and Linux systems.
The tutorial assumes that the reader is familiar with the Python Language and is capable of using command line tools .
Here we will learn about
- How to Create venv based the virtual environments on Linux and Windows systems,
- How the venv virtual environment works behind the scenes on Windows and Linux systems
- Methods for installing and managing packages within a virtual environment.
- and the subtle differences between virtual environments on Windows and Linux systems.
Tutorial is divided into Windows and Linux Sections. We also have a Video Tutorial Below.
Cross Platform Python VENV Video Tutorials
Please use the below Contents sections to select your OS.
Contents
- What is a Python virtual environment
- What is venv
- Creating a Python Virtual Environment on Linux
- How to solve ensurepip is not available error
- Structure of Python Virtual Environment (venv) on Linux
- Location of System Python on Linux
- Running the venv Command to Create Virtual Environment
- Adding Source Codes and Installing libraries to venv
- Adding packages to your venv environment
- Listing all the installed packages in our venv environment
- Creating a Python Virtual Environment (Venv) on Windows OS
What is a Python virtual environment (venv)
A Python virtual environment is a self contained directory containing its own python interpreter ,activation shell scripts and installed libraries that are separate from the main python installation .The isolated environment means that you can work on different Python projects with different dependencies, versions, or configurations without worrying about conflicts between them.
The Virtual environment is completely separate from the System's Python installation .It prevents the user from messing the installed modules of the system python environment on which various other programs may depend.
Virtual environment also allows the user to install modules inside the environment without admin rights.
There are multiple ways to create a Python virtual environment using tools like
- venv
- virtualenv
- conda,
- pipenv,
- poetry.
In this tutorial ,we will be using the built in the venv module to create a Python Virtual environment on Windows (Windows 10 /Windows 11 ) and Linux systems (Ubuntu,Linux Mint,Debian).
venv is also available on embedded system computers like Raspberry Pi for developing Python based software like data acquisition system.
What is venv
venv is a module that comes pre-installed with the standard Python installation (after Python 3.3.x) that can be used to create a Python Virtual Environment.
Since the venv module comes preinstalled with Python (on Debian based systems ,you may need to perform some extra steps),
you can create a virtual environment by just typing
python -m venv my_virtual_env
or
python3 -m venv my_virtual_env #on Linux
This will create a directory named my_virtual_env which will contain the required scripts ,libraries and binaries needed for running our Python virtual environment.
A venv created Python virtual environment may look like the following figure (simplified version).

It will contain a
- Copy or Link of System Python interpreter,
- a PIP installer binary,
- Shell scripts for activating and deactivating the virtual environment
- Directory for installing your project specific modules locally without disturbing the system Python Packages
- and configuration files
There are some minor differences between the virtual environment on Windows based Systems and Linux /Mac based systems which we will address later in this tutorial.

Creating a Python Virtual Environment on Linux
Here we will create a Python Virtual Environment on Debian based Linux Distro like Ubuntu,Linux Mint or Zorin OS using the venv module.
Make sure that you have a Python interpreter installed on your system, Which is usually installed by default on most Linux distributions.
You can check the location of your Python installation on Linux using the which command ,which will show the location of your Python binaries.

Your system Python is located at /usr/bin/python3
You can now create a virtual environment using the venv module by issuing the below command.
python3 -m venv my_venv Here my_venv is the name of our virtual environment .If the command is successful a directory named my_venv for housing your local files and modules. You can give any name of our choice instead of my_venv
How to solve ensurepip is not available error
Here we will learn how to solve the ensurepip is not available error that come up while trying to create a venv virtual environment on Linux systems .Now in Debian based distro's like Ubuntu and Linux Mint you will get an error message like
The virtual environment was not created successfully because ensurepip is not available.
On Debian/Ubuntu systems, you need to install the python3-venv package using the following command.
   apt install python3.13-venv
You may need to use sudo with that command.
After installing the python3-venv package, recreate your virtual environment.
when you try to create the virtual environment.

Here ensurepip is a module built into Python that automatically installs pip into the virtual environment,
So we need to install ensurepip using apt. just copy the command from the error message and run it.
sudo apt install python3.13-venv 
Structure of Python Virtual Environment (venv) on Linux
Most Linux systems will come with a system installation of Python along with associated libraries by default .These are needed by the system programs for running properly so it is not recommended to mess with those installation.
Python introduced the concept of virtual environments using the venv command to isolate your development libraries from the system libraries for a smooth operation of the OS.
Location of System Python on Linux
On Linux you can find the location of your Python Interpreter along with the installed libraries using the whereis command .
whereis python3
Here the python interpreter binary is located inside the /usr/bin/python3 directory
and the python libraries are inside the /usr/lib/python3 directory.
Inside the /usr/lib you will find that there area two directories named python (python3 and python3.xx).
They are for the following purposes
/usr/lib/python3.13            #core python libraries
/usr/lib/python3/dist-packages #libraries installed by the apt package of the distro
Running the venv Command to Create Virtual Environment
Now that you have an understanding of how Python and its libraries are installed on a Linux system, we will create a Python virtual environment using venv tool on our System.
We will also explain how venv works, how the directories within a venv virtual environment are organized, and what their functions are in detail.
So you can navigate to your home folder and type the below command on the bash shell.
python3 -m venv my_venv # my_venv is the name of your virtual environment,Here my_venv is the name of your virtual environment, you are going to create.
you can give any name of your choice ,some people use the name venv itself but i find that a little confusing for the beginner.
#another way
python3 -m venv venv # here second venv is the name of your virtual environment,
We will be using my_venv through out the tutorial.
Once the command is run successfully, it will create a directory called my_venv on your file system with multiple sub directories.
here is a simplified Block diagram of the virtual environment.

As you can see in the above diagram, virtual environment my_venv is totally separate from our System Python Installation.
Our Python Virtual environment my_venv has a separate directory hold its on PIP package installer ,its own locally installed libraries (local site-packages).
All the libraries we require for our project are installed in this local directory so that the main python installation is not affected.
One important distinction is that our virtual environment will be using our systems python interpreter (symlink to python3.13 in our case).
Directory Structure of Venv Python Virtual Environment on Linux
Block diagram of the venv virtual environment on Linux.

Here is a list of major directories inside the my_venv
my_venv/bin
my_venv/include
my_venv/lib
my_venv/lib64
here is a directory tree of my_venv virtual environment clearly showing the various directories.

Now i will explain the various directories of the Python virtual Environment created using venv.
The /bin directory contains the activation scripts used to turn ON and OFF the my_venv virtual environment. To use the virtual environment we need to activate it first and after our work is complete we need to deactivate the virtual environment, this is achieved by the activation scripts (activate,activate.csh etc).The different scripts are there for activating under different shell types like cshell,fish shell,poweshell etc.
The /bin directory contains the pip binary ,that we will be using to install our required libraries locally .Inside the /bin directory you can find multiple versions of pip (pip,pip3,pip3.13),They all point to the same pip. The multiple pip names are provided for compatibility and convenience.
The /bin directory contains the python interpreter we will be using to run our scripts. Inside the directory we can find multiple versions of Python (python,python3,python3.13).All these multiple versions points to the same Python which is a Symlink to the system Python interpreter located at /usr/bin/python3.
/include directory contains C header files that are needed when compiling or installing Python packages written in C or C extensions. This directory is not generally used, if you are only installing pure python packages.
/lib directory is where all the packages you install are stored after creating the virtual environment .the packages can be found inside /lib/python3.xx/site-packages .Here you can see the virtual environment has automatically installed the pip library inside it.
/lib64 points to /lib
pyvenv.cfg is a configuration file that you will find inside your my_venv directory which is used to tell the python that it is running inside a virtual environment.The inside of the the pyvenv.cfg is configuration file looks like
home = /usr/bin
include-system-site-packages = false
version = 3.13.7
executable = /usr/bin/python3.13
command = /usr/bin/python3 -m venv /home/rahul/my_venv
- home --> Directory of the base Python installation used to create the venv
- include-system-site-packages -->Controls whether system packages are visible to the venv,in our case it is set to false
- version --> Exact Version of Python that created the venv
- executable --> Path to the specific Python binary used
- command --> The exact command that created the venv (for reference)
Activating the venv Python Virtual Environment on Linux
Before using the virtual environment for developing your Python Software, you need to activate the environment using the shell scripts inside the /bin directory.
You can do that by issuing the command
source bin/activateWhere source is a is a built-in shell command used to read and execute commands from a file (here activate shell script) in the current shell environment.
Please note that source command does not start a new subshell. This means all variables, functions, and environment changes made by the file remain in the current shell.

Once the activate script is run successfully, the prompt of your shell will change to indicate that the virtual environment is active. The name of your venv virtual environment (my_venv) is appended to the shell prompt as shown in the above image.
You can also do the same thing using the dot bin/activate as shown below. Please note that there is a space between dot and bin/activate
. bin/activate # dot space bin/activate 
dot tells the bash shell to execute in current shell.
Difference between . and ./
Here . is a short hand for the bash command source and asks the shell to execute a text file (script file) in the current shell. All the changes done by the executed script will persist in the current shell.
$. bash_script_file        #both are similar
$source bash_script_file
You cannot use . dot to execute binary files.
$. binary_executable_file # will not work will result in error
./ means execute a file in the current directory. This will create a new sub shell to execute the program. The changes made to the subshell will be lost when the program returns.
$./binary_executable_file #execute binary file in new  sub shell
$./bash_script_file       #execute script file in new  sub shell
How the activate script works in venv
When you type source bin/activate in the command prompt it will run the script in the current shell so the script can modify the environment variables like $PATH and $VIRTUAL_ENV which helps to point the python interpreter into your virtual environment.
Here $PATH contains a list of directory paths that will be searched by the shell when you execute a program. The Shell searches the path in the order in which it is listed.
when the activate script is run ,it adds the path of the python interpreter in your virtual environment in the beginning of $PATH variable. So when you run the python command ,shell find the python interpreter in your virtual environment first.
Before activating the virtual environment , we can see that we are using the system Python (/usr/bin/python3) and the $PATH environment variable does not contain the path to our virtual environment

After activating we can see that

path to the python interpreter inside the venv directory (/home/rahul/my_venv/bin) is added as the first entry in the $PATH variable.
We can also see that Python binary is set to that inside the my_venv directory (which python3)
It also sets the $VIRTUAL_ENV variable to point the my_venv directory.

The script also loads the deactivate function into the memory of the shell. So we can deactivate the virtual environment and get back the original shell parameters.
How to get out of Python venv virtual environment
You can use the deactivate function to get out of your Python virtual environment
$ deactivate

No need to add . (dot) because deactivate is a function loaded into shell's memory by the activate script which we run earlier.
Adding Source Codes and Installing libraries to venv
The previous paragraphs explored the venv environment ,its features and how to set it up.
Now we are going to create a simple python project with source codes inside the venv environment.
First we create a directory called my_python_project to store our project and the venv environment.
Change directory and inside my_python_project directory create another one called src to store our Python source codes. Our Python Source codes will remain inside this directory.
Now create the venv environment by issuing the command.
mkdir my_python_project # create a project directory
cd my_python_project
mkdir src               # create a directory for python source codes
python3 -m venv venv    # create a virtual environment
Here is the screen shot of the commands running on a bash shell on Linux (Ubuntu).

In the end we will have two directories src and venv inside the my_python_project directory as shown in the above screenshot.
You can put your source codes inside src and start your Python development.
You can use a text editor like nano,vi,vim etc to create the python file inside the src directory.
nano hello_venv.py # here we are using nanoAfter this our directory structure would look like this.

Now you can activate the venv environment by typing
source venv/bin/activate and then run the code by typing.
python3 src/hello_venv.pyhere is the screenshot of the whole process.

Adding packages to your venv environment
Now we will add a couple of packages to our venv environment and run the code.
Before installing the packages, we need to activate our virtual environment, so that the packages will be installed locally into our venv/lib/python3.x.x/site-packages directory.
Here we will be installing the ttkbootstrap GUI library. If you are new to the ttkbootstrap library,Do check our ttkbootstrap tutorial for the absolute beginner here
After activating ,you can install the library using pip inside the venv environment as shown below.
python -m pip install ttkbootstrap #python or python3
After this you can find the package inside the site-packages directory as shown below.


Listing all the installed packages in our venv environment
Now we have installed all the packages inside our venv environment, we can save the required packages to a text file so others can reproduce our environment in their system.
For listing all the installed packages in our venv environment we will use the pip freeze command. Make sure that venv environment is active
pip freeze 
pillow libary is required by ttkbootstrap and is automatically installed.
You can then create a requirements file that will contain the list all the required packages to be installed by pip.
pip freeze > requirements.txtPlease note that the name requirements.txt is just convention and is not mandatory, you can give the text file any name you want. But i would recommend you stick with convention.
You can reinstall all the packages by using
pip install -r requirements.txtHere is an example for recreating our venv development environment and all the needed packages using using requirements.txt file


Creating a Python Virtual Environment (venv) on Windows
In this section, We will learn how to setup and configure a python virtual environment (venv) on a Windows system (Windows 10 or Windows 11) using venv tool.
In the previous section we learned to configure the venv environment on the Linux system, One major difference between the Linux and Windows is that Windows OS do not come with a built in Python installation
We will have to download and install the Python interpreter from the internet first before creating the venv virtual environment. You can download the python interpreter from the official website.

The Python is installed at the below location using Python Install Manager
C:\Users\user-name\AppData\Local\Python\pythoncore-3.14-64\python.exe
C:\Users\user-name\AppData\Local\Python\pythoncore-3.14-64\Lib
The Python is installed at the above location as a per user basis.
Creating the venv on windows 11
Now we will create a Python venv virtual environment on our Windows PC (Windows 11) for developing code.
First we make a Folder named Windows-Venv-Project for storing our Python source files and Virtual environment. We create a src folder to store our Python files inside it.
mkdir Windows-Venv-Project
cd    Windows-Venv-Project
mkdir src
Inside the Windows-Venv-Project Folder you can type
python -m venv venvThis will create the virtual environment folder inside our Windows-Venv-Project directory and will contain all the python executables needed for running and activating the venv.
You can see the folder structure below. The directory tree is edited to show only relevant parts of the folders.

Sometimes you may get an error called execution of scripts is disabled on this system ,you may need to change your execution policy for your script.
Structure of Python Virtual Environment (venv) on Windows
The directory structure of the Python Virtual Environment venv on Windows Operating System (Windows 10 and Windows 11) differs from that on Linux (you can check it above).
Here is a simplified directory structure of the venv environment on Windows 11.As you can see that Windows venv environment has fewer directories compared to the Linux venv environment.

The Scripts directory contains activation scripts for different command-line shells, such as PowerShell and Command Prompt (.bat file).
It also includes a copy of the Python interpreter, which is used to run Python code, and the pip installer, which allows you to install packages locally within the virtual environment (venv) folder.

In the Linux version ,Scripts directory is called bin directory and instead of the copy of the Python interpreter we have a symlink (symbolic link) to the system Python interpreter.
lib directory is where all the packages you want to use are installed, This makes sure that the main system python libraries are untouched. By default ,venv pip package manager installs the packages inside the Lib\site-packages directory.
Activating and Deactivating the Windows venv Environment
You can activate the windows venv environment by typing
.\venv\Scripts\activate
How to Solve the Power shell Activate.ps1 cannot be loaded error
Once the script is activated ,it changes the name of the prompt to reflect that we are now inside the virtual environment. Name of the virtual environment ,in our case (venv) is added to the beginning of the prompt.
Some times you may get an error like " Activate.ps1 cannot be loaded because running scripts is disabled on this system". The full error message is shown below
.\venv\Scripts\activate : File F:\Windows-Venv-Project\venv\Scripts\Activate.ps1 cannot be loaded because running scripts is disabled on this system. For
more information, see about_Execution_Policies at https:/go.microsoft.com/fwlink/?LinkID=135170.
At line:1 char:1
+ .\venv\Scripts\activate
+ ~~~~~~~~~~~~~~~~~~~~~~~
   + CategoryInfo          : SecurityError: (:) [], PSSecurityException
   + FullyQualifiedErrorId : UnauthorizedAccess
This is due to security feature of your PowerShell called Execution Policy which controls how scripts are run inside the PowerShell environment.
By default the Execution Policy is set to Block running of all scripts on your System .You can check the execution policy on your system by running the below command.
Get-ExecutionPolicyOn running the command you can see that it is restricted

You can change the Execution Policy by issuing the following command.
Set-ExecutionPolicy -Scope Process -ExecutionPolicy RemoteSigned # will work only for the current sessionhere -Scope Process means that the policy will only take effect for the current session.
-ExecutionPolicy RemoteSigned which means that locally created scripts can run but scripts downloaded from the internet need to be digitally signed

How Activate Script Works on Windows
When you type the .\venv\Scripts\activate
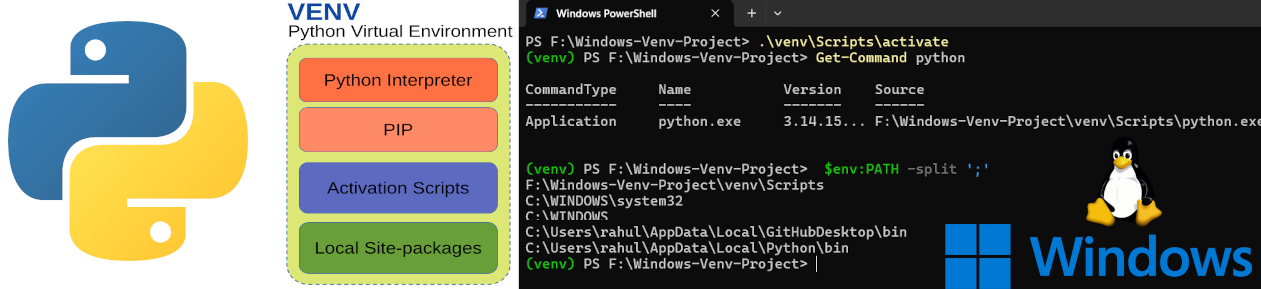
PowerShell executes the script activate.ps1 (for PowerShell) or activate.bat (for Command Prompt) that lives inside your virtual environment.
This will add the location of your local python interpreter as the first entry inside the PATH environment variable. So when you type python or pip the local copies are used instead of the system Python or PIP.
here we will show the PATH and the location of the Python interpreter before activating the the venv.

After Activation of the venv.

You can see that the path to our local python interpreter inside venv is appended as the first entry inside the PATH and we can see that we are using the venv python instead of the system Python here.
How to deactivate the Python venv environment on Windows
You can deactivate the python virtual environment on Windows 11 by typing deactivate.
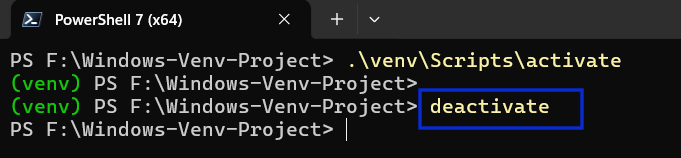
Please note that the prompt changes back.
Adding Packages and Running the code
We will put our code inside the src folder inside the Windows-Venv-Project directory.
We will install pyserial package for opening and closing the serial port inside our virtual environment . Unlike Linux, pyserial is not installed by default on Windows.
Make sure that you have to activate the environment before running the pip install command as shown below.

The pyserial packages are installed locally inside your venv environment as shown below.
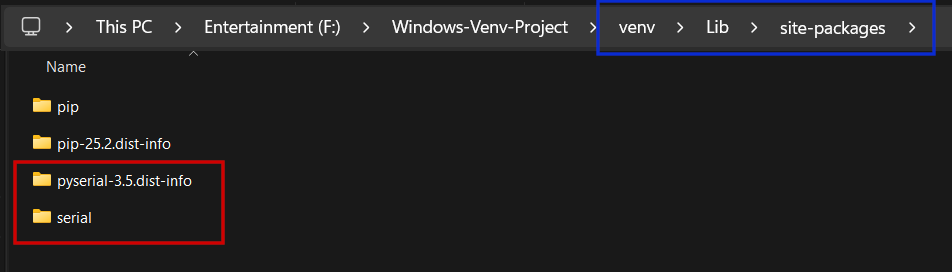
if you deactivate the virtual environment ,you will not be able to access the pyserial library.

Now we will create a simple python script named my_python_program.py inside the src folder
# my_python_program.py
# src\my_python_program.py
#-------------------------------#
import serial
s = serial.Serial()
print(s)
After activating the python environment. you can run the code using the below command
python src\my_python_program.py

- Log in to post comments