

This tutorial teaches you to program your Windows PC's Serial Port (aka COM Port) to communicate with an external peripheral like data acquisition boards, USB GPIO Boards, Relay boards, embedded computers like Arduino ,Raspberry Pi Pico etc using C/C++ language and Win32 API.
The tutorial is aimed at Software/Embedded developers who may want to interface real world sensors like DAQ's, USB Relays, USB GPIO boards ,Temperature sensors, Humidity sensors etc to Windows PC using the Serial Port (Virtual COM port or Real Hardware DB9 Port).
The software is written using C language and communicates with the Serial Port using Win32 API on both 32bit (IA-32) systems as well as modern 64 bit (x86_64) systems.

Once we become familiar with programming the Serial Port on Windows OS ,We will build a small serial communication program that will send and receive data to an Arduino board attached to your PC's serial Port (Virtual COM Port over USB) using Win32 API and C language .This Win32 C language Example application can then be further extended by the user to suit his own needs.
What about 64 bit Windows API (Win64 API) ?
Win32 API was originally designed for 32-bit Windows systems. However, it has been extended and maintained for 64-bit versions of Windows (Windows 7,Windows 8.1 ,Windows 10 ,Windows 11) as well.
There isn’t a separate "64-bit Win32 API" , instead, the same API is used with 64-bit data types and calling conventions where necessary.
All codes have been tested on a 64 bit Windows 10 and Windows 11 Systems.
All the codes in this tutorial are licensed under MIT License making it eligible to be used for developing proprietary software applications and open source applications giving maximum flexibility.
Join Our Youtube Channel for more Info
If you want to know how to control the RTS and DTR pins of the serial port .
Contents
- Source Codes
- Compilers and IDE's used
- Visual Studio Community
- GCC/MingW Compilers
- How Serial Ports Work on Windows OS
- Finding out your COM port Number
- Creating a Win32 Visual Studio C/C++ Project
- Windows 10 user Accounts
- Opening and Closing a Serial Port using Win32 API
- Setting the Serial Port Parameters using DCB Struct
- Setting Baud Rate, Parity, Stop bits ,Data format
- Setting Baud Rate
- Setting Data Bits Size
- Setting Parity
- Setting Number of Stop Bits
- Setting Baud Rate, Parity, Stop bits ,Data format
- Connecting Windows PC to Arduino Hardware For Serial Communication
- Connecting a Bare Microcontroller to Windows PC for Serial Communication
- How to Clear Serial Port Buffers (TX/RX) using Win32 API
- Reading from Windows Serial Port using C/C++
- Setting Timeouts
- Arduino Transmit Code
- Reading from Serial Port using Polling
- Event Driven Serial Port Read using WaitCommEvent()
- What is a SetCommMask()
- What is a WaitCommEvent()
- Writing Data to Windows Serial Port using C/C++
- Win32 Bi-Directional Serial Port Communication using C/C++
- Controlling the RTS and DTR pins of Serial Port using Win32
Source Codes

Please note that the source codes on this website tutorial show only the relevant sections to highlight the process of programming the serial port.
Please use the full example source codes along with Visual Studio Solution (.sln) from our Repo.
You can find the full C/C++ Source codes for programming the COM Port of a Windows System along with Arduino Microcontroller Codes in our GitHub Repo using below links.
Download Windows Serial Port Programming using C/C++ Codes as Zip file
Browse our Windows Serial Port Programming in C/C++ tutorial Github Repo.
Compilers and IDE's used
Since we are developing Serial Code tied to the Windows System API ,it is Recommended to use Visual Studio (Professional or Community Edition) IDE for compiling and running the Code.
Visual Studio Community Edition is free and can be downloaded from Microsoft's Website.

Before we start make sure that C/C++ development tools are installed on your Visual Studio IDE by running the Visual Studio Installer Program from Tools -> Get Tools and Features from the menu bar.

This will bring up another window ,and from there Select (Checkbox) "Desktop Development with C++" and Press Install as shown in the below figure.

Using GCC/MinGW Compilers

You can also compile the code using GCC or MinGW after a few tweaks.
The Code uses some Microsoft specific safe C functions like
strcat_s() and
scanf_s()
which are used to get the COM number from the user and create the COM port address string (Eg "\\.\COM9" ).
The code will compile on GCC after removing those functions.
Make sure that variables referenced by those functions are also changed.
Serial Ports on Windows OS
A little bit of History first,
Serial ports are simple 9 pin legacy ports used by the PC to communicate with external peripherals like Printers ,Data Acquisition Systems, Embedded computers like Arduino etc. You can usually find them on old PC's as shown below.

The simple protocol and the 3 pin hardware physical lines (RX,TX,GND) made it quite popular among manufacturers who wanted an easy way to connect their devices with a computer.
Most of the computer motherboards and laptops in the consumer market no longer have have old style DB9 hardware serial ports, they are all superseded by the USB Ports.
The DB9 Serial ports are still going strong in the Industrial space, most of the industrial PC's have multiple DB9 Hardware ports for talking with industrial machinery. You can see multiple DB9 serial ports on the Industrial PC running modern 64bit Windows 11 OS below for talking with other machinery.

Knowledge of the Pin configurations of DB9 Ports are still relevant if you are developing serial communication software in the Industrial Sector.

The arrival of cheap USB to UART chips like FTD FT232RL,TUSB3410,CP2102,CH340 have made it quite easy to upgrade the existing software that used to talk over serial to USB protocol. These chips provide a virtual serial port that behaves like a real one but transmits the data through USB.
If your PC does not have any hardware serial ports (RS232 DB9 ports), you can use USB to Serial Converter's like USB2SERIAL.(non Isolated).shown below

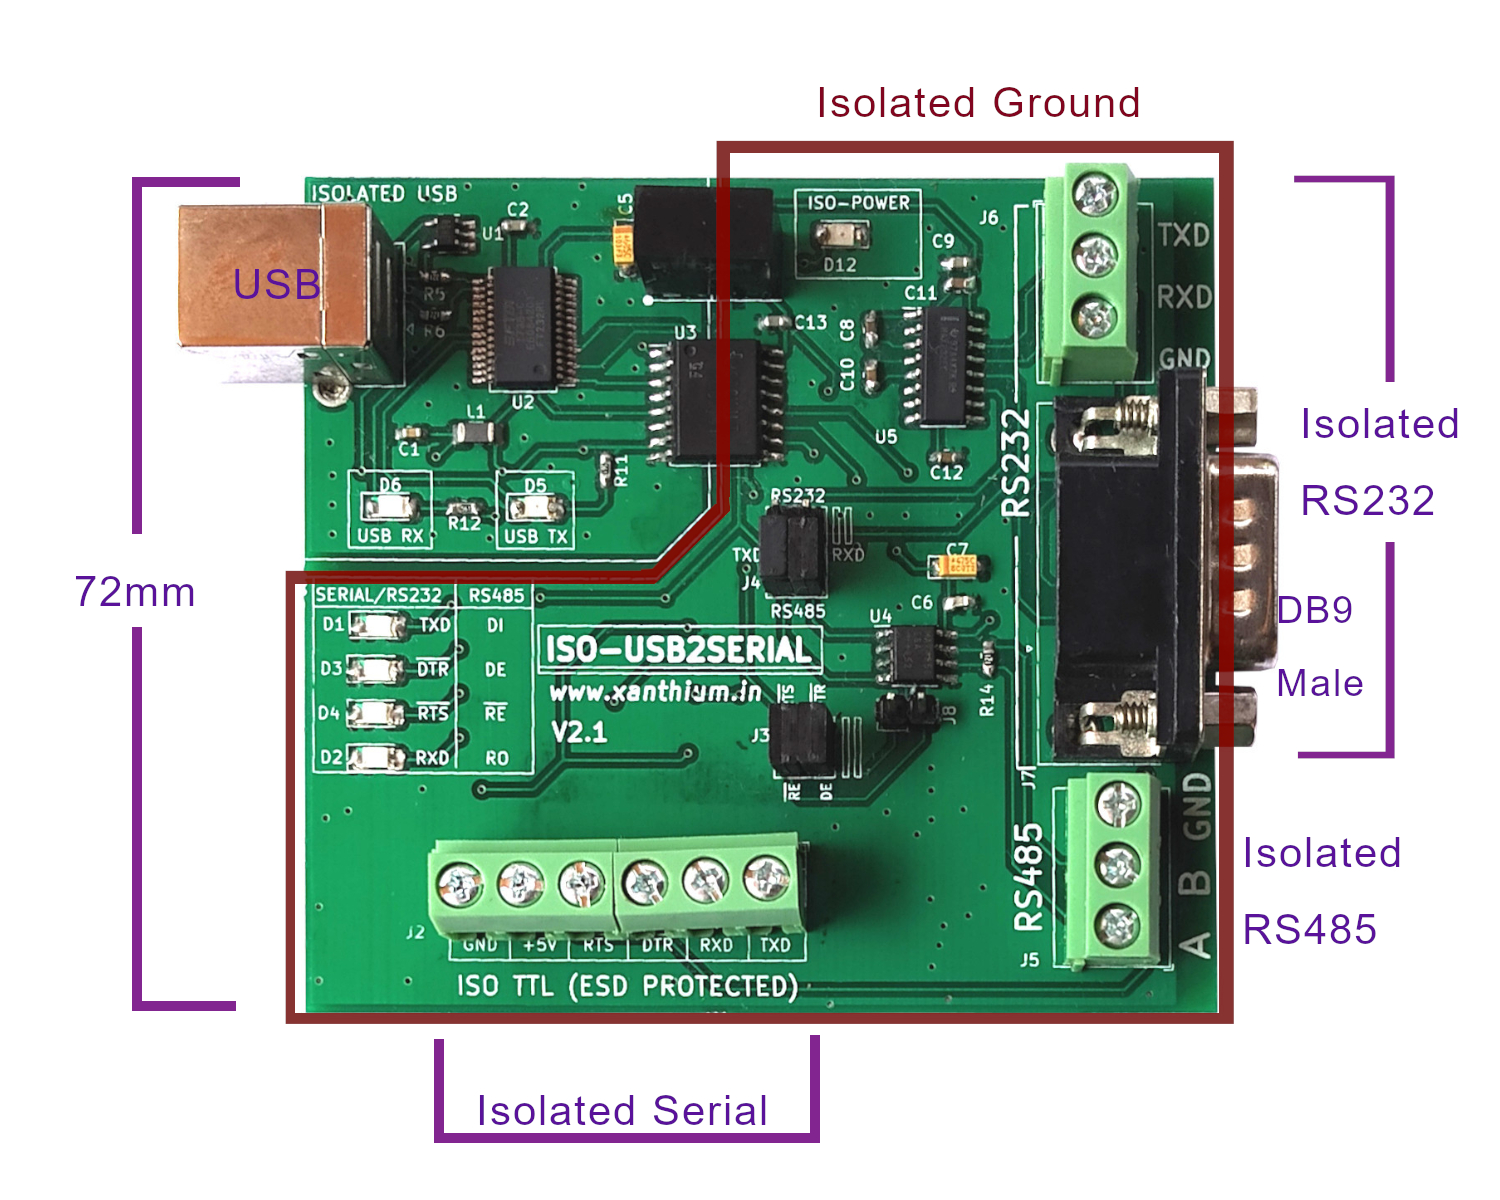
If you are operating in Industrial settings and want to communicate with machinery you can use our fully isolated USB to Serial/RS232/Rs485 Converter that have built in voltage suppression to protect your PC with random voltage spikes caused by electrical machinery
Finding your COM port Number on Windows
In Windows ,
Serial ports are named as COM1,COM2 ,COM3.. etc .COM1 and COM2 usually refer to the hardware serial ports present in the PC (quite rare now)
while COM numbers in double digits like COM32, COM54, COM24.. etc are given to USB to Serial Converters or PCI serial port extenders.
To find out the COM number corresponding to your serial port,
Type Device Manager on your OS's search bar (Windows 10, Windows 11)

Or You can Right Click on the Start Menu Icon on Windows 11 and select Device Manager as shown below.

Now you can find the Port Number of your Windows Serial Port under Ports( COM & LPT ) section in the Device Manager

So here I have connected an Arduino UNO to the Serial Port and the Windows OS has detected it as COM3.
Creating a Visual Studio C/C++ Project
Here we will be coding in C .
Since there is no C Project in Visual Studio ,Select the C++ Projects.

From the drop down, Select C++ ,Windows and All project types and then select an Empty Project template.

Save the Project on the disk.
Now to add a C Source File to your Project. Right Click on the Source Folder on your Solution Explorer, Select Add -> New Item

and Create a .C file as shown in the below image.

and finally you can add the code as shown below and compile by press F5

Windows10 Accounts
The codes/executables are able to open the connection to the serial port under both Administrator Account and Standard User Account in Windows 10.
Opening and Closing a Serial Port
To open a connection or handle to the Serial Port in Windows ,we use the CreateFileA() function provided by the Windows.h header file.
Here CreateFileA() function is used to open or create files, devices, or communication resources like serial ports.
The A at the end of CreateFileA() function stands for ANSI, meaning it uses ANSI (8-bit) strings, as opposed to CreateFileW() for Unicode
On success CreateFileA() will return a handle which is then used to refer the connection in all subsequent operations.
After opening a serial port using the CreateFileA() function you should close it with CloseHandle() function, otherwise port will become unavailable to other programs.
Now let's write a small program to open and close a serial port on Windows. You can type it into the Visual Studio IDE and Compile by pressing F5.
// Serial_Open.c
// Sample code to open a connection to serialport using Win32 API
// Change Port number to suit your System
#include <Windows.h>
#include <stdio.h>
int main()
{
   HANDLE hComm;
   hComm = CreateFileA("\\\\.\\COM3",                 //port name
                        GENERIC_READ | GENERIC_WRITE, //Read/Write
                        0,                            // No Sharing
                        NULL,                         // No Security
                        OPEN_EXISTING,                // Open existing port only
                        0,                            // Non Overlapped I/O
                        NULL);                        // Null for Comm Devices
   if (hComm == INVALID_HANDLE_VALUE)
       printf("Error in opening serial port\n\n");
   else
       printf("Opening serial port successful\n\n");
   CloseHandle(hComm);//Closing the Serial Port
   return 0;
}
For Serial Port numbers higher than COM9 you must use the special format "\\\\.\\COM10" (escaping \ in C).
The above Code will work without that since the COM port number is less than 10, Here COM3.
// Will Compile without errors ,since COM3 s less than 10
hComm = CreateFileA("COM3",                       // no need to add \\ since port number COM3 < 9
                    GENERIC_READ | GENERIC_WRITE, //Read/Write
                    //
                    );
After Compiling the code and running you will get the following output.

In this case we successfully opened the serial port.
In case if there was any errors, we need away to display the correct error messages to the terminal for easy debugging.
Error in Opening Serial Port using CreateFile() API
Please note that if you use CreateFile() function (without the A at the end) to open the Serial Port you may get an error.
In the Windows API, CreateFile() is a macro that maps to either:
CreateFileA() → ANSI version (note the A at the end)
CreateFileW() → Unicode version (note the W at the end)
Which one it maps to depends on whether you're compiling your program with Unicode enabled (UNICODE defined).
When you explicitly call CreateFileA(), you're telling the compiler that you want to use the ANSI version and not the UNICODE one.
or
you can just add an L in front of the COM Port address.
HANDLE hComm = CreateFile(L"\\\\.\\COM3", GENERIC_READ | GENERIC_WRITE, 0, NULL, OPEN_EXISTING, 0, NULL);
if you want to use the UNICODE version CreateFileW() use the below code to open the Port
HANDLE hComm = CreateFileW(L"\\\\.\\COM3", GENERIC_READ | GENERIC_WRITE, 0, NULL, OPEN_EXISTING, 0, NULL);
//Notice the L before "COM3" — it makes it a wide string (UTF -16,2 bytes per character_
Error Handling in Win32 Serial Port API
When things go wrong while developing serial port software using Win32, we need a way to determine what went wrong with our API call. When ever a Win 32 API call fails an internal error code is set explaining the reason for the failure.
The error codes are numbers ranging from 0-15999 which indicates the reason for the failure. You can find the complete error list on Microsoft's Website
.
Here is an example of the Win32 Error code's
Error Codes | Macro Name | What it mean's |
1 (0x1) | ERROR_INVALID_FUNCTION | Incorrect function. |
2 (0x2) | ERROR_FILE_NOT_FOUND | The system cannot find the file specified. |
Here we will use the following two functions to detect the generated error codes and convert them to human readable strings.
GetLastError() -> returns the error code for the last system error that occurred in the current thread
FormatMessage() -> Converts error codes to readable messages
We call the GetLastError() function after an error has occurred ,it returns the numerical error code of the last error that occurred. We then pass the code into FormatMessage() function to get a human readable error string.
Here is the partial code to do it. Full code available on Github repo.
//Partial code.
//Serial_Open_Error_Handling.c
//hComm = CreateFileA( your comport name here);
DWORD  win32_error_code;   // variable to store error
CHAR   error_message[256]; // Character array to store error messages
if (hComm == INVALID_HANDLE_VALUE) //if error happens
{
   printf("Error");

   //Error handling code
   win32_error_code = GetLastError(); //returns the error code for the last system error

   //turn error code into messages
   FormatMessageA( FORMAT_MESSAGE_FROM_SYSTEM | FORMAT_MESSAGE_IGNORE_INSERTS,
                   NULL,
                   win32_error_code,     // error codeto be converted ,integer value like 2
                   0,                    // Language ID (0 = system default)
                   error_message,        // buffer where the error message will be stored
                   sizeof(error_message),
                   NULL
                );
   printf("\nERROR : %s",error_message);
}
Here are couple of error messages returned by the Win32 API when opening the serial port goes Wrong.

You will get the above message if serial port does not exist or your Arduino disconnected.

Here we are getting an Access denied error because a different program (PuTTY) is using the serial port.
Configuring Serial Port Parameters using DCB structure
When Programming Windows Serial Port using C and Win32 API ,Serial Port settings like Baud Rate ,Number of Stop bits, Number of data bits (7/8) ,Parity etc are controlled by the DCB (Device Control Block) structure.
It is just an internal C structure used by the Windows OS to configure serial communication parameters ,here is a simplified reproduction of the DCB struct with limited members for reference.
// simplified DCB structure , Win32 SerialPort Config
// only some members shown
typedef struct _DCB
{
DWORD DCBlength;     // Size of the structure
DWORD BaudRate;      // Baud rate (e.g., 9600, 115200)
;
;//other members not shown
;
BYTE  ByteSize;      // Number of bits/byte (usually 8)
BYTE  Parity;        // Parity (0=none, 1=odd, 2=even, etc.)
BYTE  StopBits;      // 0=1 stop bit, 1=1.5 stop bits, 2=2 stop bits
char  XonChar;       // XON character
char  XoffChar;      // XOFF character
;
WORD  wReserved1;    // Reserved
} DCB;
To Configure the DCB structure we use two functions,
GetCommState() function which retrieves the current control settings of the serial port and
SetCommState() function which configures the serial port with the new values in DCB structure provided by us.
So the basic steps involved in configuring the DCB struct to set Baud rate ,Parity, Stop bits etc boils down to the below steps.
- Zero out the DCB structure
- Set the DCBlength member with correct size of your DCB struct
- Get the current DCB settings using GetCommState()
- Modify the Required DCB settings like Parity,Baudrate etc here.
- Apply the changed settings using SetCommState()
Here is the sample code for it
  //Configuring the DCB structure for Serial Comm
  DCB DCB_Struct_Parameter = {0}; //Zero out all the DCB struct members before calling GetCommState()

  DCB_Struct_Parameter.DCBlength = sizeof(DCB_Struct_Parameter); // Get the size of the DCB structure using sizeof()
                                                                 // update .DCBlength member with that size
                                                                 // required by GetCommState()
  BOOL status = GetCommState(hComm, &DCB_Struct_Parameter); // Get the current settings for the port hComm
                                                                 // and fill it in the DCB_Struct_Parameter struct
  if (status == FALSE)
      printf("\nError in GetCommState()");
  else
      printf("\nGetCommState() Success");
  //Fill in the DCB with required settings
  //Add Baud rate etc here
status = SetCommState(hComm, &DCB_Struct_Parameter);
  if (status == FALSE)
      printf("\nError in SetCommState()");
  else
      printf("\nSetCommState() Success");
At first we need to Zero out the entire DCB structure to put the structure in a known state, all members are now Zero.
Now we have to set the .DCBlength member of the DCB structure with the total size of the DCB structure. This is required by the GetCommState() function ,otherwise the function will fail.
Now call
status = GetCommState(hComm, &DCB_Struct_Parameter) //hcomm serial port handle and ptr to DCB structureAfter this,
You can set the required Baud rate, Number of stop bits ,Parity etc
then call the
status = SetCommState(hComm, &DCB_Struct_Parameter);To update the new values to the DCB structure.
Setting Baud Rate, Parity, Stop bits ,Data format using DCB
Now we have a basic idea about what a DCB struct is and how to configure and update the DCB struct using C .
We will move onto the real parameters that need to be configured for our Windows PC to communicate with an external device like Arduino or Raspberry Pi Pico board using C/C++ language.
Here we will use the common standard of 8N1 to talk with the Arduino. It means
- Number of data bits = 8,
- Parity = None
- and Stop Bits = 1
Setting Baud Rate
Now lets set the baud rate of serialport using the following line
DCB_Struct_Parameter.BaudRate = 9600; // set baudrate = 9600here you can use all the standard baud rate like 1200, 2400 , 4800, 9600,19200,38400 etc.
Data bits Size
You can set the number of data bits that are send ,most common are 8 bits making 1 byte .Some older terminals may use 7 bits instead of 8 In our case we will set byte size as 8.
DCB_Struct_Parameter.ByteSize = 8; // data word length = 8 bits per byte.Common values are 5, 6, 7, or 8Setting Parity
We are going to set parity for our port = None or No Parity by using the below line.
DCB_Struct_Parameter.Parity = NOPARITY; // NOPARITY, ODDPARITY, EVENPARITY, MARKPARITY, or SPACEPARITYYou can also use other parity schemes like
- NOPARITY,
- ODDPARITY,
- EVENPARITY,
- MARKPARITY,
- or SPACEPARITY
for your Code if you want.
Number of Stop bits
Stop bits are used in serial communication to indicate the end of a data packet (byte or character). After each byte is sent, stop bits give the receiving system a brief time to process the byte and prepare for the next one.
We can set the number of stop bits as 1,1.5 or 2
DCB_Struct_Parameter.StopBits = ONESTOPBIT; // ONESTOPBIT, ONE5STOPBITS, or TWOSTOPBITSYou can use the following Constants to set the desired number of stop bits.
1 stop bit -> ONESTOPBIT
1.5 Stop bits -> ONE5STOPBITS
2 stop bits -> TWOSTOPBITS
Once everything is set We should update the changed DCB values using SetCommState() function as shown below.
BOOL status = GetCommState(hComm, &DCB_Struct_Parameter); // Get the current settings for the port hComm
                                                              // and fill it in the DCB_Struct_Parameter struct
// Fill in the DCB with required settings
// Set Parameters in 8N1 format,8 data bits ,No Parity, 1 stop bit
DCB_Struct_Parameter.BaudRate = 9600;       // other rates 4800,19200,38400etc
DCB_Struct_Parameter.ByteSize = 8;          // data word length = 8 bits per byte.Common values are 5, 6, 7, or 8
DCB_Struct_Parameter.Parity   = NOPARITY;   // NOPARITY, ODDPARITY, EVENPARITY, MARKPARITY, or SPACEPARITY
DCB_Struct_Parameter.StopBits = ONESTOPBIT; // ONESTOPBIT, ONE5STOPBITS, or TWOSTOPBITS
status = SetCommState(hComm, &DCB_Struct_Parameter); //update the changed parameters to dcb
Windows to Arduino Hardware Connections
Now that we are going to send some data from a Windows PC to Arduino Board serially to validate our C/C++ Win32 Serial Port Programming Code .
We will delve into the basics of connecting an embedded computer like Arduino, Raspberry Pi Pico etc to the Windows PC.

When connecting an Arduino to a Windows 10 or Windows 11 PC, there's no need for an external USB-to-Serial converter. Many Arduino boards, such as those with the ATmega32u4 chip, have built-in USB communication capabilities that handle the conversion internally.
Simply connect the Arduino to your computer using a USB cable and identify the corresponding COM port number.
Make sure the appropriate device drivers are installed. if you have the Arduino IDE installed, most necessary drivers are already installed.
Connecting a Bare Microcontroller to Windows PC
As an embedded developer, you may be required to interface a bare microcontroller like ATmega328P ,MSP430 etc to a Windows PC or Laptop to communicate with it.
For example the microcontroller may want to send some data it has gathered to the PC for further analysis. In this case you may have to connect the TX,RX and Ground pins of Microcontroller UART (for eg ATmega328P ) to a Windows PC. So you may have to use a USB to Serial Converter to convert the UART signals to USB Protocol and use the Program to read the data as shown in the below figure

The PC connects to the microcontroller board(MSP430,ATmega328P or Raspberry Pi Pico) using a null modem cable, which enables direct serial communication. In this setup, the PC's RX (receive) pin is linked to the microcontroller's TX (transmit) pin, and the TX pin of the PC is connected to the RX pin of the microcontroller. Additionally, the ground (GND) lines of both the PC and the microcontroller are connected to establish a common electrical reference.
Since my Windows PC doesn't have a built-in DB9 (9-pin) serial port, I'm using an FTDI-based USB-to-Serial converter called USB2SERIAL. This device converts USB signals into TTL-level serial signals and vice versa, providing RXD and TXD lines that are compatible with the microcontroller's serial interface. Additionally, it supports selectable voltage levels, allowing it to interface safely with both 3V and 5V logic systems.
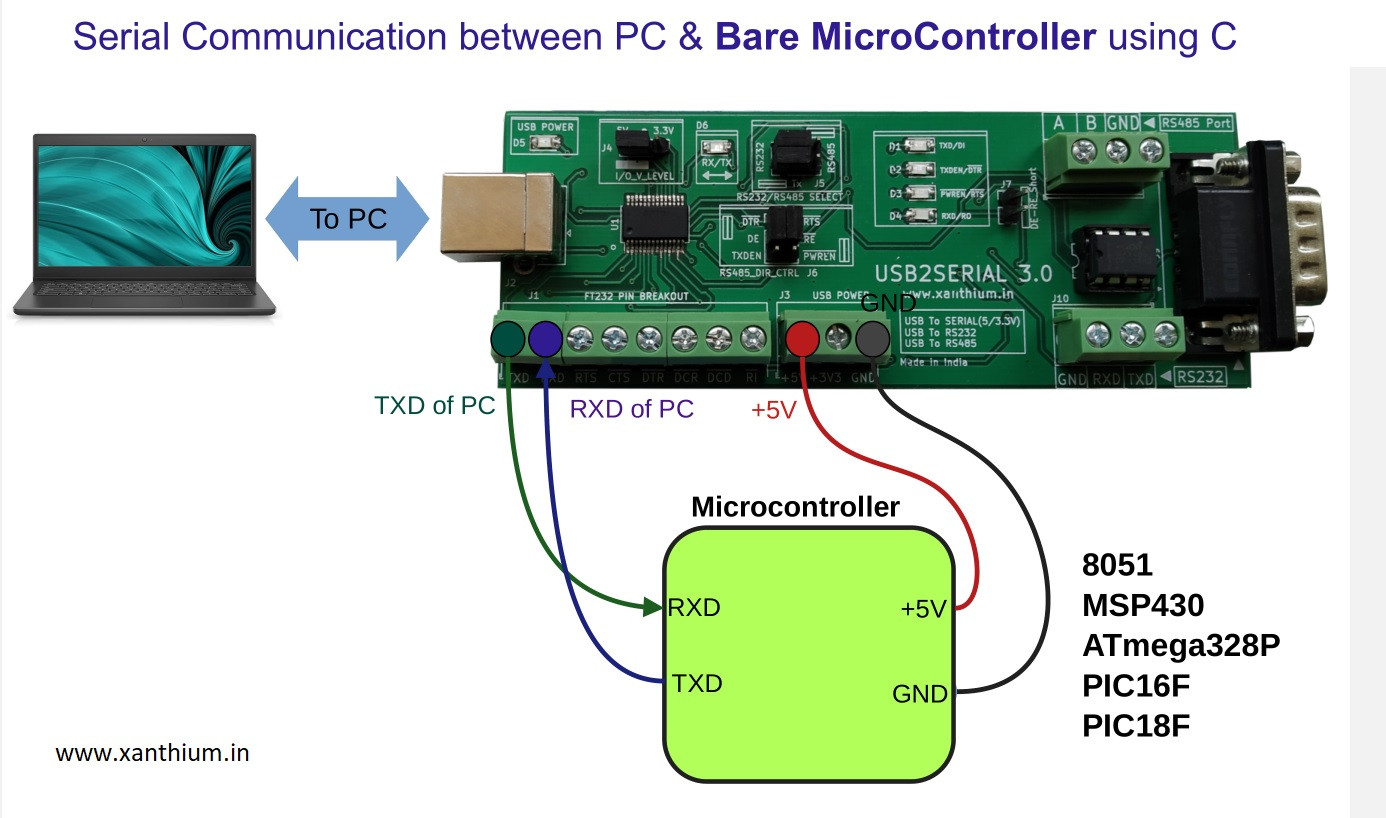
The USB2SERIAL converter includes a selectable voltage output feature, allowing you to choose between 3V and 5V TTL levels. This is especially useful when working with 3.3V logic microcontrollers like the MSP430 or LPC2129. To ensure safe operation, set the voltage level on the USB2SERIAL board to 3V when interfacing with the MSP430 or any other 3.3V device.
Note
If you're using your PC’s DB9 RS232 serial port instead of USB2SERIAL, you cannot connect it directly to a microcontroller. RS232 signal levels are significantly higher than TTL and can damage the microcontroller. In such cases, an RS232-to-TTL level shifter(like the one shown above) must be used to safely convert the voltage levels before connecting to the microcontroller's UART pins.
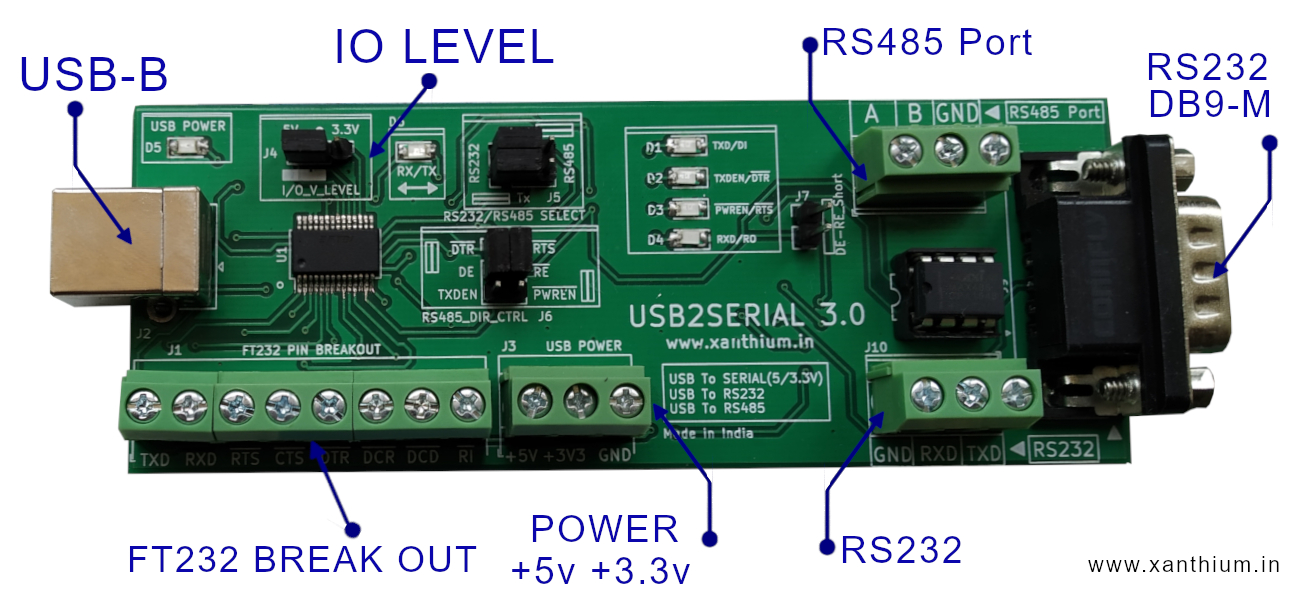
The USB2SERIAL V3.0 is a compact, FT232-based converter that supports USB to RS485, RS232, and TTL Serial (3.3V/5V) communication. It also functions as an FT232 development board with screw terminals and serves as both an RS232 and RS485 breakout board making it a versatile solution for all your serial interface needs, you can buy it from here.
Clearing Out Windows Serial Port Buffers
We can use Win32 API to clear out the transmit and receive buffers of the Windows Serial Port in C using the function PurgeComm().
Basic Syntax is
BOOL PurgeComm(
 				HANDLE hFile,  // Handle to the serial port
				DWORD dwFlags  // What to purge,TX,RX buffer or Both
			 );
You can use the following two flags to control which buffer you want to purge.
- PURGE_RXCLEAR Clears the receive buffer (incoming data)
- PURGE_TXCLEAR Clears the transmit buffer (outgoing data)
Example code to use the PurgeComm() function .
PurgeComm(hComm, PURGE_RXCLEAR | PURGE_TXCLEAR); //purge both tx and rx bufferPurgeComm(hComm, PURGE_RXCLEAR); //purge rx buffer only
Reading from Windows Serial Port
In this section we will learn how to read the data from a Windows serial port using Win32 API and C language.
Reading from a Windows Serial Port is achieved by using the ReadFile() function. Please note that It is a general-purpose function that can also be used to read data from Files, Network Sockets and Pipes.
Here is the syntax of the ReadFile() function .
BOOL ReadFile
(
 HANDLE       hFile,               // handle to the opened serial port or file
 LPVOID       lpBuffer,            // Pointer to the buffer that receives the data read from the device.
 DWORD        nNumberOfBytesToRead,// Number of bytes to attempt to read.
 LPDWORD      lpNumberOfBytesRead, // Pointer to a variable that receives the number of bytes read.
 LPOVERLAPPED lpOverlapped         // Pointer to an OVERLAPPED structure (for asynchronous I/O).
 						           // If NULL, the function is blocking.
);
ReadFile() returns a BOOL ,True or False .
Here is an example of the ReadFile() function
//Partial Code
BOOL success;
DWORD bytesRead;
char  receive_data_buffer[128] = {0};
success = ReadFile(
					hComm,                      // File handle of the opened COM port
                    receive_data_buffer,        // Pointer to the buffer that receives the data read from the device.
                    sizeof(receive_data_buffer),// size of the data
                    &bytesRead,                 // Pointer to a variable that receives the number of bytes read
                    NULL);                      // If NULL, the function is blocking.
Setting Time Outs for Reading from Serial Port
When working with serial ports in Windows using the Win32 API, setting proper timeouts is crucial. This controls how long the system will wait when using functions like ReadFile() and WriteFile().
You do this using the
SetCommTimeouts() function
and the COMMTIMEOUTS structure.
COMMTIMEOUTS timeouts = {0}; //Zero out the COMMTIMEOUTS structure
timeouts.ReadIntervalTimeout        = 20; // Max time between bytes (ms)
timeouts.ReadTotalTimeoutMultiplier = 1;  // Per-byte timeout
timeouts.ReadTotalTimeoutConstant   = 50; // Constant timeout (ms)
timeouts.WriteTotalTimeoutMultiplier = 1; // Per-byte timeout
timeouts.WriteTotalTimeoutConstant   = 50;// Constant timeout (ms)
SetCommTimeouts(hComm, &timeouts); //finally set the timeouts
ReadIntervalTimeout Specifies the maximum time interval between arrival of two bytes. If the arrival time exceeds these limits the ReadFile() function returns.
ReadTotalTimeoutConstant is used to calculate the total time-out period for read operations. For each read operation, this value is added to the product of the ReadTotalTimeoutMultiplier member and the requested number of bytes.
ReadTotalTimeoutMultiplier is used to calculate the total time-out period for read operations. For each read operation, this value is multiplied by the requested number of bytes to be read.
WriteTotalTimeoutConstant similar to ReadTotalTimeoutConstant but for write operation.
WriteTotalTimeoutMultiplier similar to ReadTotalTimeoutMultiplier but for write operation.
After this you have to set the values using SetCommTimeouts() function.
When you configure serial port timeouts using SetCommTimeouts(), those timeout values apply only to each individual call to ReadFile(),not across multiple calls or globally across the program.
Think of each ReadFile() call as one isolated operation with its own timeout window, calculated based on the timeout settings and the number of bytes you're trying to read.
Reading Serial Data from COM Port
There are multiple strategies to Read the data that have arrived in the serial port buffer of our Windows computer using the Win32 API, each suited for different use cases like blocking vs non-blocking, background thread processing, GUI apps, etc

In Non-Blocking I/O, the I/O function returns immediately, even if the operation has not yet completed. The actual completion of the operation is handled later, typically using Events or Callbacks.
Here we will use mostly Blocking I/O (Synchronous)to read and write data to the serial port. It means when a program issues a read or write request to the serial port, the function does not return until the operation is complete. The serial port remains inaccessible to other programs and access to port is effectively blocked.
To read the Serial Port you can either use
- a Polling strategy to continuously check for data reception using a loop or
- use a Event Driven Serial Port Reception using WaitCommEvent
Arduino Code to Download
Before we start ,We need a microcontroller board like Arduino connected to your Windows PC's Virtual COM Port, Which will send some data to the PC in the form of a string .
So Download the below code to your Arduino board and set baud rate = 9600.
//code to send a string to Windows 10 PC
void setup()
{
  Serial.begin(9600); // Start serial communication at 9600 baud
  Serial.flush();     // Clear out going TX buffer first
  while (!Serial) { ; } // Wait for serial port to connect (for Leonardo/Micro/Zero)
  Serial.println("Hello from Arduino! to Windows 11 PC "); // Send message to PC once
}
void loop()
{

}
Upload the code to Arduino and if you want you can test it using the Serial Monitor Program on your Arduino IDE.

Reading from Windows Serial Port via Polling Loop
A simple way to read data from a Windows serial port is by using a polling loop.
In this approach, a while loop repeatedly calls the ReadFile() function to check for incoming data in the serial port’s receive buffer. The loop continues until a predefined number of bytes have been successfully read or a timeout occurs, depending on the communication settings.
//pseudo code
while (True) //infinite loop
{
    ReadFile() //read from serial port buffer

    if (bytesRead > 0)
    {
       //Exit from loop
    }
    Sleep(100); // Wait to reduce CPU load
}
here is the actual code to implement it.
// Partial code
// Reading from Serial Port using Polling
// Text string is send by the arduino connected to the port
// SerialPort_Read_Polling_from_Arduino.c
BOOL success;
DWORD bytesRead;
char  receive_data_buffer[128] = { 0 }; // intialize the buffer
BOOL Sentry = TRUE;
while (Sentry)
{
   success = ReadFile(
                       hComm,                      // File handle of the opened COM port
                       receive_data_buffer,        // Pointer to the buffer that receives the data read from the device.
                       sizeof(receive_data_buffer),// size of the data
                       &bytesRead,                 // Pointer to a variable that receives the number of bytes read
                       NULL);                      // If NULL, the function is blocking.
   if (bytesRead > 0)
   {
       printf("\n\nReceived Data        -> %s", receive_data_buffer);
       printf("\nNo of Bytes Received -> %d" ,bytesRead);
       Sentry = FALSE;
   }
   Sleep(100); // Wait to reduce CPU load
}
Make sure that you connect the Arduino to the Serial Port of Windows PC and download the appropriate code from the Repo.
Arduino sends the string " Hello from Arduino! to Windows 11 PC" to the Windows PC through Virtual COM Port connection.
The Win32 C program running on the PC ,constantly checks the read buffer of the serial port in a loop(polling behavior) . When the string is received by the serial port , bytesRead will be greater than zero and the loop exits by making the sentry variable FALSE.
On running this code ,You will get the following output. Full code is available on the GitHub Repo.

Reading from Windows Serial Port by Setting WaitCommEvent
Reading from a Windows serial port using WaitCommEvent() is an efficient event-driven approach, especially when you want your application to react only when something happens on the serial port (like data arriving), rather than continuously polling it.
To create an Event Driven serial port reception Program,you need to do the following steps.
- Open the serial port (CreateFile)
- Set port parameters (DCB)
- Set timeouts (SetCommTimeouts)
- Enable desired events using SetCommMask()
- Wait for an event using WaitCommEvent()
- Read the data using ReadFile()
Most of the things are similar to the previous serial port reading program,the main difference is that we are using two new functions
SetCommMask()
WaitCommEvent()
What is a SetCommMask()
SetCommMask() is used to specify which serial port events (Eg like Character arrived in Serial Buffer), your application wants to be notified about using WaitCommEvent().
Basic syntax is
BOOL SetCommMask
(
  HANDLE hFile,    // handle of the opened serial port
  DWORD  dwEvtMask // bit mask specifying the event which we want to monitor.
);
Here DWORD dwEvtMask is a bit mask specifying the event which we want to monitor. Here are a list bitmasks that corresponds to common events that we want to monitor.
- V_RXCHAR A character was received and placed in input buffer
- EV_TXEMPTY Output buffer is empty
Once we set the event using SetCommMask() ,You can use the WaitCommEvent() to monitor the said event.
What is a WaitCommEvent()
WaitCommEvent() is a Win32 API function that waits for a communication event (e.g., data received, status change) to occur on a serial port.
You can use it to monitor events like incoming data (EV_RXCHAR), and then call ReadFile() to actually read the bytes.
Basic Syntax is
BOOL WaitCommEvent(
                    HANDLE       hFile,      // handle of the opened serial port
                    LPDWORD      EventMask,  // pointer to a variable that receives a mask indicating the type of event that occurred,zero in case of error
                    LPOVERLAPPED lpOverlapped // NULL in our case,
);
Here is the code to receive data from Arduino by using WaitCommEvent()
// Reading from Serial Port using WaitCommEvent()
// Partial Code
//BOOL status;
DWORD bytesRead;
char  receive_data_buffer[128] = { 0 }; // intialize the buffer
status = SetCommMask(hComm, EV_RXCHAR);  // Set mask to listen for data received (EV_RXCHAR)
//Wait for the event to happen
DWORD EventMask;
status = WaitCommEvent(hComm, &EventMask, NULL);
if (status == TRUE)
    printf("\nAn Event Happened");

    if (EventMask & EV_RXCHAR)  //Check received bitmask with EV_RXCHAR
     {
         ReadFile(  hComm,                      // File handle of the opened COM port
                    receive_data_buffer,        // Pointer to the buffer that receives the data read from the device.
                    sizeof(receive_data_buffer),// size of the data
                    &bytesRead,                 // Pointer to a variable that receives the number of bytes read
                    NULL);                      // If NULL, the function is blocking.

         if (bytesRead > 0)
        {
            printf("\n\nReceived Data        -> %s", receive_data_buffer);
            printf("\nNo of Bytes Received -> %d", bytesRead);

        }
     }

else
    printf("\nWaitCommEvent() Failure");
First we decide which event will trigger the WaitCommEvent() function.
Since we are receiving data we use the EV_RXCHAR bitmask to register our event with the SetCommMask() function.
status = SetCommMask(hComm, EV_RXCHAR); //register data received event with the SetCommMask() function
Then we call WaitCommEvent() function and wait for the data received event to happen.
DWORD EventMask;
status = WaitCommEvent(hComm, &EventMask, NULL);
Once the Event (EV_RXCHAR )happens .ie a character is received by the serial port buffer, WaitCommEvent() function will return with the bitmask of the event that caused the Event.
We then use a if loop to check it and read the data using ReadFile( ).
if (EventMask & EV_RXCHAR)  //Check received bitmask with EV_RXCHAR
{
    ReadFile( )
}
Reset the Arduino if the Event is not Happening.
On running the code, you will get the following output

Writing Data to Windows Serial Port
Writing data to the opened serial port is accomplished by the WriteFile() function. WriteFile() function can be used to write both into the files and I/O ports.
Status = WriteFile(hComm,              // Handle to the Serial port
                   lpBuffer,           // pointer to the Data to be written to the port
                   dNoOFBytestoWrite,  // No of bytes to write
                   &dNoOfBytesWritten, // pointer to the buffer where no of Bytes written is stored
                   NULL);
Here is a basic code to send a character to Windows Serial Port using WriteFile()

//Partial code full code available on Github
//Write a character to Serial Port using Win32 API WriteFile()
//BOOL status;
char ch = 'A';                // Character variable ,not a pointer
DWORD BytesWritten = 0;
status = WriteFile( hComm,        // Serial port handle
                    &ch,          // we have to give the Pointer to the character to be written so &ch
                    sizeof(ch),   // Size of the byte to be written to the port
                    &BytesWritten,// bytes written to the port
                    NULL);
if (status == TRUE)
   printf("\n %d Bytes Written To Serial Port ", BytesWritten);
else
    printf("\nError in Writing Bytes to Serial Port");
Here we are going to send an ASCII character to the Arduino using Win32 WriteFile() Function.
char ch = 'A';Here we are defining a single character variable called ch and assigning a character 'A'
status = WriteFile( hComm,        // Serial port handle
                    &ch,          // we have to give the Pointer to the character to be written so &ch
                    sizeof(ch),   // Size of the byte to be written to the port
                    &BytesWritten,// bytes written to the port
                    NULL);
Then we use the WriteFile() Function to send it .
Second parameter of WriteFile() expects a pointer to the location of the character we need to send. So we use &ch,
Third parameter expects the size of the character to be send, so we use the sizeof() function to get size of A which is a byte (ASCII)
Fourth Parameter is a pointer to the variable storing the number of bytes written by WriteFile() on Successful write to serial port
Here is a basic code to send a string of characters to Windows Serial Port using WriteFile()
const char* message = "Hello";  //variable message contains pointer to the string "hello"
DWORD BytesWritten = 0;
status = WriteFile( hComm,            // Serial port handle
                    message,          // since message is a pointer no need to use &message
                    strlen(message),  // Size of the byte to be written to the port
                    &BytesWritten,    // bytes written to the port
                    NULL);
if (status == TRUE)
   printf("\n %d Bytes Written To Serial Port ", BytesWritten);
else
   printf("\nError in Writing Bytes to Serial Port");
Here we are defining a pointer to a string stored in the memory.
const char* message = "Hello";Here message contains the pointer to string hello ,So you can give it directly to WriteFile() without the &.
On running the code you will get the following output.

Win32 Bi-Directional Serial Port Communication
Finally we will build a bidirectional serial port communication Program between Windows PC and Arduino to illustrate the use of both ReadFile() and WriteFile() functions.

Here the Program will send a character to the Arduino Board and the Arduino will echo back the said character.
PC side program will then receive the character and print it on the terminal.

Check out our next section,
If you want to know how to control the RTS and DTR pins of the serial port .
- Log in to post comments