

In this tutorial,We will build a low cost multi channel data acquisition and logging system using Python & Arduino UNO board that will log and save data to a CSV (Comma Separated Values) text file on the disk.
If you are looking for a GUI based Python Data Acquisition System ,check the link below
Contents
- Introduction
- Required Reading
- Source Codes
- Block Diagram of Arduino Python Serial Datalogger system
- Hardware Setup for Data logging
- CSV (Comma-separated values) text file Format
- Explanation of the Data Acquisition System Code
- Running the Python Data Logger Code on Windows
- Running the Python Data Logger Code on Linux
- Using MS Excel to display the logged values in the CSV
- Creating Charts from CSV data in Excel
Introduction
The system will use an Arduino and an analog front end based on LM324 opamp to measure temperature from 4 or more LM35 temperature sensors. The data coming from the Arduino serial port (USB VCP) is logged to a (CSV) comma-separated values text file or an Microsoft Excel or LibreOffice Calc Spreadsheet.
The analog values are digitized by the Arduino UNO's (ATmega328P) 10 bit ADC and transmitted to a PC or MAC using Virtual Serial Port communication.
A Python 3.x.x script running on the PC will receive the data and log the time stamped data into a CSV file on the disk .
The Python Serial Port (VCP) data logging program is capable of running on Windows 10,Linux,Mac and save the time stamped data to CSV text file on the disk which can be used for data analysis or visualization by the user.
Required Reading
Here we will be using Python and pySerial to read and write to the PC serial port and Python Signal Handling for controlling the program running on the PC.
if you are not familiar with those concepts, Please check the below tutorial links
- Python Signal SIGINT to control the program flow of the data logging software
- Pyserial based Python Serial Port Programming to connect with the data logger
Source Codes
You can download the Source code for our USB serial port data logger software free using the below links
- Download Data Acquisition System (.csv file) using Python & Arduino Code as Zip
- Browse Data Acquisition System (.csv file) using Python & Arduino Code on GitHub
- Website code may be partial or pseudo code just enough to highlight relevant techniques or methods.
- Please use the full source codes from our GitHub Repo to avoid errors (above link)
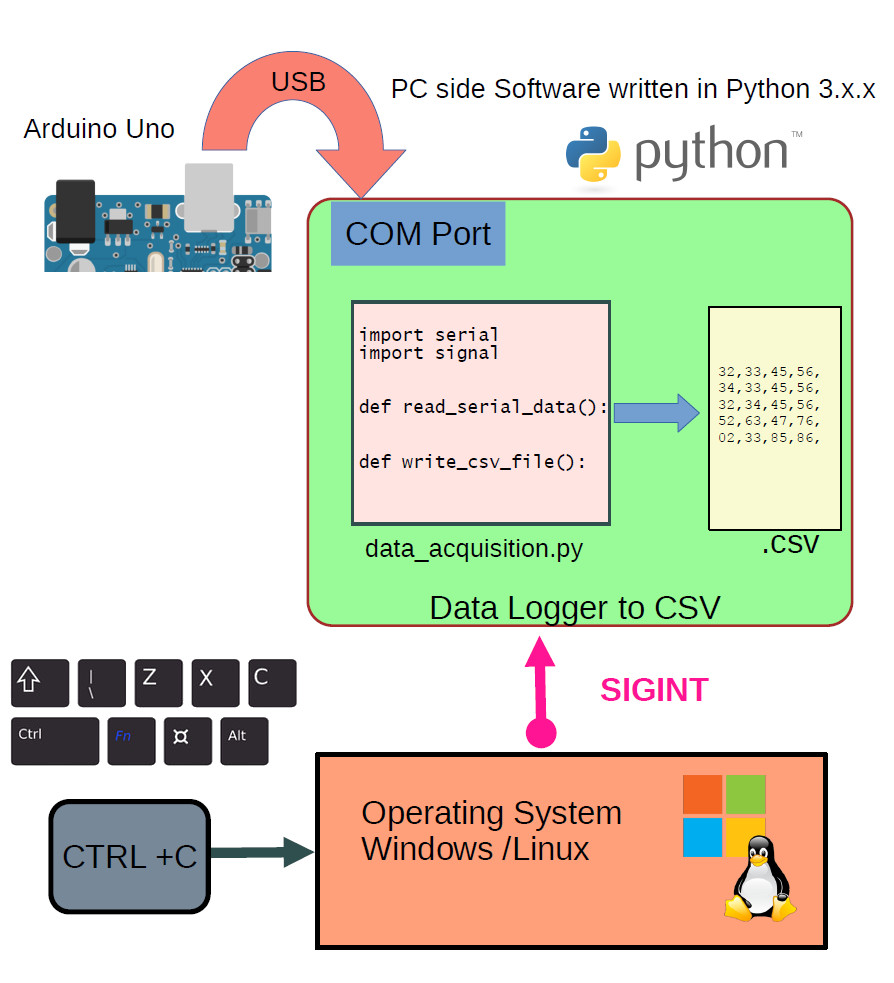
Block Diagram of Arduino Python Serial Datalogger system
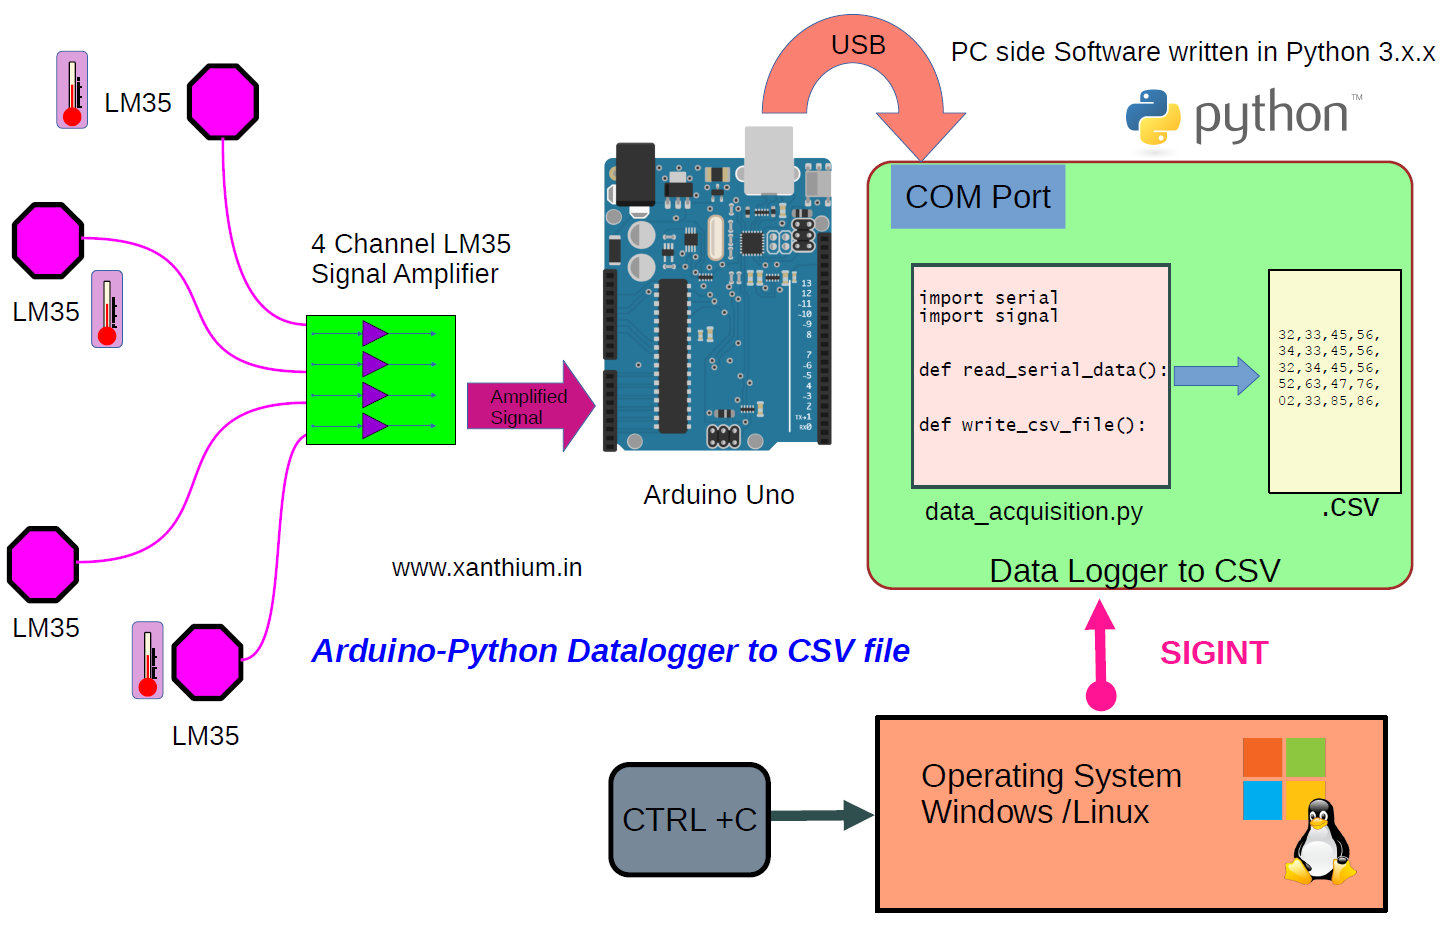
- The system comprises of 4-LM35 temperature sensors connected to a LM324 amplifier board which acts as an analog front end for the Arduino board.
- The Analog signal from the amplifier board are digitized by the ADC on the Arduino and send to a PC ,MAC or Linux computer.
- A Python script running on the PC will monitor the serial port and receive the temperature values from the Arduino.
- The script will write the received values to a Comma-separated values (CSV) text file
- You can terminate the script by using the CTRL + C Keyboard combination
Hardware Setup for Data logging
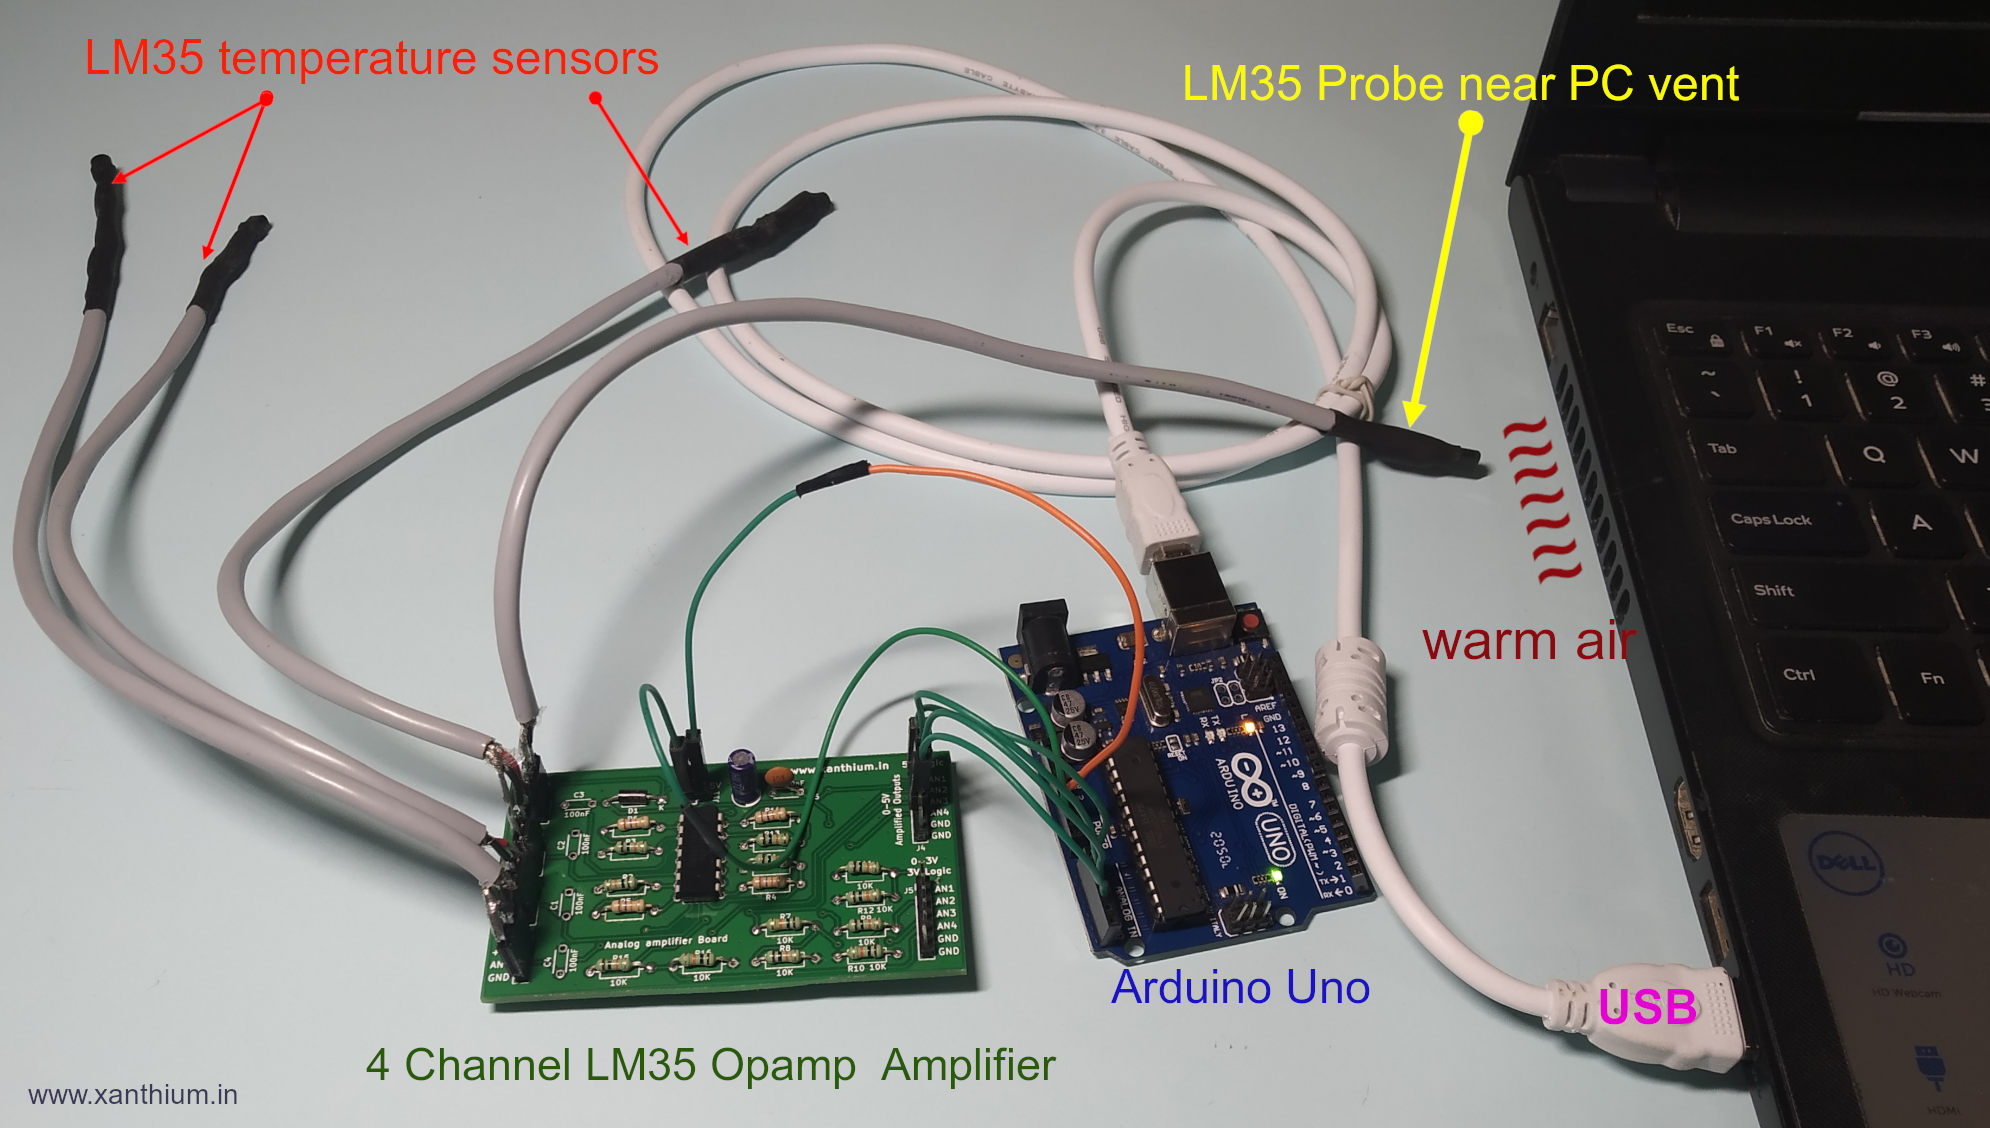
Hardware setup is shown above,
It consists of
- Four (4) LM35 temperature Probes
- 4 Channel LM35 signal opamp amplifier board
- Arduino UNO
- Laptop PC running Windows/Linux OS system
The weak signals from the LM35 temperature sensor probes are amplified by the opamp amplifier by a gain of 3.44 and is connected to the ADC inputs of the Arduino UNO.
You can check out a short video on building the LM35 temperature probe here
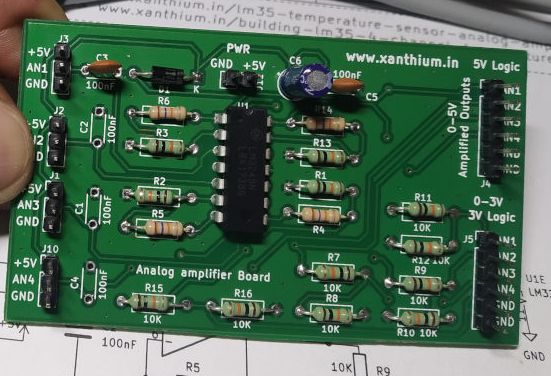
The opamp amplifier circuit is build around the Quad LM324 opamp chip. The details of the design of the LM35 small signal amplifier can be found here along with circuit diagram.
The Output of the amplifier is connected as below.
- AN1 of amplifier is connected to A0 pin of Arduino
- AN2 of amplifier is connected to A1 pin of Arduino
- AN3 of amplifier is connected to A2 pin of Arduino
- AN4 of amplifier is connected to A3 pin of Arduino
Here is a video of connecting the amplifier with the Arduino board.
The Arduino is connected to PC through the USB serial port for sending the data to the PC. Arduino used in Arduino UNO.
Arduino sends the temperture values to the PC via serial communication in the following format Temp1-Temp2-Temp3-Temp4.
Datalogger CSV (Comma-separated values) text file Format
Here i will explain the format of the CSV file generated by the serial port python datalogging software.
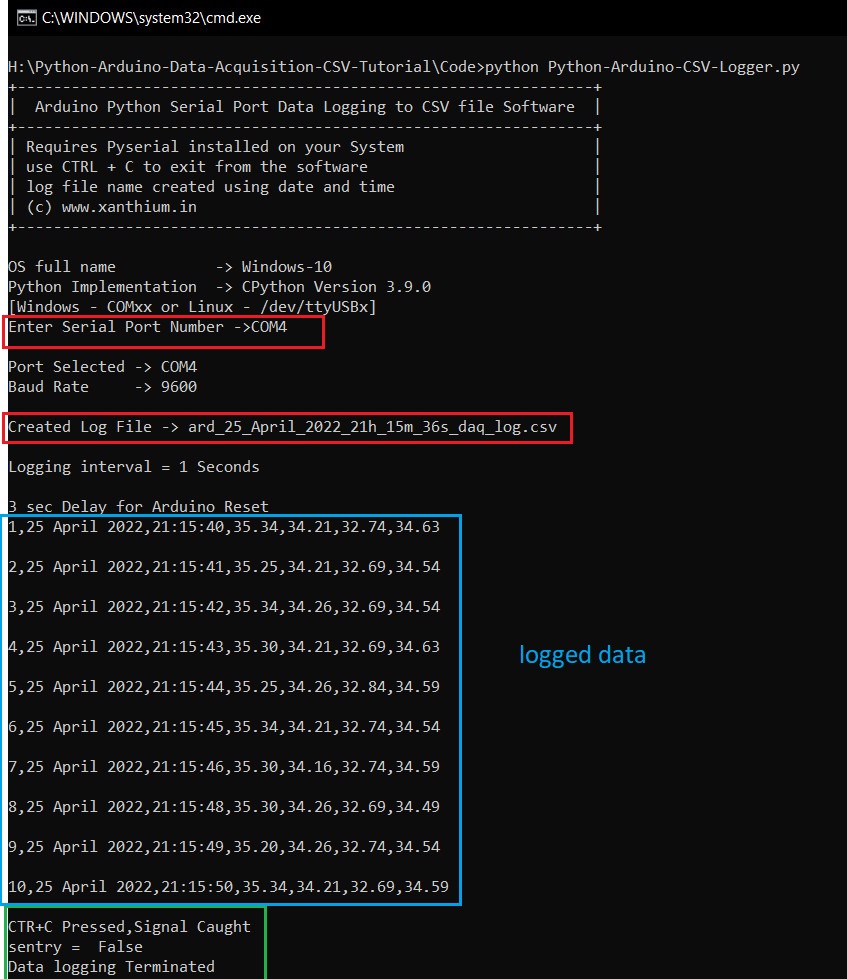
The Python code will create a text file on the hard disk using the current data and time with a file extension .csv.
For eg ard_16_February_2023_21h_29m_41s_daq_log.csv
The code for filename generation is shown below
# Generate file name using Current Date and Time
current_local_time = time.localtime()  #Get Current date time
filename           = time.strftime("%d_%B_%Y_%Hh_%Mm_%Ss",current_local_time)# 24hour clock format
filename           = 'ard_'+ filename + '_daq_log.csv' print(f'Created Log File -> {filename}')
The temperature data send by the Arduino through the serial port(VCP) are received by the python script and time stamped temperature values are written into the csv text file in the following format.
No,Date,Time,AN1,AN2,AN3,AN4
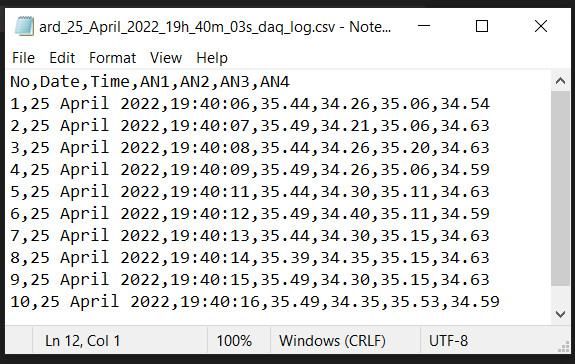
The CSV file uses a comma , as a delimiter.
You can also change the delimiter value to
- colon :
- semicolon ;
- vertical slash |
by changing the variable seperator inside the while loop
seperator = ','
Explanation of the Data Acquisition System Code
Python Serial Data Logger Code
The Python Data logger first creates a text file to log the data using current date and time. It then connects to a given serial port and queries the connected Arduino for temperature values.
The Python code sends the character '$' to the Arduino.
The Arduino replies with 4 temperature values in the format Temp1-Temp2-Temp3-Temp4.
The Python code then reads these values from the serial port and writes to a CSV file.
The below Pseudocode shows how the entire code ( Python-Arduino-CSV-Logger.py ) works .The full code can be found in our Github repo.
#Pseudo code for Python-Arduino-CSV-Logger.py
sentry = True
log_count = 1
1) Enter the Serial port number or Baud rate here
2) Generate file name using Current Date and Time
3) Create a csv File header, Write Header to File
4) Open a connection to Serial Port using Pyserial
5) Wait for Arduino to RESET
6) Create a Signal Handler for Signals.SIGINT:  CTRL + C
   def SignalHandler_SIGINT(SignalNumber,Frame):
        global sentry  # Global required
        sentry = False #turn sentry to false on CTRL + C

7) Register the Signal Handler with Signal CTRL + C
8)Infinite while loop
    While Sentry == True :
          1)transmit $,to get temperature values from Arduino,
          2)Change to receive  mode to get the data from Arduino, Arduino sends \n to terminate
          3)Get log date time from PC
          4)create a string to write into the file
          5)write to file .csv
          6)increment no of logs taken, log_count+ = 1

9)exit from the loop and close the Serial port when sentry = False
Here the variable sentry is used to control the access to an infinite loop.
When sentry is True (Boolean) the while loop runs constantly querying the Arduino for the temperature variables and writes to the CSV file.
To stop the data logging,
User presses CTRL + C key combination which generates a SIGINT signal. SIGINT signal is captured by the signal handler which in turn makes the sentry variable False, resulting in code exiting from the loop.
#Signal
# Create a Signal Handler for Signals.SIGINT:  CTRL + C
def SignalHandler_SIGINT(SignalNumber,Frame):
  print ('CTR+C Pressed,Signal Caught')
  global sentry         # Global required since we want to modify sentry from inside the function
  sentry = False        #Turn sentry into false so it exits the while loop
  print ('sentry = ',sentry)

signal.signal(signal.SIGINT,SignalHandler_SIGINT) #register the Signal Handler
Arduino Data Acquisition Code
The amplified analog signals are connected to ADC inputs (A0-A4) of Arduino UNO and converted to its corresponding digital values which are then send to PC in the following format
Temp1-Temp2-Temp3-Temp4.
Interfacing 4-LM35 sensors with Arduino
The Arduino will convert the analog voltage produced by the 4-LM35 sensors to digital values using the onboard 10 bit ADC .The digital values are then converted to degree Celsius and then send to a PC using the Arduino serial port.
The AREF (analog reference) of Arduino is set as default 5V.
5V power for LM35 board is taken from the Arduino board.
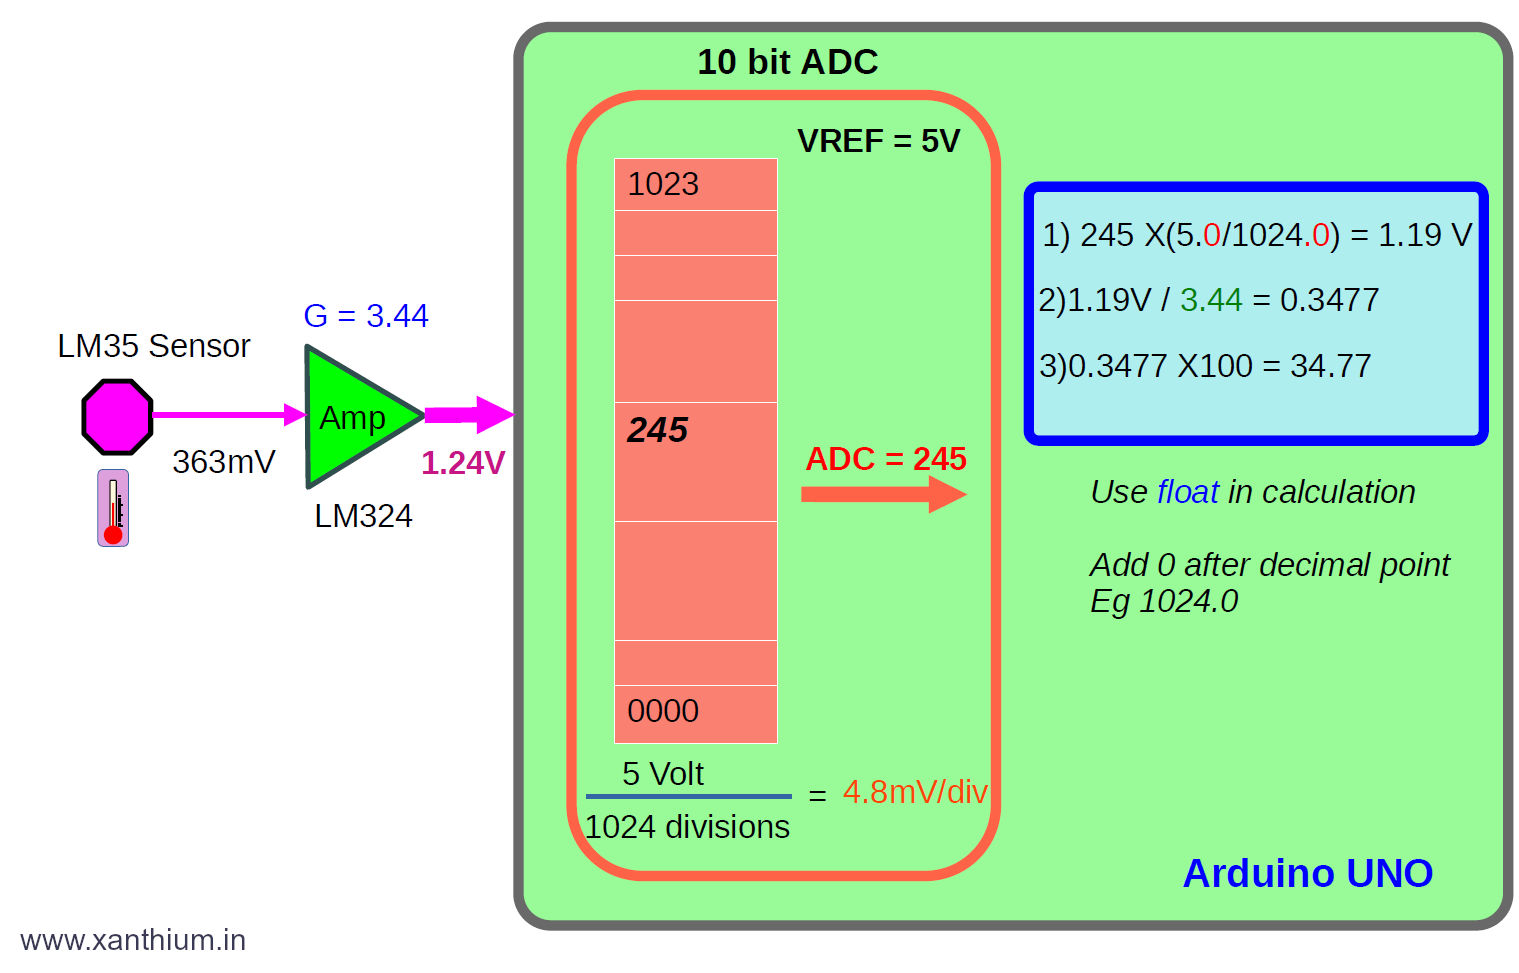
The above image shows interfacing a single LM35 sensor to Arduino ADC channel and calculations used to to convert the LM35 analog value to digital temperature in degree Celsius.
Here we have an LM35 (purple octagon) producing 363mV which indicates that the temperature is 36.3 °C
The milli volt signal is amplified by the LM324 opamp with a gain of 3.44 to a voltage of 1.24V.
The Voltage 1.24 is fed to the input of Arduino ADC pin (ATmega328P),
Here the ADC is a 10 Bit (210 =1024 divisions) and the analog reference voltage AREF is selected as 5V.
So each ADC step corresponds to 4.8mV (5V/1024 divisions).
For an input of 0V the ADC will give an output of 0000 and for 5V the ADC is give an output of 1023.
For our voltage of 1.24V the ADC will give the output as 245.
Now to get the input Voltage, We multiply the ADC step value 245 with 4.8mV = 1.19V.that is less than the input value of 1.24V.
To get the Sensor voltage we have to divide 1.24V by the amplification factor of 3.44.The division is there due to the presence of the amplifier.
Then you multiply it to adjust the decimal point.
Here we will be taking three consecutive readings and averaging out to reduce errors as shown below.
The function float ReadAnalogChannel(int analogpin) does all the above work and returns a temperature value in degree Celsius
// float ReadAnalogChannel(int analogpin)
// Read's value from the specified Analog pin (int analogpin),
// Each pin read three times in aloop to an array and averages the temperature value
// returns the temperature value in a float variable.
float ReadAnalogChannel(int analogpin)
{
	float SensorValue[3] = {0.0,0.0,0.0}; // Array to store 3 consecutive values
	float AvgSensorValue = 0.0;           // Variable to store the average of 3 consecutive analog  values
	float temperature = 0.0;              // Variable to store temperature in Celsius
	// Make three consecutivereadings from the specified analog pin
	for(int i =0;i<3;i++)
	{
  		SensorValue[i] = analogRead(analogpin); //Read 3 consecutive analog  values and store it in array
  		delay(10);
	}
	//Calculate the average of three sensor values
	AvgSensorValue = ((SensorValue[0] + SensorValue[1] + SensorValue[2]) /3);
	//Convert the average ADC value to temperature in Celsius
	temperature = AvgSensorValue * (5.0/1024.0);// 10 bit adc,1024 divisons,
	temperature = temperature/3.44;
	temperature = temperature *100;
	return temperature; //return calculated temperature in celsius,float variable
}
Arduino waits for the reception of the $ character to poll the sensors connected to it .
Once the character is received the code will call the ReadAnalogChannel(AnalogPin_AN1); one after the other and sends the resulting value to the serial port.
if (Serial.available() > 0) //Wait for data reception
 {
   ReceivedByte = Serial.read();//Read data from Arduino Serial UART buffer

   if (ReceivedByte == '$')//Check received byte is $
   {
    	temp1 = ReadAnalogChannel(AnalogPin_AN1);
    	temp2 = ReadAnalogChannel(AnalogPin_AN2);
    	temp3 = ReadAnalogChannel(AnalogPin_AN3);
    	temp4 = ReadAnalogChannel(AnalogPin_AN4);

   		Serial.print(temp1);
    	Serial.print('-');
    	Serial.print(temp2);
    	Serial.print('-');
    	Serial.print(temp3);
    	Serial.print('-');
    	Serial.print(temp4);
    	Serial.print('-');
    	Serial.println();

   } //end of if
   else
   {
     Serial.println("INVALID");
     Serial.println("use $ to start conversion");
   }
 }
Running the Python Data Logger Code on Windows
On Windows ,make sure that you have pySerial library installed.
If you are not familiar with pySerial, Check our tutorial on using Pyserial
Find out the COM port number of the Arduino which is connected to your Windows 10 using Device Manager
Now you can run the code on command line using
python name-of-your-logging-code.py

Running the Python Data Logger Code on Linux
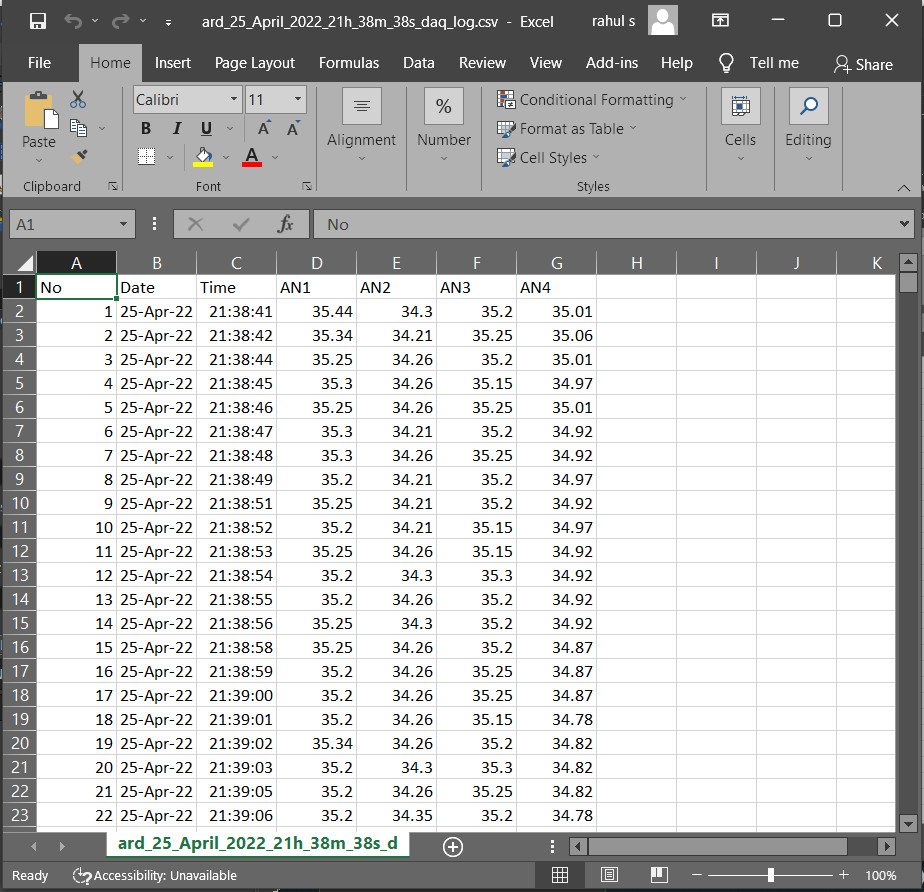
Using MS Excel to display the logged values in the CSV
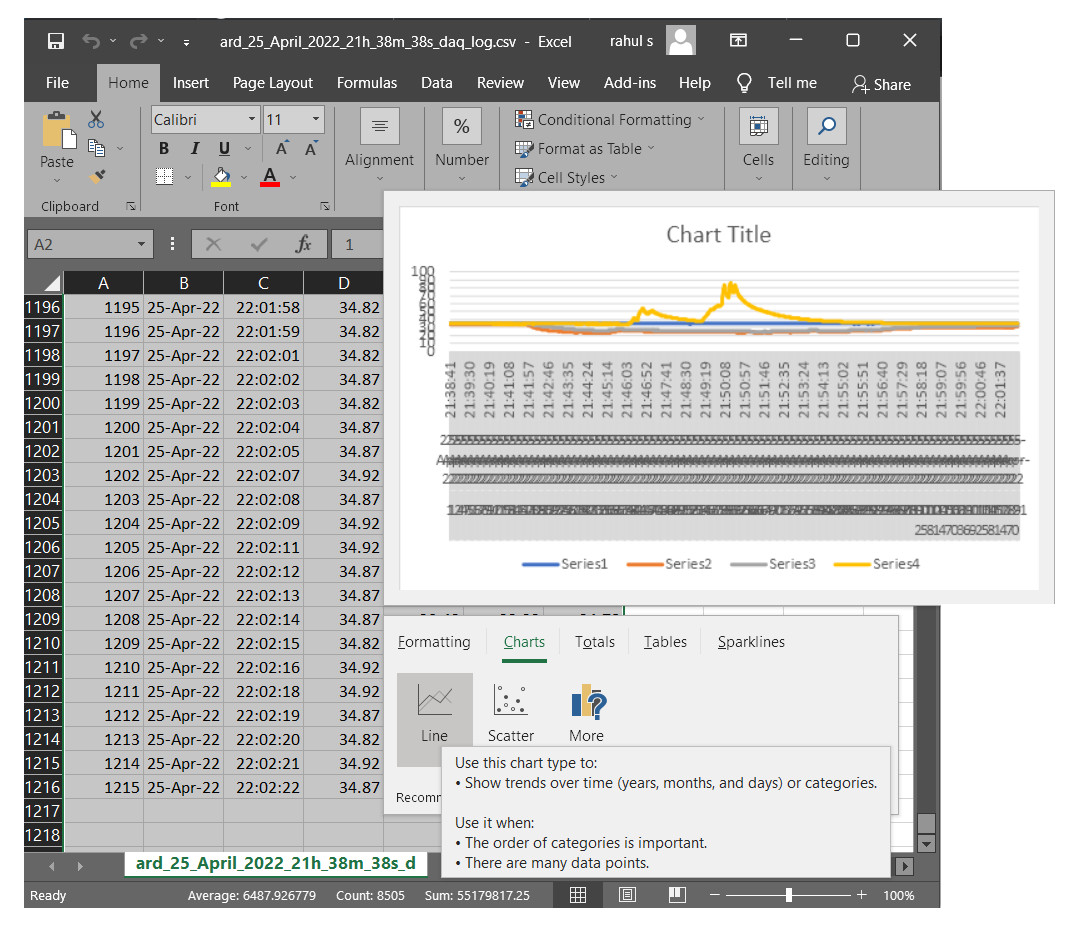
Once the data logging is complete you can use MS Excel or Libreoffice Calc to perform data analytics on your data.
Creating Charts from CSV data in Excel
You can use Quick Analysis tool in MS Excel to generate graphs or charts to display your data in an intuitive manner.
Generated Chart showing variation of temperature collected by 4 channels of our Python data acquisition system over time.
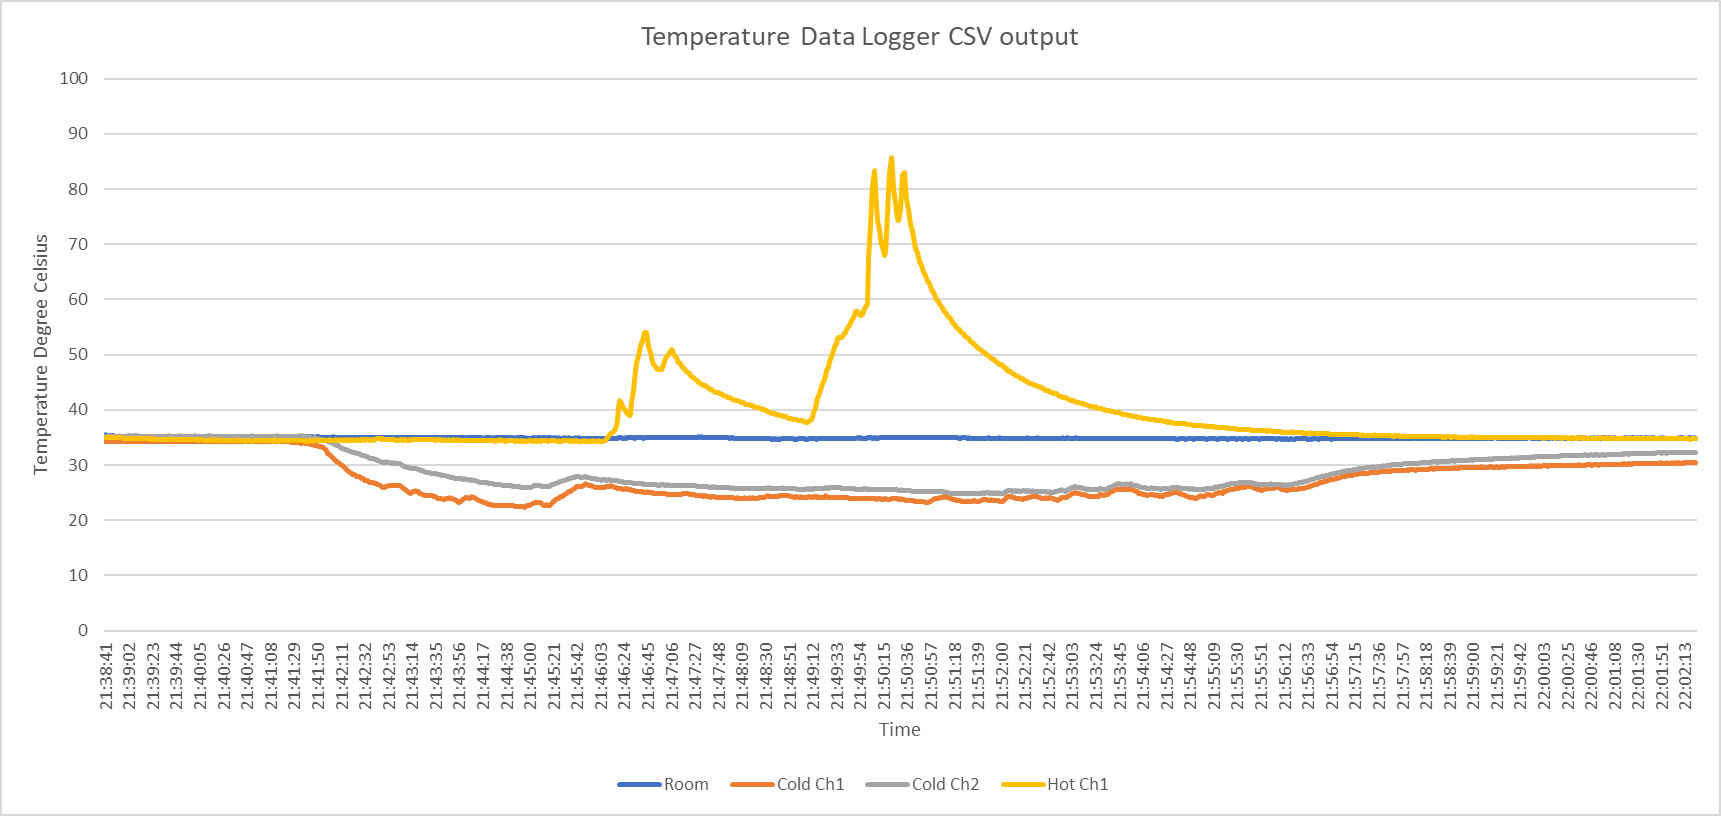
Chart shows Temperature in Degree Celsius on the Y Axis and Time on the X axis.
The Blue line represents room temperature
- Log in to post comments