
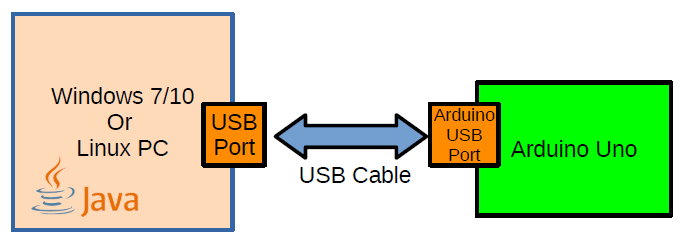
In this tutorial we will learn how to program serial port of a PC using Java programming language. The PC will communicate with an Arduino connected to the USB virtual Serial port of the PC and exchange text information using a Java program.
Contents
- Introduction
- Source Codes
- Compiling jSerialComm JAR on Windows Cmd
- Checking for available serial ports using Java
- Opening a Serial Port connection using Java
- Receiving data from Arduino using Java Serial Port Program
- Transmitting data from PC to Arduino using Java Serial Port API
- RTS and DTR pin control of Serial Port using Java
- Java Linux Serial Port Programming
Introduction
Java Standard library no longer carries classes to communicate with the PC serial port. Some of the user developed java serial port programming API's like RxTx are no longer maintained.
In our Java Serial port programming tutorial we will be using a third party library called jSerialComm library from Fazecast, Inc to open and control the serial ports.
jSerialComm is a Java library designed to provide a platform-independent way to access standard serial ports without requiring external libraries, native code, or any other tools. It is meant as an alternative to RxTx and the (deprecated) Java Communications API
This tutorial will teach you how to program your serial port using java to communicate with a USB Virtual serial Port based device like Arduino, USB Multifunction DAQ,GPS devices etc
Source Codes

- Please note that ,Code displayed on this webpage may be partial.
- Use the below link to download the full code for Java serial port communication with Arduino Microcontroller.
- Download the Java Serial Comm Code Repo as Zip File
- Browse our online Github Repo
Compiling jSerialComm JAR on Windows Command line
First step in learning Java serial port programming is to correctly compile jserialcomm jar file along with your Java source code.
Make sure that the version number of the jSerialComm JAR file is correct, It may change with time .
If you are new to Java Language and need assistance in using jar file Do check our Tutorial on Creating, Building and Using JAR Files.
Once you have downloaded the jSerialComm JAR file in a directory of choosing, you can compile the source code as shown below. The above code is compiled on a Windows System.
javac -cp .;jSerialComm-2.9.0.jar YourSerialSourceCode.javaOnce the code has compiled without any errors you can run the resulting class file as shown below.
java -cp .;jSerialComm-2.9.0.jar YourSerialSourceCodeDo not forget to add . ; before the JAR file while compiling and running
USB to Serial Hardware
If you want to communicate with a microcontroller other than Arduino,
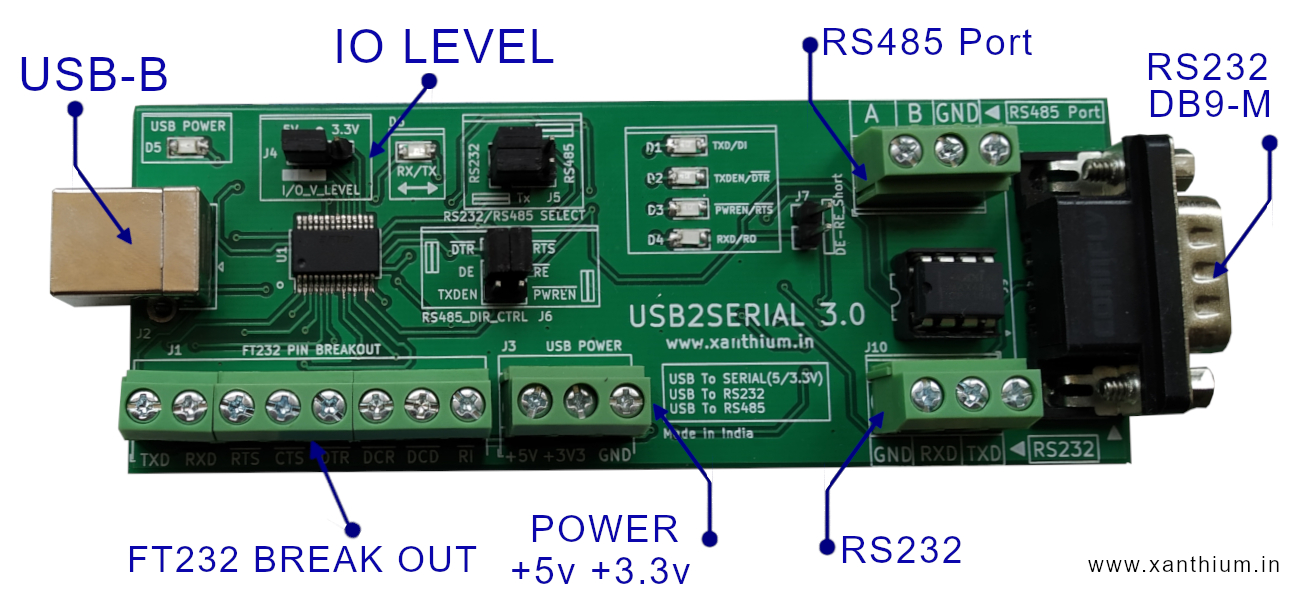
You may need a USB to Serial Converter to convert the USB protocol to Serial for the Microcontroller. Do check out our USB2SERIAL that can works as a USB to Serial,RS232,RS485 converter.
Checking for available serial ports using Java
Once you have managed to compile your code without any issue, for Eg jSerialComm JAR file not found error, jSerialComm JAR file missing error.
You can build a simple serial port program in Java that will check for the available serial ports (COM ports ) on a Windows System.
You can find the listing of Source code SerialPortsAvail.java below.
import com.fazecast.jSerialComm.*;
public class SerialPortsAvail
{
   public static void main (String[] Args)
  {
    SerialPort [] AvailablePorts = SerialPort.getCommPorts();
      // use the for loop to print the available serial ports
        for(SerialPort S : AvailablePorts)
             System.out.println("\n  " + S.toString());
  }
}
Copy and save the file into a java source file (SerialPortsAvail.java).
Here we import the all the classes required for serial port access from the JAR file using
import com.fazecast.jSerialComm.*;SerialPort.getCommPorts(); is a static class method that return an array of serialport objects which is stored in the AvailablePorts array.
We then use a for loop to iterate over the available ports.
You can then compile and run the code.
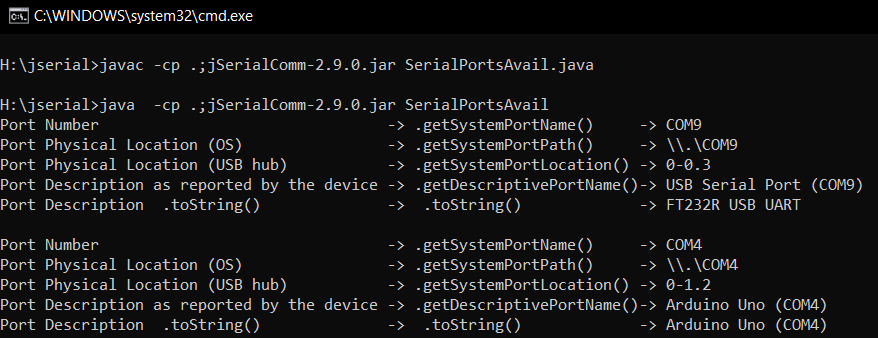
javac -cp .;jSerialComm-2.9.0.jar SerialPortsAvail.java
java  -cp .;jSerialComm-2.9.0.jar SerialPortsAvail
In my system, I have two connected devices that identify as USB Virtual COM port
An Arduino UNO
FT232RL based USB Device
On Running the code, we get the following output
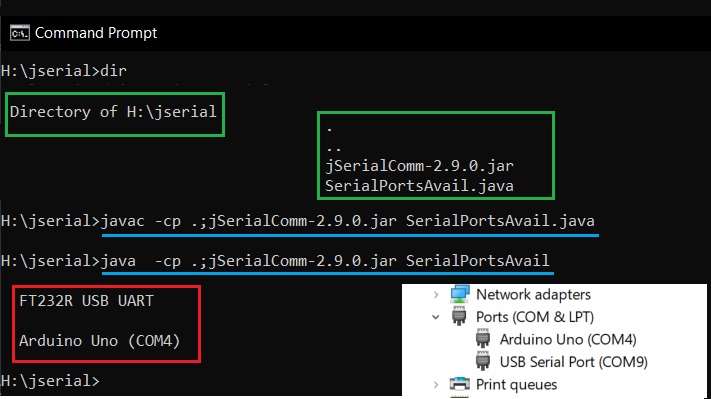
In most applications we only wants to return the COM port number.
For that you can use S.getSystemPortName(); Method which just returns the COM port number.
The below table shows some of the Methods you can use to get more information about the port you have to access
| Returns port number in COMxx format | S.getSystemPortName(); |
| Port Description as reported by the device | S.getDescriptivePortName(); |
| Port OS path | S.getSystemPortPath() |
| Location of the Virtual COM port on the USB Hub | S.getSystemPortLocation() |
Opening a Serial Port connection using Java
Now we will open a connection to the serial port using the below Java program.
Please use the full program from the GitHub repo instead of the snippet below.
// SerialPortOpen.java
import com.fazecast.jSerialComm.*; // Serial Port classes
public class SerialPortOpen
{
  public static void main (String[] Args)
  {
    SerialPort [] AvailablePorts = SerialPort.getCommPorts();

       //Open the first Available port
       SerialPort MySerialPort = AvailablePorts[0];

       MySerialPort.openPort();    //open the port
                                   //Arduino May get reset

       if (MySerialPort.isOpen())//Check whether port open/not
             System.out.println("is Open ");
       else
          System.out.println(" Port not open ");
       MySerialPort.closePort(); //Close the port
     if (MySerialPort.isOpen())
           System.out.println(" is Open ");
       else
           System.out.println("\n Port not open ");

  }//end of main()
}
At first we get all the available serial ports using SerialPort [] AvailablePorts = SerialPort.getCommPorts();
Now AvailablePorts array contains all the serial ports available in the system provided you have multiple USB virtual COM ports connected to your System.
You can access the available ports using array index notation.
AvailablePorts[0]
AvailablePorts[1]
AvailablePorts[n times]
In our case we will be using the first one or index 0 as i have a single Arduino UNO connected to my Laptop.
Now create a SerialPort object ( MySerialPort) and assign the first Port on the system to it as shown below.
SerialPort MySerialPort = AvailablePorts[0];Now you can open the port using .openPort() method
and then check whether the port is open or not using the .isOpen() Method .The Method return TRUE if port is open, FALSE if not .
MySerialPort.openPort();   //open the port
if (MySerialPort.isOpen()) //Check whether port is open or not
      System.out.println("is Open ");
else
    System.out.println(" Port not open ");
and finally you can close the port using .closePort();
MySerialPort.closePort(); //Close the port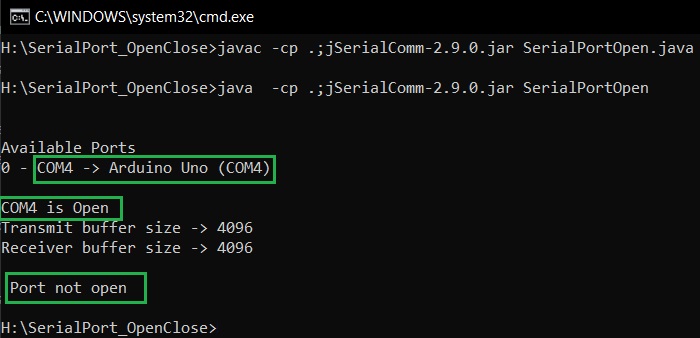
Arduino Reset Issue
Please note that your Arduino UNO may get RESETed when you open the Serial Port .This may cause problem when Arduino is trying to receive info from PC
This Issue is only for Arduino Platform as Arduino IDE uses RTS ,DTR lines of Serial Port for controlling the Arduino board connected to it.
Receiving data from Arduino using Java Serial Port Program
In this section,
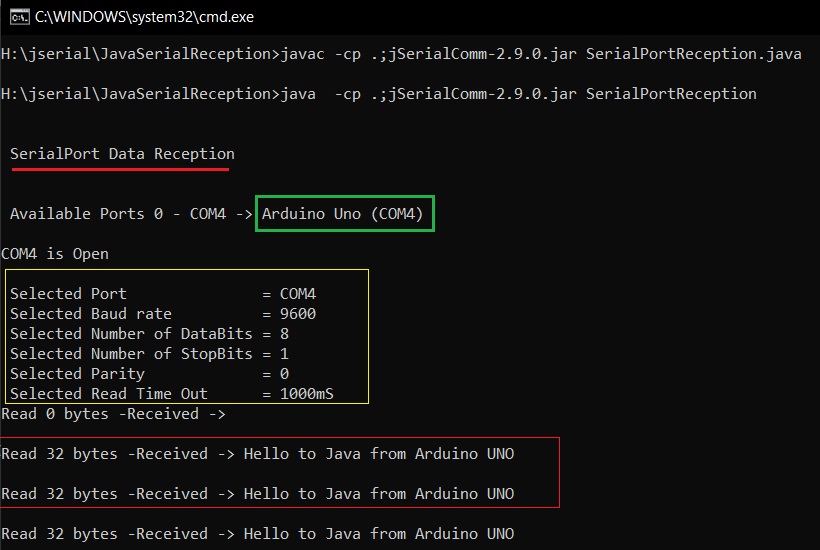
we will learn how to receive a string of text send by an Arduino UNO using Java Serial Port program running on command line.
The Arduino will be sending the data using standard baud rate of 9600bps and 8N1 format (8-data bits, No Parity, Single Stop bit).
All the code can be downloaded from our Github Repo.
Please note that I will only be showing relevant parts of the code here, Please download the full code from our GitHub repo.
The Arduino Side code is a basic serial transmission program which uses Serial.println() to send a text message Hello to Java from Arduino UNO to PC via COM port.
Arduino Side Transmission Code
void setup()
{
 Serial.begin(9600); // opens serial port, sets data rate to 9600 bps 8N1
}
void loop()
{
 char TextToSend[] = "Hello to Java from Arduino UNO";
 Serial.println(TextToSend); // sends a \n with text
 delay(1000);
}
So if you try to update your Arduino (on COM4) code while the Serial Port Program(on COM4) is running ,you will get a port in use error.
Our Java Serial Program will be running in the Blocking Mode where the Serial Port will be locked by the program when in use. This means that only one program can access the port at a time.
jSerialComm library supports all the standard baudrates 1200,9600,19200 etc.
//Partial Code only
int BaudRate = 9600;
int DataBits = 8;
int StopBits = SerialPort.ONE_STOP_BIT;
int Parity   = SerialPort.NO_PARITY;
//Sets all serial port parameters at one time
MySerialPort.setComPortParameters(BaudRate,
                                  DataBits,
                                  StopBits,
                                   Parity);
//Set Read Time outs
MySerialPort.setComPortTimeouts(SerialPort.TIMEOUT_READ_BLOCKING,
                                1000,
                                   0);
MySerialPort.openPort(); //open the port
int StopBits = SerialPort.ONE_STOP_BIT; Here we are using only 1 stop bit,
int Parity = SerialPort.NO_PARITY; Parity is none here ,
Jserialcomm also allow you to have odd and even parity like
int Parity   = SerialPort.ODD_PARITY;
int Parity   = SerialPort.EVEN_PARITY;
After which we configure the port to use the above settings using
MySerialPort.setComPortParameters(BaudRate,DataBits,StopBits,Parity);
After which we set out the Time outs
.setComPortTimeouts(TIMEOUT_Mode,
                   READ_TIMEOUT_milliSec,
                   WRITE_TIMEOUT_milliSec);
Here Read Timeout is set for 1000 milliseconds while Write Time out is set for 0.
MySerialPort.setComPortTimeouts(SerialPort.TIMEOUT_READ_BLOCKING,
                               1000,
                               0);
We then read the bytes arriving at the port using
MySerialPort.readBytes(readBuffer, readBuffer.length);here readBuffer is the buffer into which data will be read and readBuffer.length is the number of bytes to read from serial port.
once the bytes are read, they are converted to String and displayed on the command line
//Reading from COM port using Java
try
{
   while (true)
   {
     byte[] readBuffer = new byte[100];
     int numRead = MySerialPort.readBytes(readBuffer,
                                          readBuffer.length);
     System.out.print("Read " + numRead + " bytes -");

     //Convert bytes to String
     String S = new String(readBuffer, "UTF-8");
     System.out.println("Received -> "+ S);
   }
}
catch (Exception e)
{
     e.printStackTrace();
}
MySerialPort.closePort(); //Close the port
Here is the output of the program on a Windows Command line
Transmitting data from PC to Arduino using Java Serial Port API
Here we will transmit a byte from PC to Arduino using Java and Arduino will light up a LED connected to its Port 7 .
Arduino Reset Issue
Please note that when you Open the SerialPort using MySerialPort.openPort(); //open the port method ,
the Arduino UNO board may get RESET. So you need to insert a small delay after opening the Serial Port, otherwise the Arduino will not receive any data
MySerialPort.openPort(); //open the port
//Arduino Will Reset
Thread.sleep(2000);//Delay added to so Arduino-
                   //-can recover after RESET
.
Once you have configured all the settings as we had done in the earlier example. We can now write data as shown below.
You can get the Full code from our github repo.
This will send 65 decimal to the Arduino and Arduino will light up the LED connected to Pin7.
//SerialPortTransmit.java
try
{
     byte[] WriteByte = new byte[1];
     WriteByte[0] = 65; //send A
     int bytesTxed  = 0;
     bytesTxed  = MySerialPort.writeBytes(WriteByte,1);
     System.out.print(" Bytes Transmitted -> " + bytesTxed );

}

RTS and DTR pin control of Serial Port using Java
In this section of our Java serial port programming tutorial we will learn how to control the RTS and DTR pins.
Serial port have two pins RTS and DTR which can be turned ON/OFF by your Serial port program for signaling purposes.
In some Arduino variants DTR pin is used to reset the microcontroller for uploading the code. This method is also used by other serial port based programmers.
jserialcomm provides two instance methods which we can use to control the state of RTS and DTR pins.
RTS Pin Control Methods
.setRTS(); Make RTS pin High
.clearRTS(); Make RTS pin Low
DTR Pin Control Methods
.setDTR(); Make DTR pin High
.clearDTR(); Make DTR pin LOW
When you are using USB to Serial Converter (USB2SERIAL) like FT232,you should check the active logic levels of their RTS and DTR pins.
In FT232, RTS and DTR pins are active LOW ,so setRTS() will make the pin LOW and clearRTS() will make the pin High.
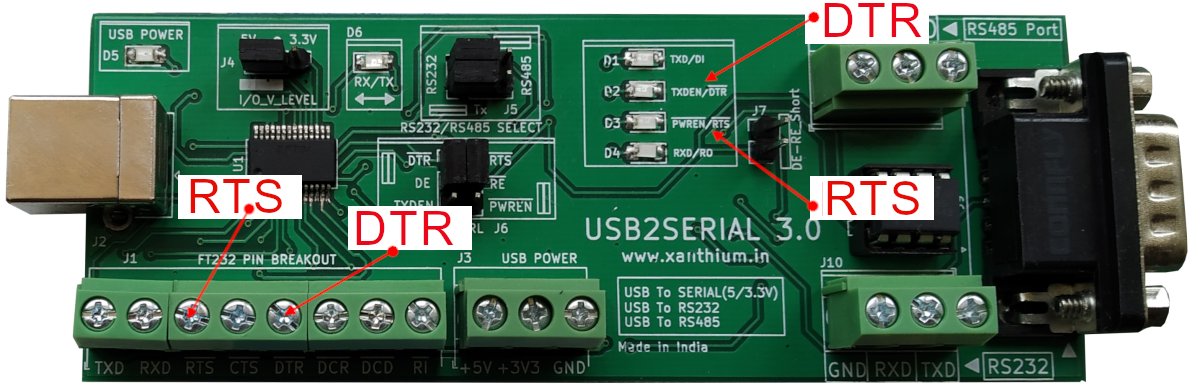
The USB2SERIAL converter shown above have LED's that indicate the logic levels of the DTR and RTS Pins.The Pins are even brought out to screw terminal head's as shown above.
Now programming the RTS /DTR pins in Java is quite simple. You open the serial port and use the serial port object to call the necessary methods.
You can find the partial code below. Full code available in Github Repo.
MySerialPort.openPort(); //open the port
MySerialPort.setRTS();   // Make RTS pin High
Thread.sleep(2000);      // Delay added to so you can see
MySerialPort.clearRTS(); // Make RTS pin Low
MySerialPort.setDTR();    // Make DTR pin High
Thread.sleep(2000);       // Delay added to so you can see
MySerialPort.clearDTR();  // Make DTR pin LOW
MySerialPort.closePort(); //Close the port
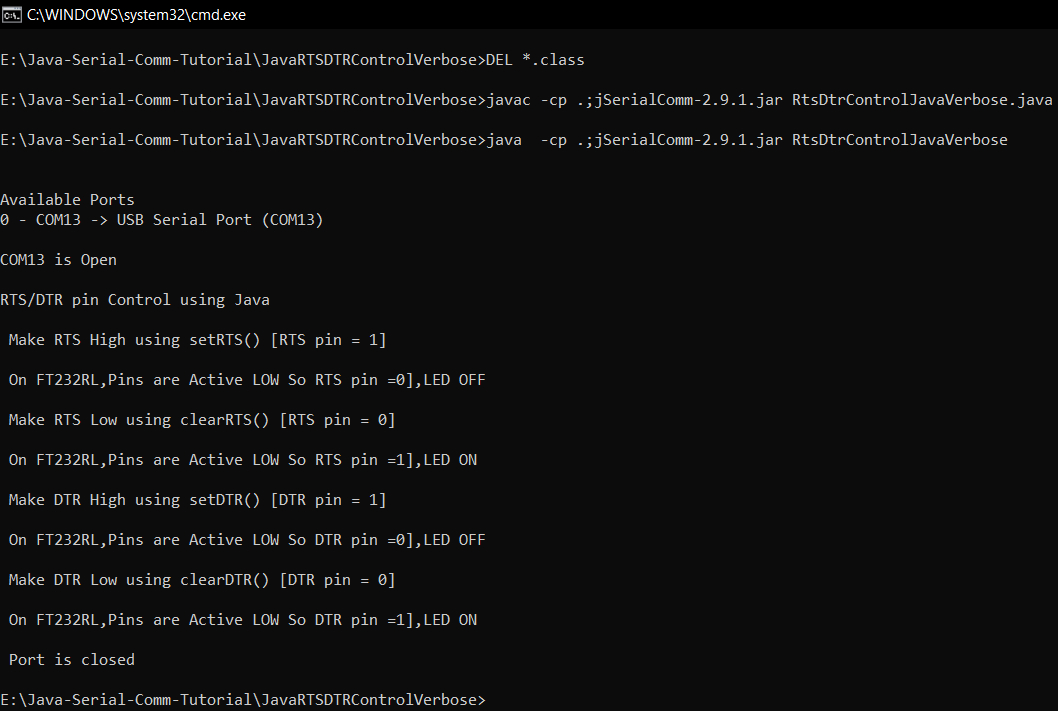
Here is the full program running on a Windows 10 PC ,
We are using USB2SERIAL USB to Serial/RS232/RS485 converter (above image)with built in LED's connected to DTR and RTS pins here.
Linux Serial Port Programming using Java
Here we will learn how to communicate using serial port between an Arduino and a Linux Computer/PC using Java and jSerialComm Library
- Log in to post comments