
In this short tutorial, you'll learn how to create and work with SQLite databases using Python across different platforms. The tutorial will walk you through the essential CRUD operations like Create, Read, Update, and Delete using Python with SQLite.
In the First section of the Tutorial, We will teach you commonly used core SQLite CRUD operations like
- Creating a SQLite database on Disk
- Adding data to the SQlite Database
- Reading Rows from the Sqlite Db
- Updating and Deleting Specific data from the SQLite Database.
We'll cover how to enable STRICT mode in SQLite ,to ensure that database columns strictly match their defined data types.
You'll also learn how to store and retrieve binary data, such as images (BLOBs), in SQLite.
This guide will work seamlessly across various platforms like Windows, Linux, macOS, and even on embedded ARM-based systems like the Raspberry Pi.
Please do check our Contents Section ⬇️ to easily access the required tutorial for your needs.
Contents
- Source Codes
- How SQLite Differs from Other Databases
- Creating a SQLite Database in Python
- Understanding SQLite Data Types and Type System
- Creating & Connecting to SQLite Database using Python
- Using 'with' Context Manager
- Creating a Table in SQLite using Python
- Inserting Data to SQLite Table
- Fetching Data from SQLite Database
- Updating a Row in SQLite Database using Python
- Deleting a Row in SQLite using Python
- Deleting the Full SQLite Table using Python.
- Getting Schema of SQLite Table using Python
- Storing and Retrieving Binary Blobs (images) from SQlite using Python
Source Codes

Source codes along with sample Database for the Python SQLite Programming Tutorial can be downloaded using below links.
Browse Python SQLite Tutorial Source codes on GitHub
What is SQLite and How it differs
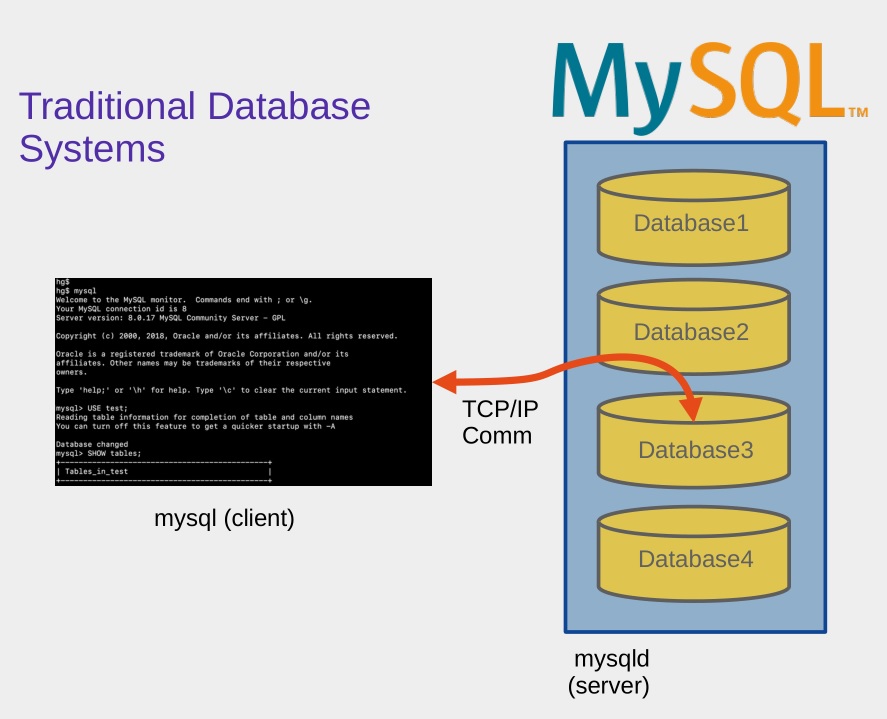
SQLite is a lightweight, self-contained, and server-less relational database engine. Unlike traditional database management systems like MySQL, which require a separate server process and a client-server architecture, SQLite runs entirely within the application itself. It does not require any configuration or setup. Once the library is included in your project, you can start using it immediately. The entire database, including all tables and data, is stored in a single file on disk, making it highly portable and easy to manage.
One of the primary differences between SQLite and other databases like MySQL lies in how they handle connections and data management. MySQL operates as a separate server that must be installed, configured, and maintained. It supports multiple concurrent users and can handle large-scale applications with complex querying and data manipulation needs.
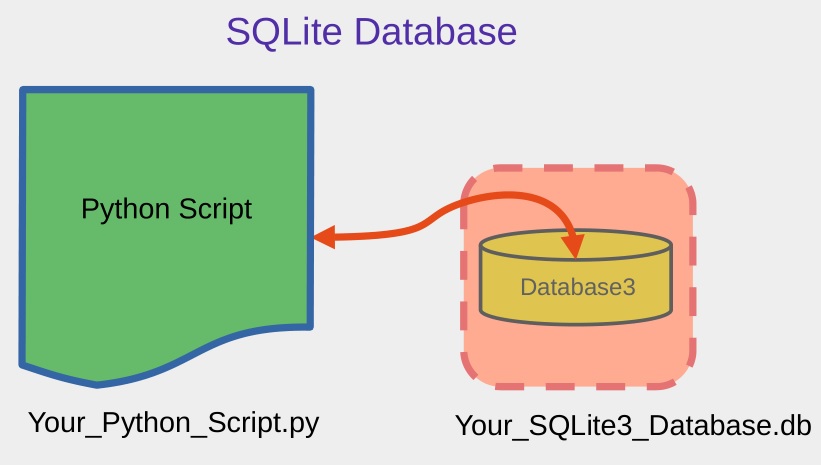
In contrast, SQLite is optimized for simplicity and minimal overhead. It is best suited for situations where the database access is limited to one user or a few simple operations, such as in mobile apps, small desktop applications, embedded systems, and testing environments.

For example, consider a data logging application running on a Raspberry Pi. This system collects data from multiple sensors, timestamps each reading, and stores the information locally. In this type of embedded application, SQLite is a highly practical choice for a database management system.
Unlike MySQL, SQLite does not require running a separate database server. Python can interface with it directly through built-in libraries. This simplifies deployment and reduces system overhead. Moreover, because SQLite stores the entire database in a single file, it is easy to back up or transfer to another system, making it especially well suited for portable or low maintenance projects.
Creating a SQLite Database
Here we will create a simple SQLite Database using Python on the disk and open a connection with said database. You can use the below code to do it.
import sqlite3                          # import the sqlite library
conn = sqlite3.connect('Logger.Sqlite') # Create a connection object
conn.close()                            # Close the connection
the first line imports Python’s built-in sqlite3 module, which provides an interface for interacting with SQLite databases. Since sqlite3 is included in the Python standard library, no additional installation is needed. It allows you to create, connect to, and manage SQLite databases using SQL commands through Python.
conn = sqlite3.connect('Logger.Sqlite') # Create a connection objectHere, a connection to a SQLite database file named Logger.Sqlite is established. If the file does not already exist in the current working directory, SQLite will automatically create it. The connect() function returns a connection object, which acts as a handle to interact with the database (e.g., running SQL queries, managing transactions).
and finally we close the connection using conn.close() .This closes the connection to the database. It’s important to close the connection when you're done to free up system resources and ensure all changes are properly saved and written to the file.
You can use a context manager like with to automatically close the connection as shown below.
import sqlite3
#using a context manager
with sqlite3.connect('Logger.Sqlite') as conn:
   cursor = conn.cursor()
Creating an in memory SQLite database
Creating an in-memory SQLite database is useful when you want to store data temporarily, for Eg, for testing, prototyping, or handling short-lived data that doesn't need to persist after the program ends. Instead of saving to a file, the database exists only in RAM and is discarded when the connection is closed. You can do that using the below code snippet.
conn = sqlite3.connect(':memory:') # Create an in-memory SQLite databaseChecking SQLite Version in Python
You can easily check the SQLite version being used in Python by using
sqlite3.sqlite_version property
It returns the version of the SQLite library that your Python interpreter is currently using (not the version of the sqlite3 module itself).
This is especially useful to verify whether features like Strict Mode (STRICT tables or PRAGMA strict = ON) are supported, these require SQLite 3.37.0 or later.
Here is the code.
import sqlite3
print("SQLite version:", sqlite3.sqlite_version)
Understanding SQLite Data Types and Type System
This section describes the available datatypes on a sqlite database that you can use to store your data. We also explain some unique quirks of the SQLite db compared to other RDMS.
SQLite uses a unique and flexible approach to handling data types compared to traditional relational databases like MySQL or PostgreSQL. Instead of enforcing strict typing at the column level, SQLite uses a concept known as dynamic typing along with type affinity.
SQLite stores values using one of the following five fundamental storage classes (these are the actual data types used internally)
- NULL : Represents a missing or undefined value.(NULL does not mean Zero)
- INTEGER : A signed integer, stored in 1 to 8 bytes depending on the magnitude.
- REAL : A floating-point number, stored as an 8-byte IEEE 754 value.
- TEXT : A text string, stored using UTF-8, UTF-16BE, or UTF-16LE encoding.
- BLOB : A Binary Large OBject, stored exactly as input ( binary data like images or files).
Storing dates in SQLite
Storing dates and times in SQLite can be a bit different from other databases because SQLite does not have a dedicated DATE or DATETIME storage class.You can use the following datatypes to store date and time in a SQLite database.
- You can use TEXT to store date in ISO 8601 format( standard for representing date and time).
- Storing Date in ISO8601 will look like this YYYY-MM-DD, Eg 2025-05-05 (5th May 2025)
- time is represented in the 24 hour format HH:MM:SS ,Eg 14:30:00 (2:30 PM)
- The date and time are combined by a T separating the date and time components: YYYY-MM-DDTHH:MM:SS , For Eg 2025-05-05T14:30:00
- You can use INTEGER to Store TIme as a Unix timestamp (also known as Epoch time).
- Unix time is the number of seconds since January 1, 1970, at 00:00:00 UTC (also known as the Unix Epoch).
- Storing Unix timestamps as INTEGER values is very compact, especially when compared to storing dates in a human-readable format like ISO 8601.
- Unix timestamps are based on UTC, which makes them timezone-independent. This is useful if you're dealing with systems spread across multiple time zones, as you don't have to worry about local time zone conversions.
How SQLite Stores Boolean Values
SQLite does not have a dedicated BOOLEAN storage class. Instead, it treats Boolean values as part of its INTEGER storage class, where TRUE and FALSE are stored as specific integer values.
In SQLite:
- TRUE is stored as the integer value 1.
- FALSE is stored as the integer value 0.
Although you can declare a column as BOOLEAN, SQLite internally treats it as INTEGER, which means that Boolean values are effectively stored as integers 1 (for TRUE) or 0 (for FALSE).
Type Affinity in Sqlite
While SQLite does not enforce strict column types like most RDBMS systems, it does assign each column a type affinity, which influences how values are stored and compared.
When you define a column in SQLite, you can use standard SQL data types like VARCHAR, INT, or BOOLEAN. Internally, SQLite interprets these and maps them to one of five type affinities.
| Declared Type | Affinity |
| INT, INTEGER | INTEGER |
| CHAR, CLOB, TEXT | TEXT |
| REAL, FLOAT, DOUBLE | REAL |
| BLOB | BLOB |
| Anything else (default) | NUMERIC |
SQLite does not enforce that values match the column's type affinity. Instead, it uses type coercion to convert values when needed.
For instance, you can insert a string into an INTEGER column, and SQLite will accept it, it will not throw an error.
SQLite Strict Mode
SQLite Strict Mode (introduced in SQLite 3.37.0) is a feature that enforces stricter type checking on the data being inserted into a database. By default, SQLite is very lenient with data types, meaning you can insert any kind of data into any column, even if it doesn’t match the column’s declared type. I
In Strict Mode, SQLite enforces type constraints, and any violation of the expected data type results in an error.
Strict mode helps ensure that the data in your SQLite database adheres to the column’s declared type, thus providing more predictable behavior and avoiding potential data integrity issues.
In SQLite 3.37.0 and above, you can enable Strict Mode directly at the table level using the STRICT keyword when creating a table. This is often preferred over using PRAGMA strict = ON, as it applies only to that table and persists across sessions.
-- SQlite STRICT mode enable at Table level
CREATE TABLE table_name
(
   column1 TYPE,
   column2 TYPE NOT NULL,
   ...
) STRICT;       -- Space before STRICT
Make sure that there is space between closing bracket and STRICT, otherwise the parser sees )STRICT as a single token and throws a "malformed database schema" error.
You can also enable STRICT mode by executing PRAGMA strict = ON; using a cursor object. In this case STRICT mode is applicable to this instance of the connection only.
conn   = sqlite3.connect(":memory:") # or any db name like sqlite3.connect("mydb.db")
cursor = conn.cursor()
cursor.execute("PRAGMA strict = ON;") # enable STRICT mode for this connection only
Creating & Connecting to SQLite using Python
Let's create a simple SQLite Database on disk using Python and the built in sqlite3 module .You can use the below code.
import sqlite3
connnection_object  = sqlite3.connect('mydatabase.db') # create a connection object
connnection_object.close()
This will create a database file named mydatabase.db on your disk. The database will be empty, containing no tables or data.
the line
connection_object = sqlite3.connect('mydatabase.db')creates a connection to a database file named mydatabase.db.
If this file do not exist on the disk , SQLite will automatically create it in the current working directory.
The variable connection_object holds the connection object, which serves as the primary interface for interacting with the database, allowing you to create cursors, execute SQL queries, and manage transactions.
After you're done working with the database, it's important to call connection_object.close() to properly close the connection. This ensures that all resources are released and any pending changes are saved, which helps avoid issues like file locks or data corruption.
Using 'with' Context Manager
While you can explicitly close the connection with .close(), a more robust and Pythonic approach is to use a with statement (context manager), which automatically closes the connection when the block is exited as shown in the below code.
import sqlite3
with sqlite3.connect('mydatabase.db') as connection_object:
   pass               # Connection is open inside this block
   					  # pass statement in Python is a placeholder, basicallydo nothing.
# Connection is automatically closed when the block exits
Creating a Table in SQLite using Python
In this section, we will learn how to create a table in a SQLite database using Python to store some sample data logging information.
We'll use SQLite's STRICT mode to ensure that only specific data types can be written to their corresponding columns, enforcing stronger type safety.
If you prefer, you can easily remove the STRICT mode from the code by simply deleting it from the table creation SQL query.
Please Remember to put a space between closing bracket and STRICT keyword in the SQL query to prevent a "malformed database schema" error.
Here is the code.
#Python code to create a table in sqlite using STRICT option
import sqlite3
create_table_sql_query = '''
CREATE TABLE IF NOT EXISTS data_logger(
                                       Id INTEGER PRIMARY KEY AUTOINCREMENT NOT NULL, --Primary Key
                                       Temp_Sensor1 REAL,   -- Temperature values in Degrees like 34.67
                                       Temp_Sensor2 REAL,   -- Temperature values in Degrees
                                       Temp_Sensor3 REAL,   -- Temperature values in Degrees
                                       IP_Address   TEXT,   -- ip address like 192.168.1.1
                                       TimeStamp    INTEGER -- time in unix time

                                      ) STRICT;   -- Space before STRICT
                                                                                     '''
connection_object = sqlite3.connect('datalogger.sqlite')  # Connect to a database (or create it if it doesn't exist)
cursor_object     = connection_object.cursor()            # Create a cursor object using the previous connection object
cursor_object.execute(create_table_sql_query)             # create the table
connection_object.commit()                                # commit the changes to the database
connection_object.close()                                 # close the connection
When you run this code, it will create a database file named datalogger.sqlite in your current working directory. You can open or explore this database using a tool like DB Browser for SQLite. Inside the database, you'll see that the data_logger table has been successfully created.
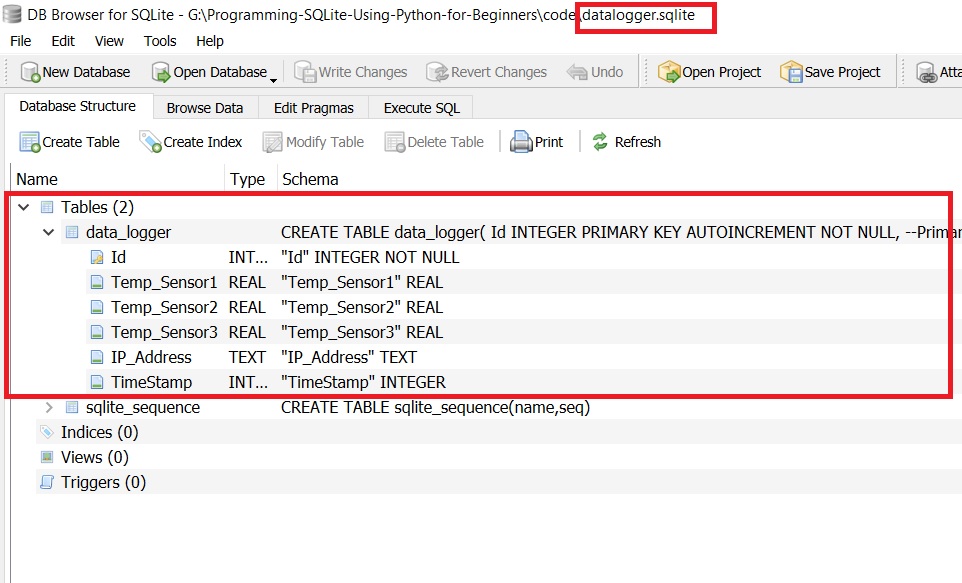
You can see the column names below.

I am going to explain the program in detail below.First the table creation query
create_table_sql_query = '''
CREATE TABLE IF NOT EXISTS data_logger(
                                      Id INTEGER PRIMARY KEY AUTOINCREMENT NOT NULL, --Primary Key
                                      Temp_Sensor1 REAL,   -- Temperature values in Degrees like 34.67
                                      Temp_Sensor2 REAL,   -- Temperature values in Degrees
                                      Temp_Sensor3 REAL,   -- Temperature values in Degrees
                                      IP_Address   TEXT,   -- ip address like 192.168.1.1
                                      TimeStamp    INTEGER -- time in unix time
                                     ) STRICT;   -- Space before STRICT
The IF NOT EXISTS clause prevents an error if the table already exists.
Each column is defined with a specific data type, such as REAL, TEXT, or INTEGER. The STRICT keyword (with a space before it) ensures that only the specified data types can be inserted into each column. For example, you cannot insert text into the Temp_Sensor1 column because it is defined to accept only REAL values.
A connection is first established using sqlite3.connect('datalogger.sqlite') This connects to the datalogger.sqlite file, creating it in the current directory if it doesn’t already exist.
The returned connection object (connection_object) acts as a session through which database operations can be performed.
Next, a cursor is created with
cursor_object = connection_object.cursor() which is essential for executing SQL statements and retrieving results.
The table is created by executing the SQL Query contained in the variable create_table_sql_query
cursor_object.execute(create_table_sql_query) Although no data is inserted at this point, connection_object.commit() is called to commit the structural changes, which is a good practice.
Finally, the connection is closed with connection_object.close() to release system resources and ensure all changes are properly saved.
This results in the creation of a SQLite database file named datalogger.sqlite, containing a strictly typed data_logger table.
You can also use a with context manager to execute the above code as shown in below example.
with sqlite3.connect('datalogger.sqlite') as connection_object : # Connect to a database (or create it if it doesn't exist)
   cursor_object     = connection_object.cursor()                # Create a cursor object using the previous connection object
   cursor_object.execute(create_table_sql_query)                 # create the table

   # connection_object.commit()
   # You don’t need connection_object.commit() inside a with block
   # SQLite auto-commits when the with block exits without errors.
   # But including it explicitly doesn’t harm.
Full code available in Github Repo (link above)
Inserting Data to SQLite Table
We have created the table, Now we will add some data into the sqlite table using Python .Here is the code for it
#adding some data into sqlite database
import sqlite3
import time
# Sample data
temp1 = 25.3
temp2 = 34.6
temp3 = 24.8
ip_address = '192.168.0.101'
timestamp = int(time.time())  # current Unix time
insert_data_sql_query = '''
          INSERT INTO data_logger (Temp_Sensor1,
                                   Temp_Sensor2,
                                   Temp_Sensor3,
                                   IP_Address,
                                   TimeStamp)
          VALUES (?, ?, ?, ?, ?)
   '''
# Connect and insert data
with sqlite3.connect('datalogger.sqlite') as connection_object:
   cursor_object  = connection_object.cursor()
   cursor_object.execute(insert_data_sql_query, (temp1, temp2, temp3, ip_address, timestamp))
   print("Data inserted successfully.")
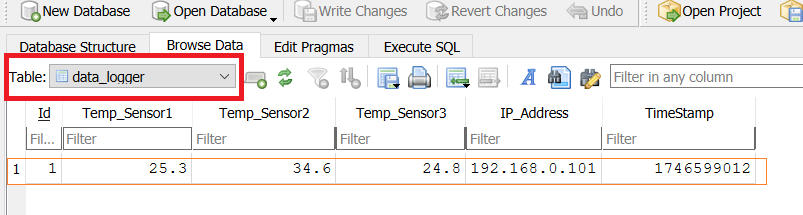
The above Python code will insert data into the newly created table named data_logger. Once executed, all the data will be added to the table, as shown in the figure below. You can use the DB Browser program to view the Inserted data.
The Standard SQL Command for inserting the datainto the table is
INSERT INTO data_logger (
   Temp_Sensor1,
   Temp_Sensor2,
   Temp_Sensor3,
   IP_Address,
   TimeStamp
)
VALUES (25.3, 34.6, 24.8, '192.168.0.101', 1715087100);
But here we will be using parameterized queries (with ?) to ensure safety and prevent SQL injection.
Parameterized queries separate the query logic from the data, which prevents attackers from injecting SQL code.Instead of inserting values directly into the SQL string, you use placeholders (? in SQLite) and supply the actual values separately.
Using Parameterized Queries
So here we will use ? as placeholders for the values to be inserted into the table. So our SQL query will look like this.
insert_data_sql_query = '''
          INSERT INTO data_logger (Temp_Sensor1,
                                   Temp_Sensor2,
                                   Temp_Sensor3,
                                   IP_Address,
                                   TimeStamp)
          VALUES (?, ?, ?, ?, ?)
   '''
Here we will use the cursor.execute() method in our case it is named cursor_object.execute(),which takes two parameters.
cursor.execute(sql_query, parameters) # in our case cursor_object.execute()
#sql_query ->SQL Query to execute
#parameters - data that will used to replace the ? placeholders
            - usually send in a tuple (12,13,'hello')
So in our case
cursor_object.execute(insert_data_sql_query, (temp1, temp2, temp3, ip_address, timestamp))you can also give the values directly
cursor_object.execute(insert_data_sql_query, (25.3, 34.6, 24.8, '192.168.0.101', timestamp)) #time stamp is generated dynamicallyWhen you use cursor.execute() in combination with parameterized queries, you're sending a SQL query and a tuple (or dictionary) of values to the SQLite engine for execution.
Here Binding means associating the values from the tuple (or dictionary) to the placeholders (? for SQLite).
SQLite First scans the SQL query for placeholders (?).It then binds the values from the tuple (temp1, temp2, temp3, ip_address, timestamp) to the placeholders in order.
The first value (temp1) goes into the first placeholder,
the second value (temp2) goes into the second placeholder,
and so on.
One of the key things SQLite does during this binding process is escaping any special characters that may be in the values. Any quotes or special characters in the input are properly escaped so they won't break the SQL syntax.
After the binding process is complete, the final SQL query is internally constructed by SQLite. However, this is done without string concatenation, which is the dangerous approach that can lead to SQL injection if done incorrectly.
Then SQLite engine will execute the final prepared statement internally, inserting the data into the data_logger table. Since the values have been properly escaped and formatted, SQLite will safely insert the data without any risk of SQL injection.
Inserting Multiple Rows into SQLite Database
To insert multiple rows into an SQLite table using Python, you can use the executemany() method with parameterized queries.
The main syntax of the executemany() method is
cursor.executemany(SQL Query to Execute , List of Tuples)executemany() method do not return anything after execution of the SQL query.
Here is the partial code for inserting multiple data to a sqlite table using Python in one go.
# Sample data list
data_list = [ (25.3, 34.6, 24.8, '192.168.0.101', int( time.time() ) ),
              (26.1, 35.2, 25.4, '192.168.0.102', int( time.time() ) ),
              (24.9, 33.8, 23.7, '192.168.0.103', int( time.time() ) )
            ]

# Connect and insert data
with sqlite3.connect('datalogger.sqlite') as connection_object:
   cursor_object  = connection_object.cursor()

   cursor_object.executemany(insert_data_sql_query,data_list) #insert multiple data at the same time.
Here data to be inserted are kept in a list and then the list is given to the executemany() function.
cursor_object.executemany(insert_data_sql_query,data_list) #insert multiple data at the same time.You can see the inserted data in the database using DB Browser.

How fast Can you INSERT data to SQLite
The speed of adding data to an SQLite database using Python depends on how you're inserting the data and whether you're using transactions efficiently.
Without transactions the speed is about 5-20 Inserts per second.
With transactions ,it is around 50,000 to 100,000 inserts per second
If you are using a compiled language like C ,then you can reach a insert speed of 200,000–500,000+ inserts/sec with good disk I/O and settings.
Reading Data from SQLite Database
To read row data from the SQlite database using Python ,You can use the following methods provided by the sqlite3 library.
fetchone()
fetchall()
fetchmany(n)
Here
fetchone() is used to get a single row from the database and return a single tuple or none. It is good for applications where we have to deal with large tables and didn't want to load the whole table into the memory.
fetchall() will get all the rows returned by the SQL statement and return a list of tuples. It may result in large memory usage if the number of rows are significant.
fetchmany(n) is used to retrieve the next n rows from the result set of a SELECT query. It returns a list of tuples, where each tuple represents one row from the database. If fewer than n rows remain, it returns only the remaining rows; if no rows are left, it returns an empty list. This method is particularly useful when dealing with large datasets, as it allows you to process rows in manageable batches rather than loading the entire result set into memory
Here is an example of code using fetchall to get all the data from SQL query
#Reading data from SQLite database using fetchall()
import sqlite3
# Connect to the database
with sqlite3.connect('datalogger.sqlite') as connection_object:
   cursor_object  = connection_object.cursor()

   cursor_object.execute('SELECT * FROM data_logger') #Execute a SELECT query

   rows = cursor_object.fetchall() #Fetch all rows

   # Print each row
   for row in rows:
       print(row)
Here's the rewritten version of the above code using .fetchone() .
import sqlite3
# Connect to the database
with sqlite3.connect('datalogger.sqlite') as connection_object:
   cursor_object = connection_object.cursor()
   cursor_object.execute('SELECT * FROM data_logger')  # Execute a SELECT query

   # Fetch and print one row at a time
   row = cursor_object.fetchone()
   while row:
       print(row)
       row = cursor_object.fetchone()
The fetchone() method retrieves the next row from the result set as a tuple. If there are no more rows to fetch, it returns None.
The while row: condition checks whether a row was returned; if so, it proceeds to print the row and then calls fetchone() again to retrieve the next one. This loop continues until all rows have been processed.
Updating a Row in SQLite
The updating and deleting the rows in the SQLite database using Python is done by just giving out the correct SQL Commands and executing them using the cursor object.
In our case ,we will update the temperature values corresponding to a specific time stamp, We will replace the old ones with new ones.
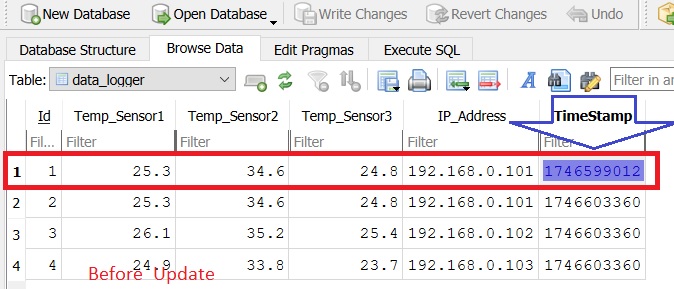
Here we will change the temperature values in our first row of the table data_logger which has the timestamp = 1746599012.
We will craft a simple SQL query to do it .
UPDATE data_logger
SET Temp_Sensor1 = 2900.5, Temp_Sensor2 = 3500.0, Temp_Sensor3 = 2800.7
WHERE TimeStamp = 1746599012
Now we will convert the query into parameterized form ,
update_data_sql_query = '''

UPDATE data_logger
SET Temp_Sensor1 = ?, Temp_Sensor2 = ?, Temp_Sensor3 = ?
WHERE TimeStamp = ?
                        '''
So you can safely execute using the cursor_object.execute() method without causing an SQL injection attack. As shown below.
# Connect to database
with sqlite3.connect("datalogger.sqlite") as connnection_object:
   cursor_object = connnection_object.cursor()

   cursor_object.execute(update_data_sql_query, (new_temp1, new_temp2, new_temp3, timestamp_to_update))

   connnection_object.commit()

   #checking whether any rows where affected
   if cursor_object.rowcount > 0:
       print("Row updated successfully.")
   else:
       print("No row found with the given timestamp.")
Here .rowcount is an attribute of the cursor object that tells you how many rows were affected by your last execute() call.
Before the update ,our table looks like this.
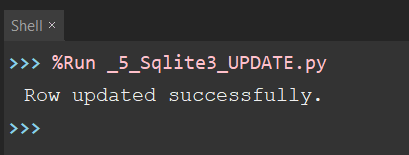
You will get a message like this on the terminal .
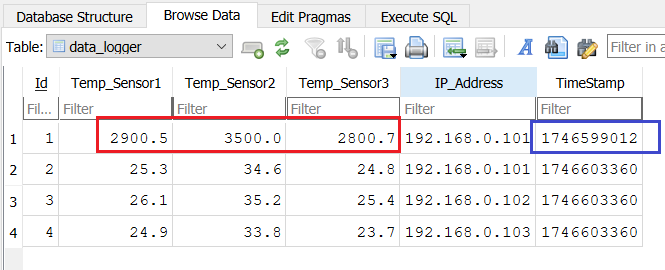
Now you can see that temperature values has been updated inside the table as shown below.
You can also update other fields as shown in the below example.
cursor.execute(
   "UPDATE data_logger SET Temp_Sensor1 = ? WHERE IP_Address = ?",
   (30.1, '192.168.0.101')
)
You can also use the update command to clear specific fields or Values instead of deleting the whole row.
cursor.execute('''
   UPDATE data_logger
   SET Temp_Sensor1 = 0
   WHERE TimeStamp = ?
''', (timestamp,))
This does not delete the field itself, but it removes its value and sets it to NULL, 0, or a default of your choice
Deleting a Row in SQLite
To delete a row in SQLite using Python, you use the DELETE FROM SQL command along with a WHERE clause to specify which row(s) to delete.
Here we will delete the row whose time stamp matches 1746599012..
Here is the full code for deleting a row from the sqlite database using Python.
#deleting a row using Python and SQLite
import sqlite3
timestamp_to_delete = 1746599012  # time stamp of the first row
delete_sql_query    = "DELETE FROM data_logger WHERE TimeStamp = ?"
with sqlite3.connect("datalogger.sqlite") as connnection_object:
   cursor_object = connnection_object.cursor()

   cursor_object.execute(delete_sql_query, (timestamp_to_delete,))

   connnection_object.commit()

   if cursor_object.rowcount > 0:
       print(f"{cursor_object.rowcount} row(s) deleted.")
   else:
       print("No row found with that timestamp.")
Please note that the below Query without the WHERE clause will delete all data.
cursor_object.execute("DELETE FROM data_logger")
Deleting the Full SQLite Table using Python.
To delete an entire SQLite table using Python, you can use the DROP TABLE SQL command. This completely removes the table and all its data and structure from the database ,it cannot be undone.
Please note that DROP TABLE is destructive. All rows, columns, indexes, and constraints will be permanently deleted.
# SQL command to delete the full table
   cursor.execute("DROP TABLE IF EXISTS data_logger")
Getting Schema of SQLite Table
In SQLite, the schema refers to the structure or blueprint of the database. It defines how data is organized and includes details such as the tables that exist, the columns within those tables, their data types (like INTEGER, TEXT, or REAL), and any constraints such as PRIMARY KEY, NOT NULL, or UNIQUE.
The schema may also include relationships like foreign keys, as well as optional components such as indexes, triggers, and views.
You can view the schema in the SQLite command-line shell using the .schema command or retrieve it programmatically using Python by querying the sqlite_master table.
#Retrieve the Schema of a Table Using Python
import sqlite3

# Connect to the SQLite database
with sqlite3.connect("datalogger.sqlite") as connnection_object:
   cursor_object = connnection_object.cursor()

   # Query the schema of a specific table (e.g., 'data_logger')
   cursor_object.execute("""
       SELECT sql FROM sqlite_master
       WHERE type='table' AND name='data_logger'
   """)

   result = cursor_object.fetchone()

   if result:
       print("Schema for 'data_logger':\n")
       print(result[0])  # This is the CREATE TABLE statement

   else:
       print("Table 'data_logger' not found.")
Storing and Retrieving Blobs from SQlite
Tags
- Log in to post comments