

In this tutorial we are going to use Visual Basic.net to program your PC's Serial Port and communicate with an Arduino or embedded microcontroller like Texas Instruments MSP430,AVR series like ATmega328P,Microchip PIC series like PIC18F or the good old 8051 series (AT89S52,Nuvaton W78E052DDG).
Visual Basic.net is an easy to learn language from Microsoft for the Windows, Linux and Mac OS X platform (now with the release of .NET Platform). One of the cool features of Visual Basic.net is the ability to whip up good looking GUI components with a few lines of code.
In the first section of our tutorial we will build a simple command line program that would show us how to read and write from the Serial port using Visual Basic.net .
Here we are going to use the SerialPort Class provided by the dot net framework(dot net core ,dot net8/9) to access the port using vb.net code.
The code may look similar to Serial Programming using C# tutorial since we are using the same dot net framework
The vb.net Serial port communication codes in this tutorial will run on the Classical .NET framework 4.5+ ,.NET core 3.0+ and the latest .NET 8/9 platforms.
Contents
- Source Codes
- IDE/Compiler Selection for VB.Net Development
- What is System.IO.Ports namespace
- Hardware for Arduino VB.NET Serial Communication
- Interfacing Bare Microcontroller with PC using VB.Net
- Accessing SerialPort Class using Visual Basic.Net
- Finding Available Serial Ports using Visual Basic.Net
- Opening a Serial Port Connection in VB.Net
- Reading data from Serial Port using vb.net
- Writing Data from PC to Arduino using VB.Net
Source Codes

All the VB.net (.vb) source files used in this tutorial can be downloaded from our GitHub Page.
Download Visual Basic.net Serial Port Communication Code as Zip file.
IDE /Compiler for Vb.net
Earlier the only IDE/Compiler one would use to develop a Visual Basic.net project was Visual Studio.
Now with the release of the open source .NET platform by the .NET Foundation, we can either use the .NET Platform SDK or the Visual Studio Community Edition to develop projects on multiple OS platforms.
The .NET SDK is available on Windows ,Linux and Mac OSx
while Visual Studio is available on Windows and Mac OSX only.
Here we will be using Visual Studio Community Edition on Windows 10/11 for programming the PC's Serial Port using Visual Basic.net

Creating a Vb.net Project using .NET SDK CLI Tools
Here we will create a Visualbasic.net project using the command line tools of the .NET SDK. This can be used if you don't want to use the full Visual Studio suite and the code development is limited to console applications.
.NET SDK CLI tools can create both WinForms and WPF based projects on Windows systems, but it is better and convenient to use Visual Studio's GUI building tools like Forms Designer for GUI development.
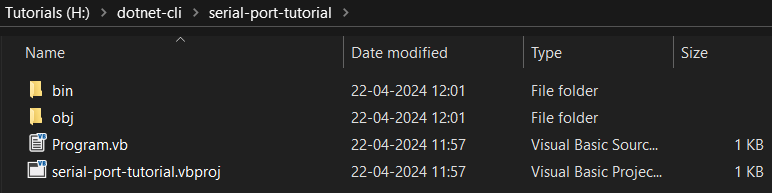
First create a directory to store your project files. then you can create a console project by issuing the following command inside your directory,
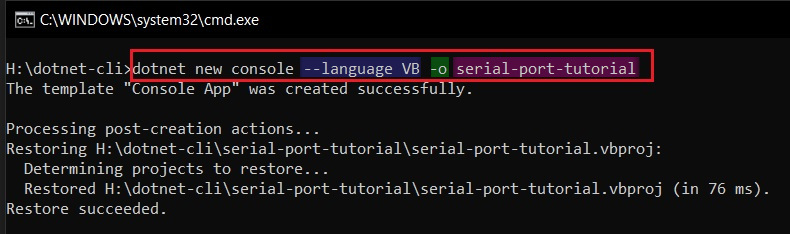
dotnet new console --language VBThis will create a VB.net console project inside the current directory.
You can also specify an output directory using the -o flag.
dotnet new console --language VB -o serial_port_tutorialThis will create a console project and place all the files inside a directory named serial_port_tutorial.
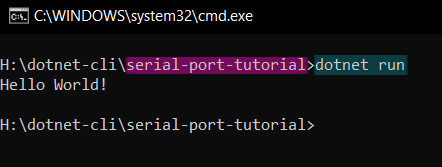
You can run the code using
dotnet run issue this command inside the directory containing the source file.
Adding a nuget package using command line tools
Here we need to add the System.IO.Ports package from nuget.org using .NET SDK command line tools before running the serial port codes.
First thing is to go to nuget.org and search for the required packages.
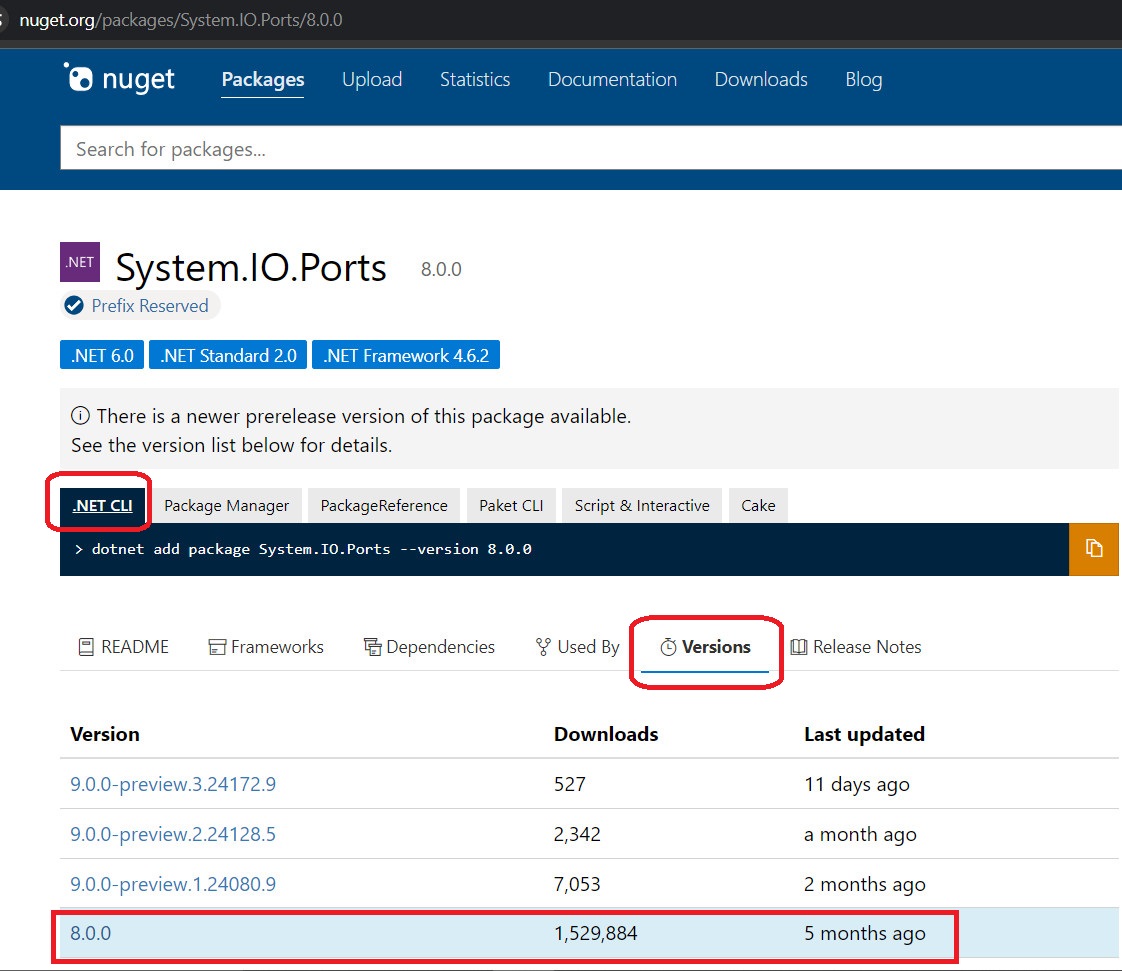
from the page select the required version and copy the code from .NET CLI as shown in the above image.
dotnet add package System.IO.Ports --version 8.0.0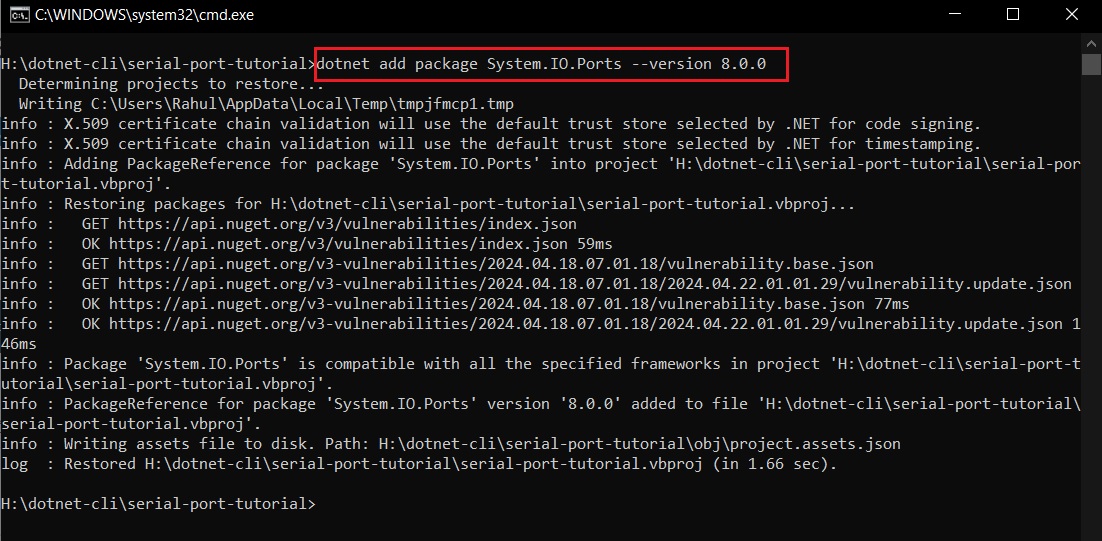
Now you have the System.IO.Ports namespace and its associated assemblies installed for your project. Your Source code can now access the classes provided by the System.IO.Ports namespace like SerialPort.
Creating a Vb.net Project using Visual Studio
Now double click on the Visual Studio Icon and Create a new Project . for Visual Basic as shown below
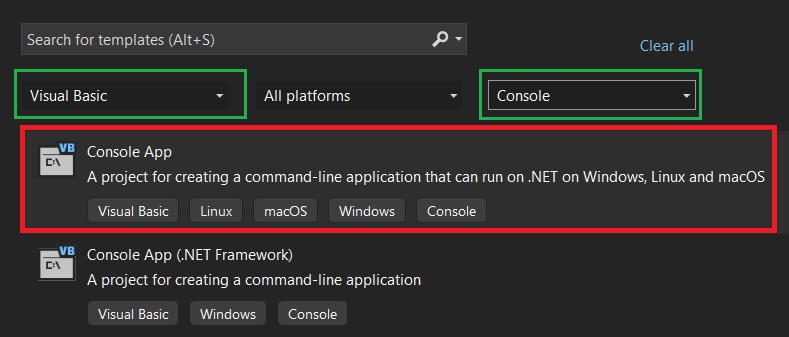
Select " Visual Basic " on the drop down menu, then "All Platforms", then "All Project types".(above Image)
Now Select the Console App Project from the Selection.
With the release of the .NET Platform, It is possible to use Visual Basic.net language on multiple platforms like Linux and Mac OS.
Even though, You can run the Visual Basic.net Serial Port communication Program on all three platforms like Windows, Linux and MacOS, here we will be sticking to Windows platform.
The bottom console project targets the Classical .NET Framework.

Give a name to your Project and Select a Location to Store the files. Press Next.
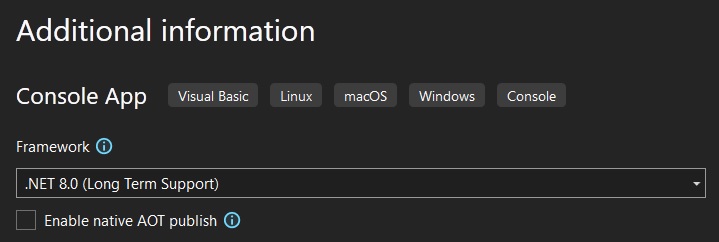
Here we can select the .NET Platform Version on which our Serial port program is going to run.
Here we will select .NET8.0 LTS version.
After you have pressed the Create button, the IDE will create a file named Module1.vb under the Project folder as shown below

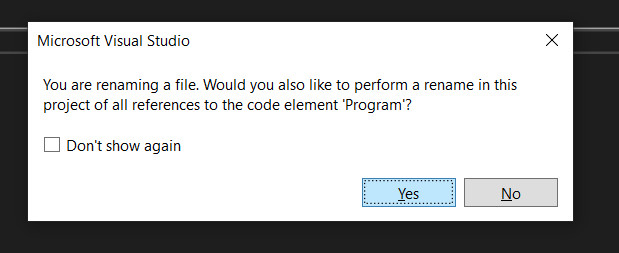
You can rename the Program.vb to any name of your choice (here SerialCommWrite) by right clicking on the file in the Solution Explorer and selecting Rename.
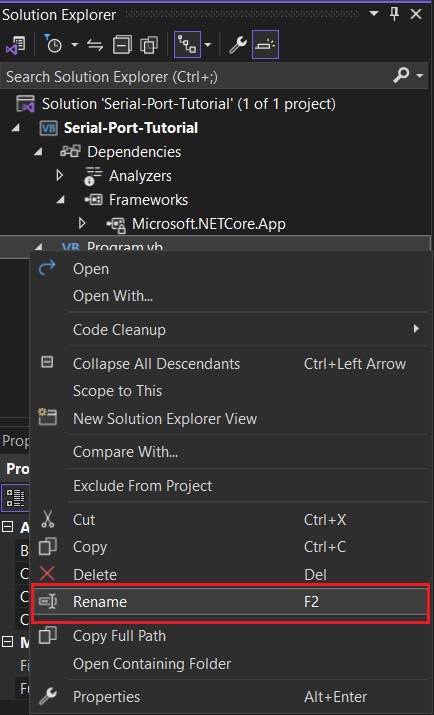
A dialog will popup asking you to confirm the action. Press OK
Now your file name under your Solution Explorer as well as the Module name on the Source file will be changed to the one specified by you (here SerialCommWrite)
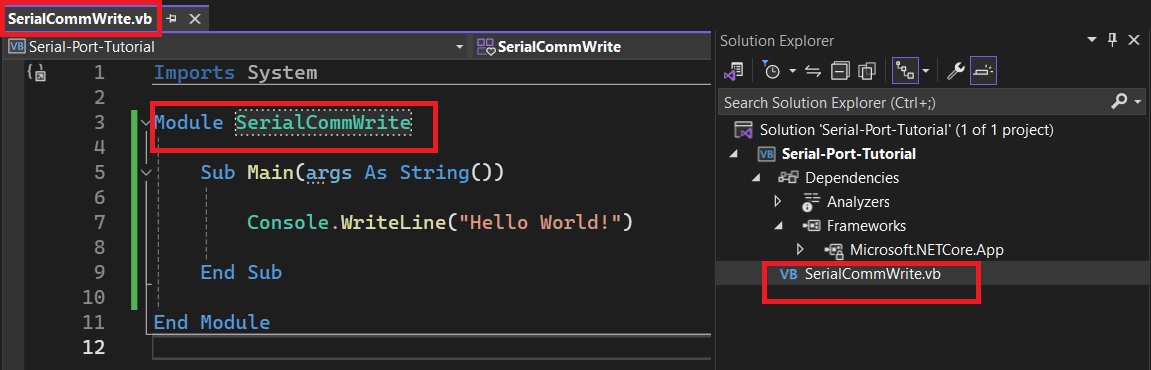
Now you can add your code for controlling the serial port under Sub Main() and start Programming.
What is System.IO.Ports namespace
System.IO.Ports is a namespace in the .NET Framework (and its successor, .NET Core/.NET) that provides classes for accessing and controlling serial ports on a computer.
Modern Computers lack traditional serial ports, here we will be using Virtual COM ports that emulate Serial Port over a USB connection. You can use a USB to Serial Converter like USB2SERIAL to add traditional Serial Port or an RS232 Compatible Serial Port to your Computer.
The System.IO.Ports namespace contain classes like SerialPort, which allows you to interact with serial ports by opening connections, reading and writing data, setting communication parameters (such as baud rate, parity, stop bits, etc.), and managing events related to serial port activity.
By default ,the System.IO.Ports namespace is absent.
We need to use the Nuget package manager to install the System.IO.Ports namespace and the associated assemblies to our Visual Basic.Net Project before running the Serial Port code from the Github repo
Right Click on your solution name and select "Manage Nuget Packages for Solution.. "
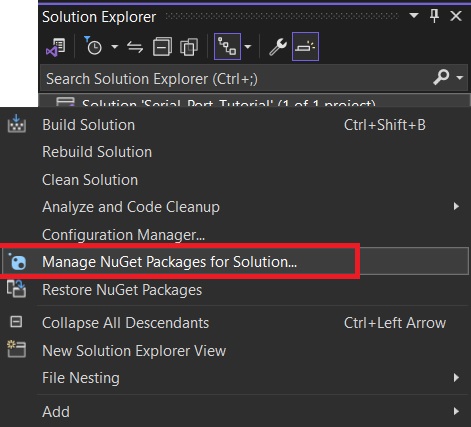
On clicking that you will see the Nuget package manager.
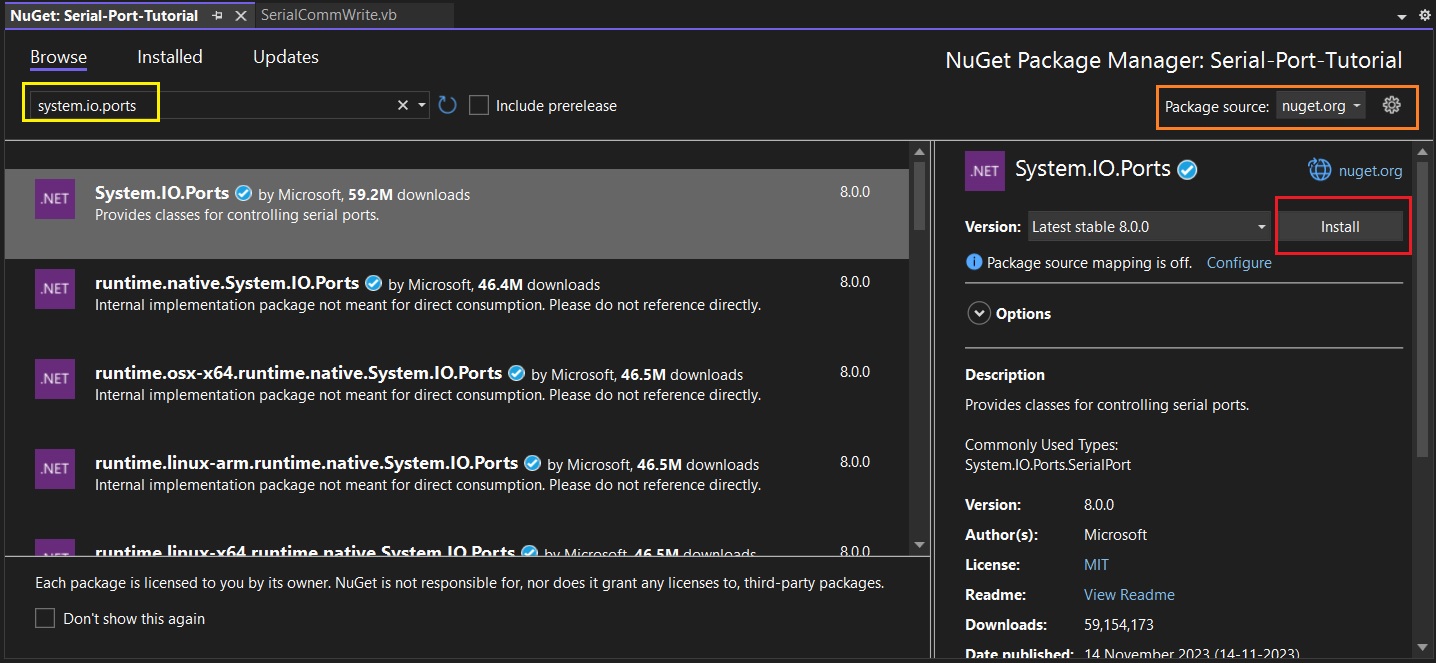
Now Click on the "System.IO.Ports by Microsoft "and Click Install (on the right hand side).
This will install the System.IO.Ports namespace and associated assemblies to your Project/Solution.Now you can easily Import the namespace and access the SerialPort class to program your COM port.
Arduino Hardware for Serial Comm
This section details the hardware connections needed to connect an Arduino to Windows PC Serial Port using Visual Basic.net (VB.Net) and .NET Platform. Following the launch of the new open-source .NET platform, it's now viable to leverage VB.net on alternative platforms like Linux and Mac OSX. For our context, we'll concentrate on Windows 10 or Windows 11 systems.
Connect your Arduino or USB to Serial Port Converter to windows PC .Find out your COM port number by going to your " Device Manager Program "and looking under the " Ports" Section as shown Below.
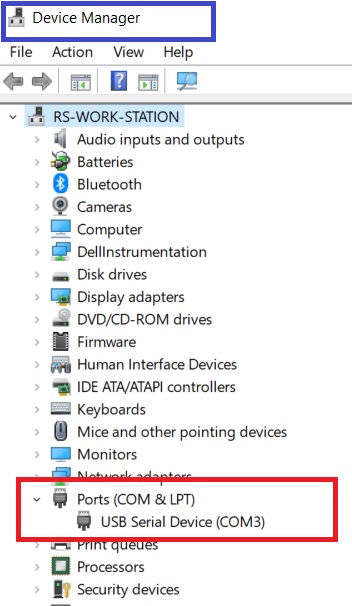
Here COM port number is COM3.It may be different on your System.
The hardware connections are shown below.
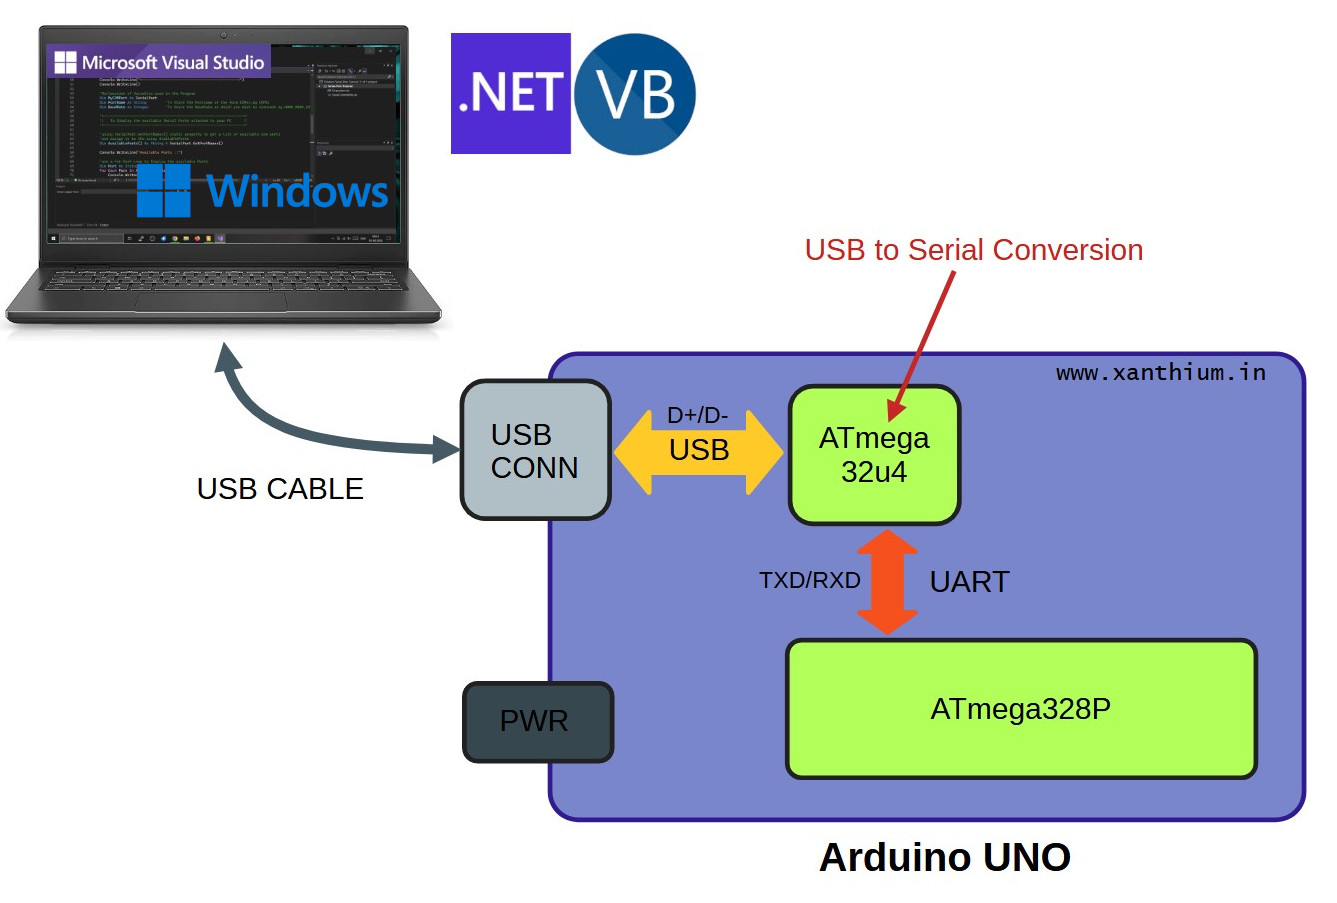
Simply plugging the Arduino into the USB port of your Windows PC and running the VB.net program to establish communication will suffice. However, let's take a deeper dive into the internal workings of the Arduino UNO board and learn how the UART of the ATmega328P connect with the USB port of PC.
Arduino UNO usually consists of two Microcontrollers the ATmega328P where all your Arduino sketches are downloaded and the ATmega16u4 which handles the USB protocol and connect with the PC.
The UART Pins of the ATmega328P are connected to the UART pins of ATmega16u4 as shown Below. Here TXD of ATmega328P is connected to RXD pin of ATmega16u4.
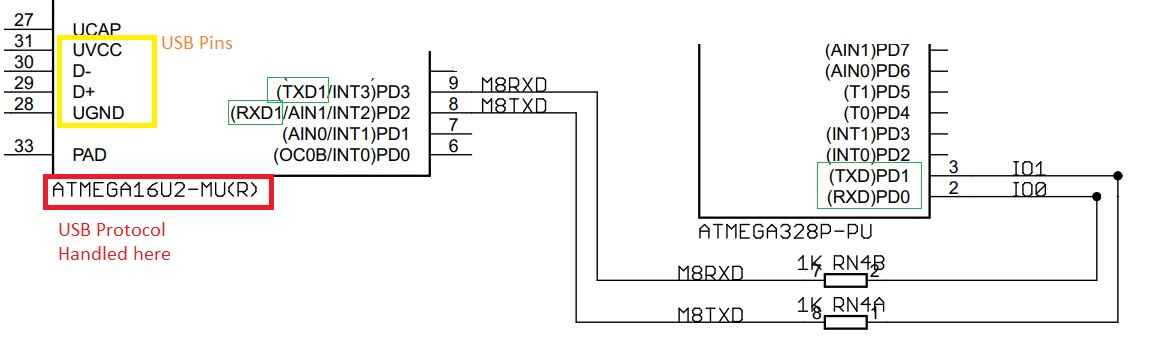
All the data transmitted by the ATmega328P UART is received by the ATmega16u2 and converted into USB protocol using the internal USB PHY which is then send to PC through the USB cable.
Connecting a Bare Microcontroller to PC
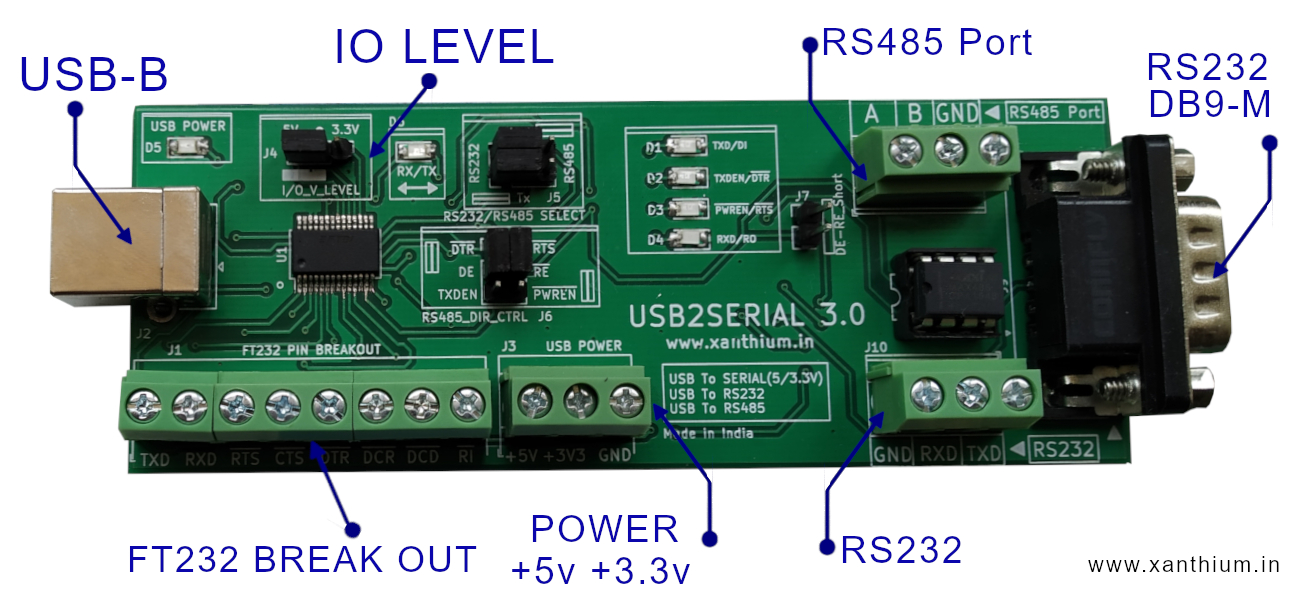
Here we will learn how to connect a bare microcontroller like 8051 (AT89s51,W78e052DDg),MSP430 or PIC16F series to a PC and communicate it with serial protocol using Visual Basic.Net. For that we would need a USB to Serial Converter to convert the UART signals of microcontroller to USB standard as shown below.

Here we are using USB2SERIAL V3.0 which can do USB to Serial, USB to RS232 and USB to RS485 Conversion.
Sometimes we may require USB to Serial converters that are required to interface with Signals that may couple in serious electrical transients that may damage your computer.
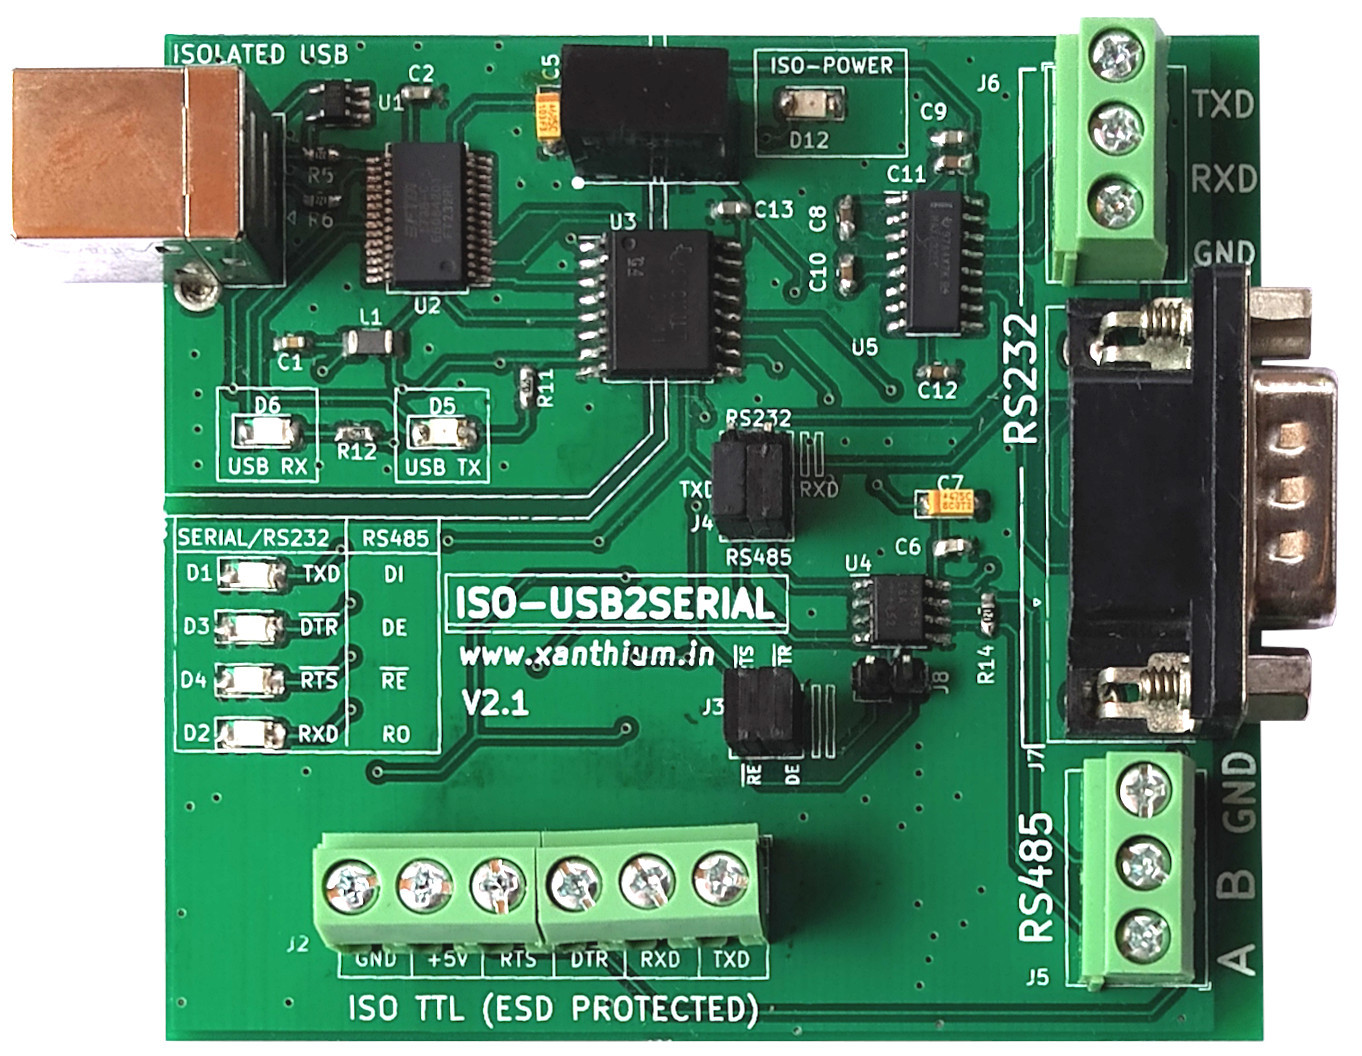
For that purpose you can use a fully Isolated USB to Serial/RS232/RS485 Converter like ISO-USB2SERIAL V2.0 the one shown below.
Accessing SerialPort Class using VB.Net
Here, we'll utilize Visual Basic.NET to interface with the SerialPort Class from the .NET Framework (.NET Platform) for communication with hardware serial ports. If your PC or laptop lacks hardware serial ports, which is common in newer models, you can employ a USB to Serial Converter such as USB2SERIAL to establish communication with external devices
Before you can use the SerialPort class you have to import the dotnet namespace corresponding to it (System.IO.Ports).
This can be done by using the Imports Keyword as shown below.
Imports System          'To Access Console.WriteLine()
Imports System.IO.Ports 'To Access the SerialPort Object
You can find out Serial ports (COM ports ) both real and virtual ,attached to your PC by going to the Device Manager .
Finding Available Serial Ports using VB.Net
You can find out the serial ports attached to your PC programmatically using the SerialPort.GetPortNames() method .
The GetPortNames() method returns an array containing all the COM ports attached to your computer. The COM port names returned by GetPortNames() method is stored in the AvailablePorts array.
A For Each loop is then used to print the available ports on the command line .
You can display the available ports connected to your computer by using the following snippet of code .
Imports System.IO.Ports          'For accessing the SerialPort Class and Methods
Module AvailablePorts
    Sub Main()
        Dim AvailablePorts() As String = SerialPort.GetPortNames() 'List available ports on a System
        Dim Port As String
        Console.WriteLine("Available Ports ::")
        For Each Port In AvailablePorts
            Console.WriteLine(Port)
        Next Port
    End Sub
End Module
First we import all the required libraries.
Dim AvailablePorts() As String = SerialPort.GetPortNames()The above line of code uses the GetPortNames() method of the SerialPort class to retrieve an array of strings representing the names of all available serial ports on the system. The array of port names is stored in the AvailablePorts variable.
For Each Port In AvailablePorts
           Console.WriteLine(Port)
       Next Port
This For Each loop iterates through each port name in the AvailablePorts array. It assigns each port name to the Port variable, and then prints the name of the current port (Port) to the console using Console.WriteLine().
Configuring the Serial Port Parameters using VB.Net
Here we will learn to configure the various parameters of the Serial Port like Port Name/Number, Baud rate, Number of Start/Stop bits and Parity Bits using VB.Net.
We define MyCOMport as an object of type SerialPort class and then instantiate it using the new keyword.
Dim MyCOMPort As SerialPort
MyCOMPort = New SerialPort()
After the object is created we then provide the name of the SerialPort, Baudrate at which to communicate ,Number of Stop/Start bits etc .
MyCOMPort.PortName = "COM3"        'Assign the port name to the MyCOMPort object
MyCOMPort.BaudRate = 9600          'Assign the Baudrate to the MyCOMPort object
MyCOMPort.Parity   = Parity.None   'Parity bits = none
MyCOMPort.DataBits = 8             'No of Data bits = 8
MyCOMPort.StopBits = StopBits.One 'No of Stop bits = 1PortName: Specifies the name of the serial port to be used, in this case, "COM3".
BaudRate: Sets the baud rate at which communication will occur, in this case, 9600.
Parity: Specifies the parity bit setting, in this case, Parity.None indicates no parity.
DataBits: Sets the number of data bits per byte, typically 8 for most applications.
StopBits: Specifies the number of stop bits used to indicate the end of a byte, in this case, StopBits. One indicates one stop bit.
Here is the full code to display the parameters of the Serial Port
Imports System.IO.Ports 'For accessing the SerialPort Class and Methods
Module ConfigSerialParam
Sub Main()
Dim MyCOMPort As SerialPort
MyCOMPort = New SerialPort() 'Create a Serial Port Object
MyCOMPort.PortName = "COM3" 'Assign the port name to the MyCOMPort object
MyCOMPort.BaudRate = 9600 'Assign the Baudrate to the MyCOMPort object
MyCOMPort.Parity = Parity.None 'Parity bits = none
MyCOMPort.DataBits = 8 'No of Data bits = 8
MyCOMPort.StopBits = StopBits.One 'No of Stop bits = 1
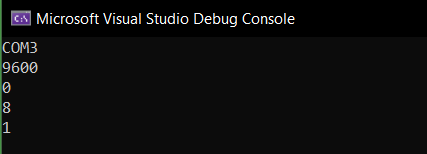
Console.WriteLine(MyCOMPort.PortName)
Console.WriteLine(MyCOMPort.BaudRate)
Console.WriteLine(MyCOMPort.Parity)
Console.WriteLine(MyCOMPort.DataBits)
Console.WriteLine(MyCOMPort.StopBits)
End Sub
End ModuleOutput of the program
Opening a Serial Port in VB.Net
You can open a connection to the Serial Port using the Open() method of the Serial Port Object (MyCOMPort) as shown below.
MyCOMPort.Open()After the Serial Port is Opened we can read and write into the port or change the status of RTS and DTR pins.
Once opened the port will be locked by our program and other programs will not be allowed to access the serial port. They will receive a Port In Use Error.
Arduino Reset Issue While Opening the Serial Port
When a Serial Port is opened, the RTS and DTR pins of the Serial Port may change state (switch ON and OFF).If you are using the RTS and DTR pins to control any aspect of the microcontroller function like boot process, these may be effected.
In the case of Arduino, when the Serial Port is opened the Processor onboard Arduino (ATMega328P) may get RESETed.
So for proper communication a small delay should be included after open() method to compensate for that effect. This is an Arduino specific Issue, Other micros may not have this issue.
MyCOMPort.Open()
Thread.Sleep(2000);//sleep for 2 seconds or 2000mS
You can check the status of the serial port (Opened or Closed) using the .IsOpen Property of the serial port object (here MyCOMPort) as shown in the below code snippet.
isOpen is a Boolean Property and will return True if port is open, False if port is closed.
If MyCOMPort.IsOpen Then    'if MyCOMPort.IsOpen is True ,Port is open
    Console.WriteLine("Port Opened")
Else
    Console.WriteLine("Port Not Opened")
End If
Using Serial Port Exceptions in VB.net
Opening a serial port is a potentially error-prone operation where unexpected or exceptional situations may arise. Therefore, it's advisable to enclose this part of our operation within a Try...Catch statement. This allows our program to gracefully recover or fail in a controlled manner without causing resource leaks.
The basic syntax of Exception handling in VB.Net is as follows.
Try
	'Do the thing that causes the exception
Catch ex As Exception
	'Íf an error occurs,you are here,Do something about that
End Try
So our code becomes.
'Exception Code Block
Try
    MyCOMPort.Open()
Catch ex As Exception
    Console.WriteLine("An Exception Occured here") 'Your Custom Message or Action
    Console.WriteLine(ex.Message)     'Short Message
    Console.WriteLine(ex.ToString())  'Detailed Info about the Error
End Try
'Çheck the status of the SerialPort
If MyCOMPort.IsOpen Then    'if MyCOMPort.IsOpen is True ,Port is open
    Console.WriteLine("Port Opened")
Else
    Console.WriteLine("Port Not Opened")
End If
You can use the exception object ex in the above code to identify the cause of the exception.
You can use either ex.message property to get a short Message like the one below.
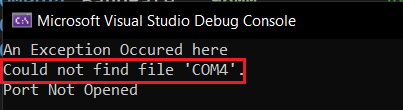
or
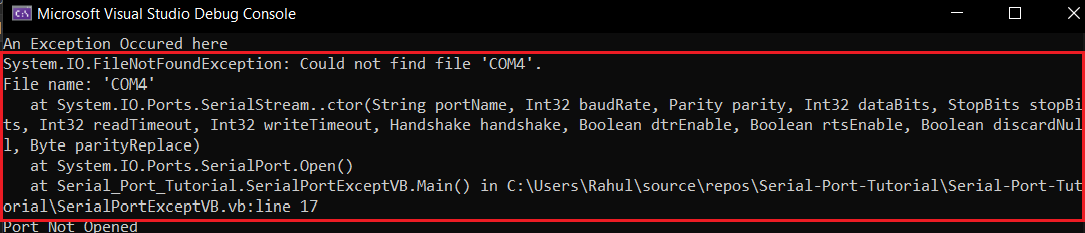
You can use either ex.ToString() to get a long detailed info about the error like the one below.
Reading data from Serial Port
Here, we will learn How to read incoming data from PC serial port using Visual Basic.Net using various methods of the SerialPort Class.
Before reading and writing into the serial port, We should open a connection using MyCOMPort.Open() method (here MyCOMPort is the name of the serial port object created in the previous code.
Here is a simple code to read from serial port using vb.net
 MyCOMPort.Open()                      ' Open the port

 'Reading from Serial Port
 DataReceived = MyCOMPort.ReadLine()  ' Read from Serial Port

 MyCOMPort.Close()                    ' Close port
After you have successfully opened the connection you can Read from the port
using MyCOMPort.ReadLine()
or MyCOMPort.Read()
After you have completed your transaction you should close the port using MyCOMPort.Close() method.
Please note that ReadLine() will only return after a new line character ( \n ) is received so you will have to send the newline character from Arduino Side.
Setting Timeouts in Read Operations.
When you are reading some data from serial port ,you are waiting for an external device like Arduino or a Data Acquisition Device to send some data to your Computer through the USB Serial Cable.
Some times the data never comes, in that case your Readline() method will get stuck. To mitigate such situations we use timeouts that expire after a set time period usually seconds (milliseconds).
You can set Read/Write timeouts in VB.net Serial Port communication using the following snippet of code (below)
MyCOMPort.ReadTimeout = 3000 'set timeout to 3 second or 3000mS
'Try to read data from SerialPort
Try
   DataReceived = MyCOMPort.ReadLine() 'Read data send from Arduino
Catch ex As TimeoutException
   Console.WriteLine(ex.Message)         'In case of not receiving any data from Arduino
Finally
   MyCOMPort.Close() 'Çlose the serialport
End Try
Here we are setting the time period to 3 second using the line.
MyCOMPort.ReadTimeout = 3000 'set timeout to 3 second or 3000mSPlease note that ReadTimeout accepts delay in the form of milliseconds.
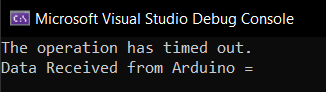
After 3 seconds a TimeoutException will occur and the exception handler will catch it and perform the required actions. This prevents the ReadLine() function from waiting for ever.
Here is the output of the code, when a timeout occurs.
Full code is available on the Github Repo.
Arduino Code For Transmitting to PC
Upload the below code to your Arduino UNO board.
// Sends the text "Hello From Arduino to VB.Net" to PC
// Code also sends \n character
// www.xanthium.in (c) 2024
// Arduino_String_Transmit_Loop.ino
void setup()
{
  // Start serial communication at 9600 baud rate
  Serial.begin(9600);
  // Wait for serial port to initialize
  while (!Serial);// Wait for serial port to connect
  char DataToSend[] = "Hello From Arduino to VB.Net" ;

  Serial.flush(); // Flush the serial buffers
   Serial.println(DataToSend);

}
void loop()
{

}
Now we are going to receive the string "Hello From Arduino to VB.Net" send by the Arduino using Visual Basic.net.
Compile the code shown below using Visual Studio and Run. Make Sure you use the correct COM port number during compilation.
Imports System.IO.Ports
Imports System.Threading
Module SimpleReadDataSerialPort
Sub Main()
Dim MyCOMPort As SerialPort
Dim DataReceived As String
MyCOMPort = New SerialPort("COM3", 9600) 'Create a Serial Port Object
'Should be inside a Try..Catch() statement
MyCOMPort.Open()
MyCOMPort.ReadTimeout = 3000 'set timeout to 3 second or 3000mS
'Try to read data from SerialPort
Try
DataReceived = MyCOMPort.ReadLine() 'Read data send from Arduino
Catch ex As TimeoutException
Console.WriteLine(ex.Message) 'In case of not receiving any data from Arduino
Finally
MyCOMPort.Close()
End Try
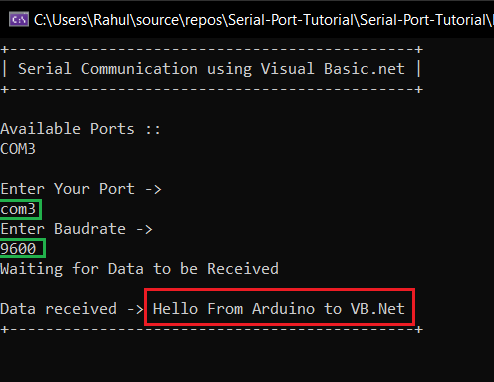
Console.WriteLine($"Data Received from Arduino = {DataReceived}")
End Sub
End ModuleThe output of the code is shown below.

You can also use the SerialCommRead.vb on our Repo for reading data from Serial Port. That version will ask for the COM port number and baud rate.
Writing Data to Serial Port using VB.Net
Here is a short snippet of code for writing into serial port. Here we are sending an ASCII "A" to the Serial Port.
The full Source file " SerialCommWrite.vb " can be downloaded from our Github Page .
MyCOMPort.Open() ' Open the port
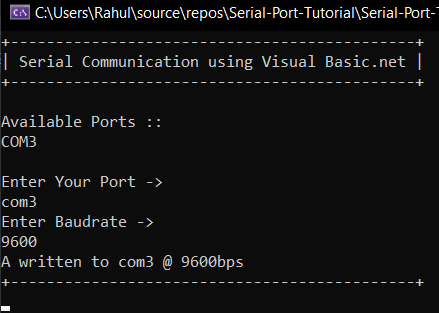
MyCOMPort.Write("A") ' Write an ascii "A"
MyCOMPort.Close() ' Close port Here is a screenshot of " SerialCommWrite.vb " running on Windows 10
Tags
- Log in to post comments